After spending five months in Germany, teaching, learning, and exploring the region, we have returned to the U.S.A.
It was a wonderful experience, one that I would repeat anytime if I could. During this time I was an employee of the Federal Republic of Germany, an honor for me (I was supported by a grant from an organization called DAAD, funded by the government).
It has been especially nice to be teaching typography in the country where it was invented, and where the industry is thriving today. Want to see a Gutenberg bible? Germany has 12 of them! Want to see a limestone plate made by Alois Senefelder himself? Munich has many of them! Want to visit a paper-making factory running a 120-year-old Fourdrinier machine? Germany has several of them! Germany is field trip heaven for a college professor. I took the students to the Heidelberg press factory, and I took them to the Gutenberg Museum in Mainz to see the two Gutenberg bibles there. We visited the Bavarian office where the Senefelder litho plates are stored (we did that on bicycles and public transportation).
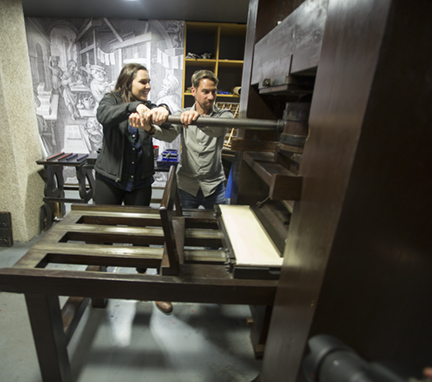
Emily Hoehenrieder and Martin Hämmerle make an impression on the replica press at the Gutenberg Museum in Mainz. They made a page of letterpress printing that is similar to the pages in the original Gutenberg bibles.
I also appreciate the students I had in my classes. They are serious, dedicated and willing to put in the extra effort to take a course taught in English, which is not their primary language. I had two Spanish-speaking students, a Ukrainian-speaking student, six of German-speaking students, and five English-speaking students in one of my three courses.
I would like to think that I challenged them; I know that they challenged me.The Munich University facilities were great for the courses that I taught. I was teaching on Windows – in German – using familiar Adobe applications. What saved me was the keyboard commands. I use the Creative Suite so much that I have memorized the keyboard commands, and those work in German just like they do in English (thank goodness!).
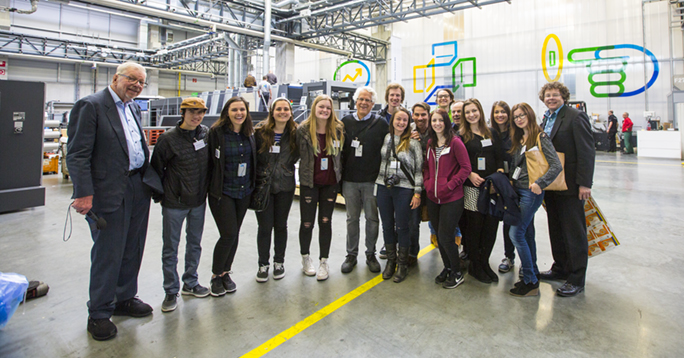
The students from Hochschule München at the Heidelberg printing press factory outside Heidelberg. Leading our tour, on the left, was Gunter Wittich, a longtime Heidelberg executive who is now retired, but returns to give tours of the facility from time to time.
Living in Munich was a life-changing experience. I have never lived in a big city (except Oakland, where I was born – but I left 50 years ago), so learning how to navigate in Munich was a great experience for me. They have S-Bahns, U-Bahns, and Deutsche Bahns (various kinds of trains); they have streetcars (called trams), and I realized after several months in the city that I had not been in an automobile for a long time (it was a relief). I was still paying for two automobiles in California, both of which were in storage, but I was not driving them, of course.
Now that I am home in San Luis Obispo, I have spent the days turning things back on: my printers, my insurance policies, my desktop computer. I am not going to turn cable TV back on, because I have discovered that I don’t need it anymore (and they are the utility I love to hate). I am not going back to AT&T because it’s too expensive. Mobile phone service in Germany is about $10 per month; here, the same service is about seven times that much on AT&T. I had such a great experience with T-Mobile (called Telekom in Germany) that I’m going to give them a try here. We’ll see how that goes (at only four times the price of German service).
I never got sick while in Germany, but managed to catch a nasty cold on the flight home, so I have been spending time in bed, and I’ve been using a lot of over-the-counter cold remedies. I feel lousy, but I will get better – I have to get on a plane again tomorrow to fly across these United States. I hope I don’t get a double-cold!
The Blognosticator is changing back to its original flag (without the German colors), and will continue as before. I thank my readers for sticking with me over the years. There will always be more to read here, so stop by from time to time.
In April, my students and I visited the Landesamt für Digitalisierung Breitband und Vermessung in Munich (Read that story here). In English, this is the state office of digitization, broadband and surveying. Among the things they do is to manage Geographic Information Systems data for the state of Bavaria. They do aerial laser mapping, conventional surveying, and digital data dissemination for those who interject digital data about the real world into studies about population, land use and much more sophisticated work.
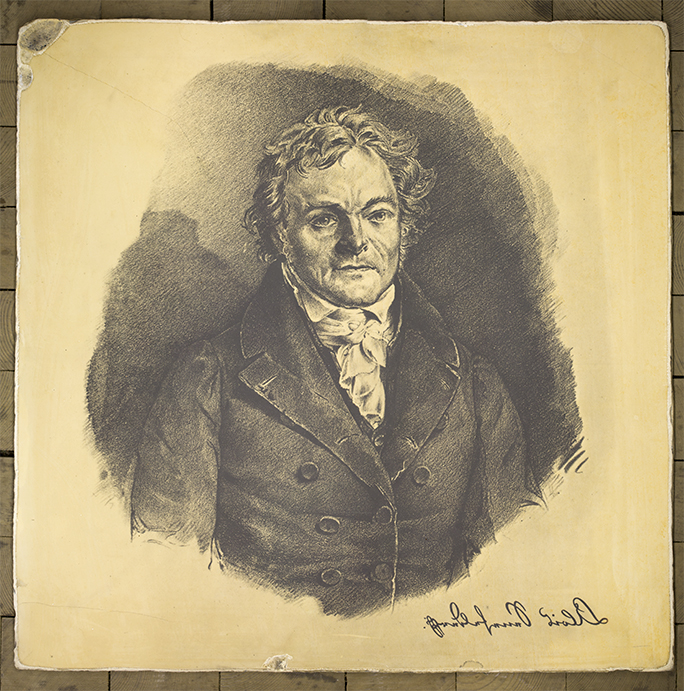
The lithographic stone portrait of Alois Senefelder housed at the Landesamt für Digitalisierung und Vermessung in Munich.
Another thing they do is to maintain an archive of over 27,000 limestone printing plates that were created in the late 18th and early 19th centuries. These stones contain images of the land of Bavaria – they are maps that were used in the 19th century for property line records, and ultimately for purposes of taxation.
The stones (or the images from the stones) were photographed a long while back, and are archived in a database of mapping information that can be accessed by the workers at the LDBV, and the public can order beautiful prints of the historic data.
The limestone slabs, each about 30 inches on a side and about three inches thick, weigh about 250 lbs. each. Thet were quarried at the famous Solnhofen Quarry, an operation that is still producing limestone for construction – and for printing plates.
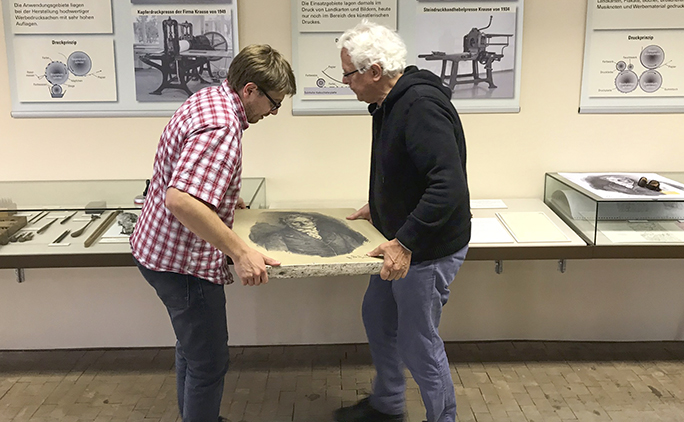
Sebastian Söckler and I lift the limestone plate with the image
of Senefelder from the display case.
When I visited the LDBV in April I was impressed by a limestone plate on display in a glass case in the press demonstration room. On the stone is a portrait of Alois Senefleder, the inventor (more properly discoverer) of lithographic printing. He was a German born in Prague in 1771 when that city was part of Germany. The son of an actor and playwright, Senefelder took up the trade and began his own theatrical work. But the cost of reproducing texts and scores for his performances proved too costly for Senefelder, so he developed a new method for printing that did not require the tremendous skill and experience of copper engraving or type-casting and typesetting used by printers at the time.
His method for printing involved nothing more than drawing (backward) on a polished limestone surface with a grease pencil. Then, by applying ink (oil) and water in turn to the surface of the plate, one made a printing surface which when applied to paper with a lot of pressure, would transfer the image to the paper (and some of the water also). This technique provided a new method for printing that was of high quality but is relatively inexpensive. The process is still in use today, though we use thin aluminum plates now instead of three-inch thick slabs of limestone.
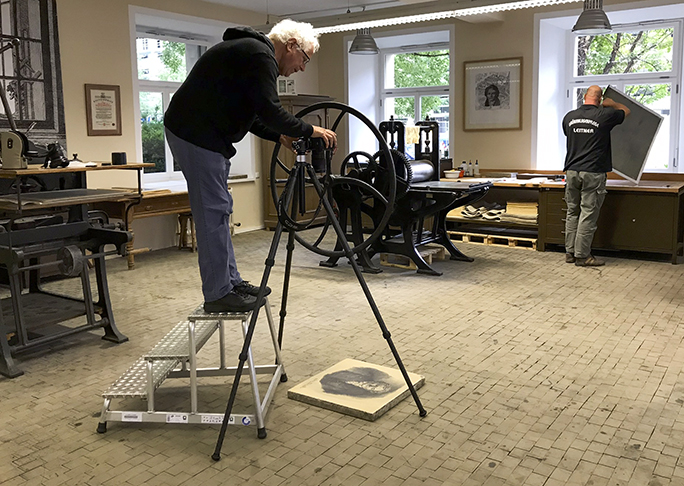
My set-up for making the images of the Senefelder stone. I took four images for each final file, each a quadrant of the original. The camera is a Canon 5D Mark III with the Canon 100mm f2.8 macro – their sharpest lens. Photos by Patrick Lawler
I asked, back in April, if there was a digital image of the Senefelder portrait-on-stone that I could acquire. Later in the week I was told that the LDVB did not have such an image. But, my contact, Sebastian Söckler at the LDBV, told me I was welcome to return to their office and photograph the stone myself!
So, last Tuesday afternoon I returned to the LDBV with camera and macro lens in hand, along with my trusty Really Right Stuff tripod. Once set-up, Mr. Söckler and I removed the glass case from the cabinet and lifted Mr. Senefelder’s stone from the cabinet. We placed it on the floor where the light was acceptable (rather primitive, but acceptable).
Then, with he assistance of my son Patrick, I took a series of photos of the stone. I shot it in quadrants with the intention of stitching it back together in Adobe Photoshop. Patrick held a sheet of translucent plastic over my camera to diffuse the fluorescent light from above. The result turned out to be better than acceptable. The final image is excellent.
Once I had finished my images, we lifted the stone – which weighs about 80 lbs., – back into its display case and returned the glass display box on top.
Now I have a nice image of the portrait of Alois Senefelder that resides in the LDVB in Munich (and they now have that image also). With this I can teach about the importance of this man to the history of printing. In the third week of September, back in California, I will project Senefelder’s image onto the screen in my GrC 101 class and tell the students about the accomplishments of this gentleman, and the importance of his work on our industry.
This morning, almost exactly six years after my first blog on the Blognosticator, the site has received its 250,000th visitor. Thank you!
I began writing blogs for Graphic Arts Monthly magazine in 2008, and the blog grew at that publication to have a loyal following of hundreds of readers. Epson was my sponsor for that blog. Midway through my career writing for Graphic Arts Monthly, the publisher asked me to write additional blogs for their sister publication, Converting. I did that for over a year. It was a great assignment, and it introduced me to the world of online reporting.
Unfortunately, Graphic Arts Monthly and Converting went out of business. My blog died with them, but the publisher returned all of my manuscripts (and the copyrights) to me.
I was a blogger without a forum. A few weeks later I was attending a conference in Philadelphia and there I ran into the editors of What They Think, a company that publishes a number of online publications for the graphic arts industry. They offered to pick up my blog and continue to publish it. I accepted, and was soon back online, publishing under the new monniker The Blognosticator.
The recession had hit our industry pretty hard, and it didn’t miss The Blognosticator. A few months later I was back on the digital street, a writer without a forum. I waited a few months and finally decided to put The Blognosticator on my own server – certainly I could get Epson back as a sponsor (never happened). I downloaded a WordPress blog template and practiced a few times. Then I posted my first new blog here. It worked!
I secured the blognosticator.net and blognosticator.org domains. Blognosticator.com is owned by a person who wants to sell it for a quite a bit of of money; I was unwilling to pay enough to acquire it. The two URLs have served me well, as have search results on Google and other search engines which find me quickly (Brian Christopher Lawler, the professional wrestler, always comes up ahead of me).
My Internet service provider leases my site to me with unlimited storage, so I can put a lot of blogs and images there without exceeding my server space, and the speed of their access is very fast, so there is never a problem with data throughput. It all fits together nicely.
Here are some interesting facts about The Blognostcator:
I have written and posted 254 articles on the site. There are 481 legitimate comments on the site. In the six years that the site has been running I have had an astonishing 470,320 spam comments, many of them “malicious.” I pay the WordPress organization through their Akismet group to filter those spam attempts, and they have an impressive 99.5 percent success rate. Spam comments, for the uninitiated, are comments sent in that have embedded links to web sites that sell counterfeit merchandise and other things. It’s tiresome to deal with these, but Akismet identifies and supresses most of them without my involvement.
My best day for readers was April 30, 2012, when 856 readers visited the site. I’m not sure what was so exciting that day. I had just written my first blog about the GigaPan, a robotic camera mount that I use to this day. The previous day I had written about the demise of Nikon Scan software and the Dear John letter that Quicken had sent to Macintosh users telling them that Quicken for Mac would no loner be supported, and inviting them to buy a Windows machine as the solution.
On most days I get between 150 and 250 readers, with recent peaks approaching 300 readers. 176,633 unique readers have visited the site from 214 countries. The most common is the U.S., followed by Great Britain, then Germany. Tonga is my least common country of origin, with only one reader. I have never received a visitor from North Korea.
Tuesday at 10:00 a.m. is the most common time for readers to visit (I don’t know which time zone). My statistics program offers no explanation for this Tuesday morning phenomenon.
I have the stats program ignore me, so the ten zillion visits I have made to my own blog are ignored. I check in often to find and correct errors in my work.
My best-read blog is one I wrote on July 22, 2012 about the practice of putting numbers in parentheses after they have been presented in prose. On a typical day I get 30 to 40 readers for that blog, and it is the one with the greatest number of comments – 75. That blog is also my most controversial; this topic gets a lot of attention, and people have strong feelings about the subject.
The second most common blog is one I wrote about the Macintosh operating system being able to repair damaged JPEG images (It can’t do this anymore). That one is slightly more popular than the blog I wrote about mounting large prints on foam-core.
I have spent six years writing blogs that inform and educate readers, and I will keep doing it. Why do I do this? Obviously it’s for the money. Oh, I forgot; there isn’t any money.
Thank you, dear readers, for reading these things. I am happy that you find it interesting.
In my home county in California we have a famous castle, one built by newspaper magnate William Randolph Hearst in the early 20th century. Called Hearst Castle, it is a tourist mecca, visited annually by several million people. The castle is an eclectic collection of arts and an architectural masterpiece designed by Julia Morgan, Hearst’s favorite architect. We San Luis Obispans are justifiably proud of the castle, which is a State Park owned by the people of California.
My wife and I have spent the last five months living in Munich, Germany. We have marveled in the excitement of seeing water fall from the sky (they call it “rain”), and we have enjoyed beautiful green fields, verdant forests, some very cold weather and even snow! We have none of these things where we live. By the end of March our county has turned to “California gold” which is the happy term for the dry grass that we have after our very short rainy season. That dry grass often becomes the tinder for wild fires that often ravage our state. There are over 100 wild fires currently burning in California. None in Bavaria.
This is the famous Bavarian castle Neuschwanstein in the mountains south of Munich, Germany. It was built in the 19th century by King Ludwig II, but never finished. It is run by the government of Bavaria and is open for public tours.
And, where we have one castle, Bavaria has too many to count.
(Crazy) King Ludwig II built three of his own, and had planned to build another two, but he ran out of money and died young so never finished. His dad had another three; there are others scattered around Bavaria. The largesse of Ludwig’s castles is impressive.
While staying in Munich we visited Schloss Nymphenburg, Herrenchiemsee and the Residenz in downtown Munich. We also traveled to the Schongau castle and Neuschwanstein castle, which is the one credited with inspiring Walt Disney to build his Cinderella castle at Disneyland.
I had set a goal of making a GigaPan photo of the Neuschwanstein Castle, and I carried my camera and tripod with the GigaPan head to the castle – twice – to get the photo. On my first visit we ran out of time and had to leave before I had a chance to make an image of the castle. I did make a GigaPan of the valley below the castle and the distant towns of Schwangau and Füssen. On the second adventure I planned enough time to hike up to the castle and then on to the Marienbrücke, a pedestrian bridge in the canyon above the castle, to take a GigaPan from there.
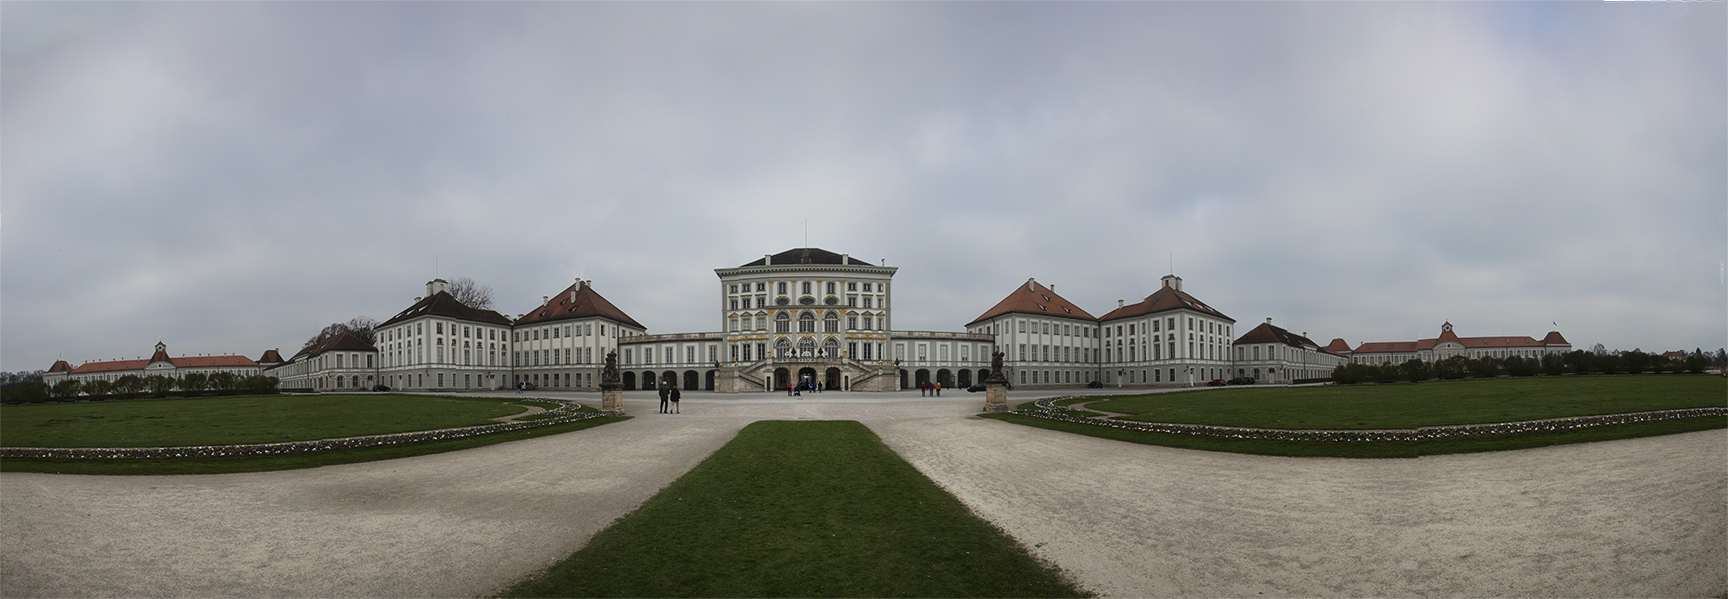
This is Schloss Nymphenburg located on the west edge of the city of Munich. It is home to spectacular gardens and palatial rooms.
When you are on the Marienbrücke you are there with at least 100 of your closest friends. Everyone is jostling for a position to take photos of the castle, and it’s a human traffic jam. I estimate that there were 150 people on the bridge while I was making my images.
I set up my tripod in a position where I could make a lovely photo of the castle. I put two of the legs against the cables at the edge of the bridge. Then i put the third leg out into traffic, adjusted the view and began my photography. But the constant movement of people on the bridge was causing the boards under my tripod feet to bend. The camera was moving significantly between frames. After about 50 exposures I canceled the session and moved the tripod about six feet to the right, with the third leg resting on a steel beam supporting the boards. It was more stable, and free of the bouncing effect.
…and this castle is located on Herreninsel, an island on the Chiemsee, a lake in southern Bavaria. The castle is an exact replica of Versailles (but slightly larger). It was built, but never finished, by King Ludwig II who spent only ten days in the castle in his lifetime.
Then I started over. I used my Canon 100-400 mm zoom set to 300 mm, and I focused carefully on the castle. After adjusting the exposure to provide a fast shutter speed (to prevent blur from movement), I was shooting at 1/160 sec. at f20. The combination would provide excellent depth-of-field and would resist movement. The GigaPan device asks for the upper-left and lower-right, and then it calculates the angle of your lens, and then the number of photos it needs to take to capture the entire scene. In this case it calculated 350 frames. I started it running and then stood with my legs on both sides of the extended tripod leg. I also held the tripod firmly with one hand for the entire time (about 20 minutes) so that it wouldn’t move in the event someone kicked one of the legs. I was pretending to be an immovable obstacle so that no one disturbed my effort. It worked.
This image of Neuschwanstein is from my GigaPan image. To see the full-resolution image, click here. There you can zoom to see tremendous detail in the image.
After taking the complete set of photos, I crossed the bridge and hiked further up the ridge along a trail that overlooks the castle. The view from there may be a bit better, but I was satisfied with what I had done on the bridge, so I passed on the opportunity to make another 30-minute GigaPan. I took a few six-frame panoramic images and hiked back down.
Back in my apartment I processed the images. I shoot everything in Camera Raw, and I import as a matter of obsolescence-prevention to Adobe DNG files. GigaPan will work with JPEG and TIFF. This requires that I convert to TIFF because I would never convert to JPEG this early in the process – it’s too harmful to images. To convert I use the Image Processor in Adobe Photoshop and I end up with a folder of TIFFs ready for the GigaPan Stitch software to put the images together.
For this image, that took only an hour or so on my MacBook Air. I did some retouching (not much was needed) and I enhanced the image with a Vibrance adjustment layer. The final image, after a little cropping, measures about 10 GB. Its resolution is 102,096 x 37,852 pixels. At 300 ppi (graphic arts quality) it would reproduce up to 340 inches x 126 inches or 28 feet wide and over 10 feet tall.
The photo is very pretty, and I am glad I made it. I would like to return again in different weather to capture the castle in a variety of lighting conditions and with more beautiful Bavarian clouds, which are very common. But I am returning to the U.S.A. soon and that photo will have to wait for another trip to Germany – something I hope to do as soon as I can.
This is part four of my series on panoramic photography and cameras.
In the first episode I wrote about rotating panoramic cameras that used rolls of film. As the camera turns, the film rolls past a vertical slit aperture in the back of the camera. The speed of the film must be synchronized with the speed of the camera (the focal length of the lens and distance-to-subject are also factors). In the second blog I wrote about photo-finish cameras that record strip images of things that move in front of the camera. In my third blog on the topic I wrote about roll-out photography, where you use a photo-finish camera to take a strip image of an object turning in front of it.
In this thrilling episode we will discover how digital panoramic cameras work.
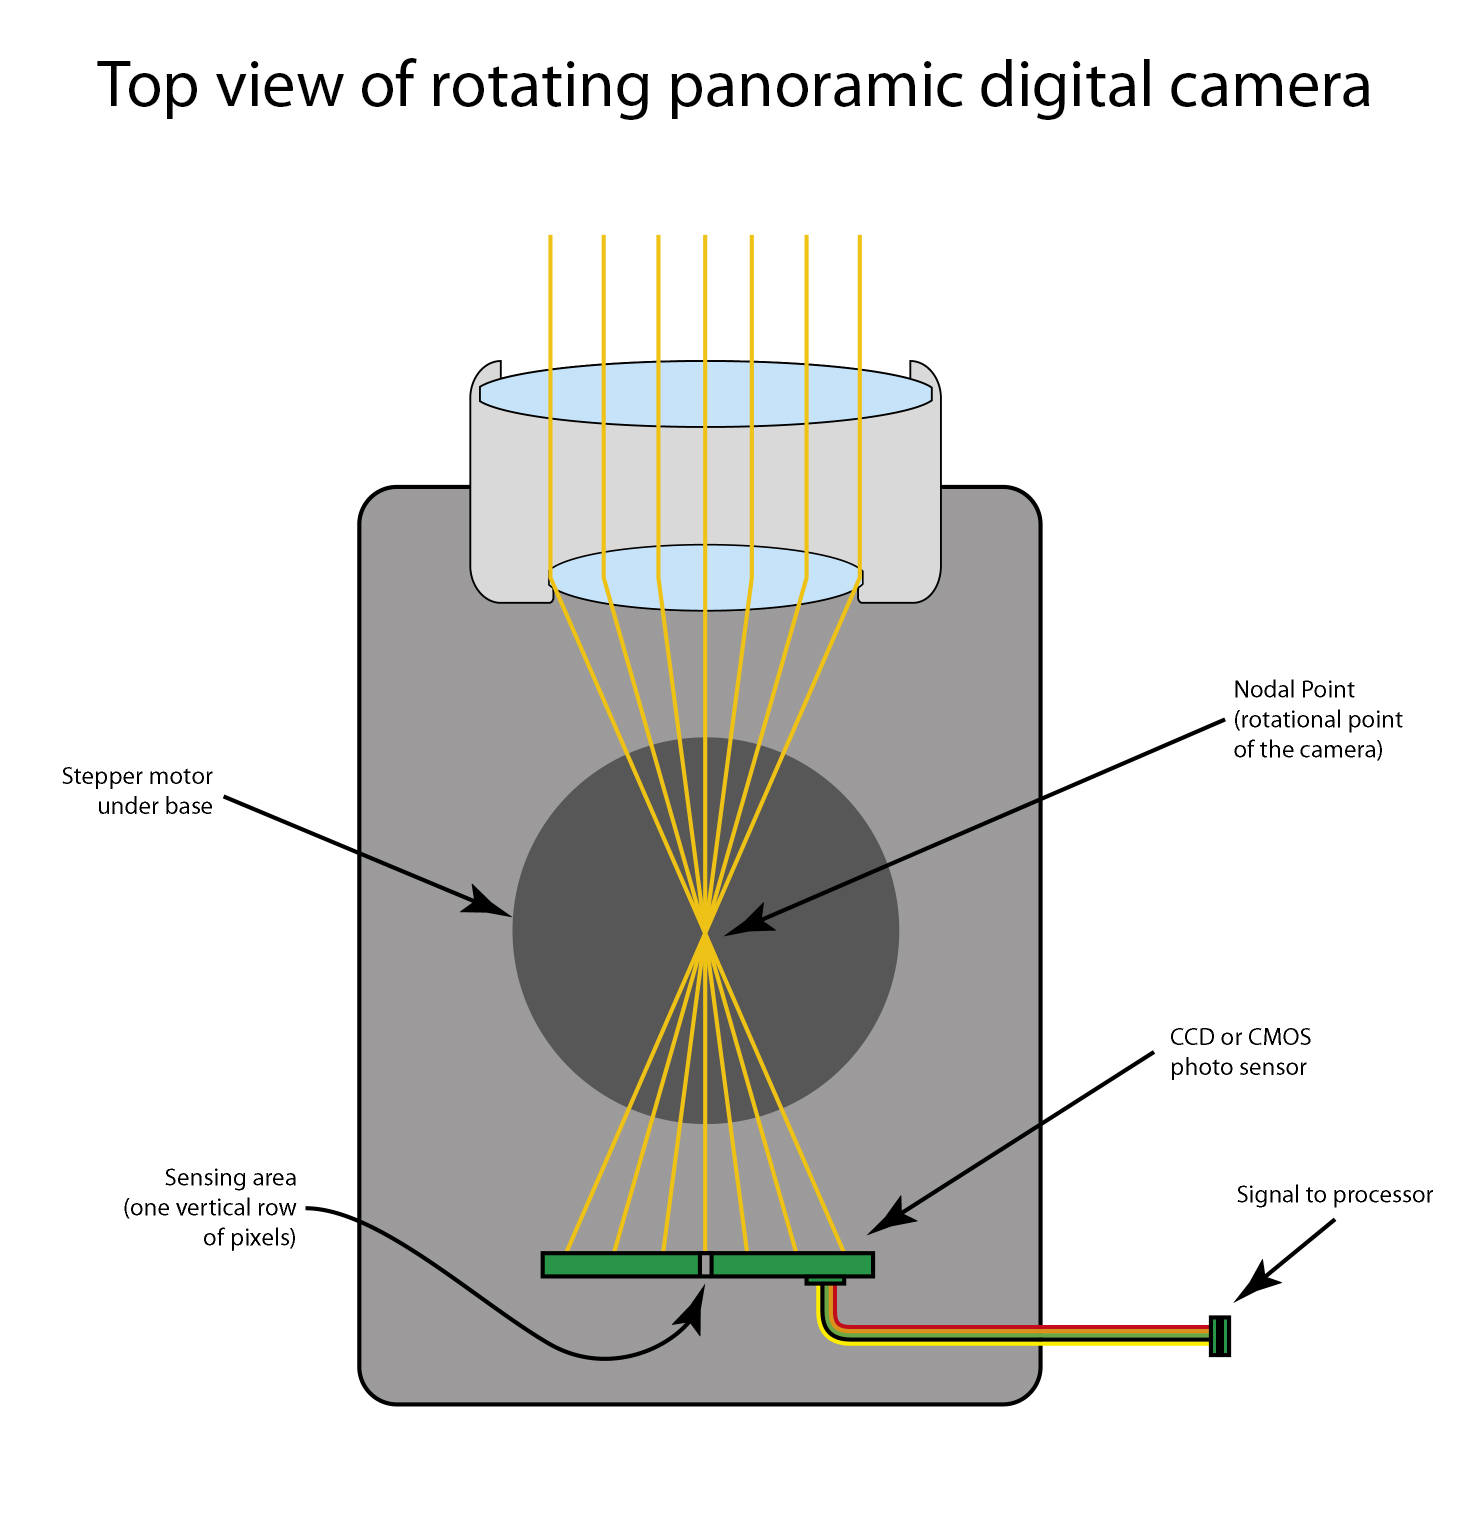
This is what a digital panoramic camera looks like. The camera might be a specialized digital device or a common mobile phone. The sensor would need to be a trilinear array (three rows of pixels – one each for red, green and blue) and there would have to be some phase-correction software to put the three colors into correct register as the camera captures the image.
If we take the mechanism of a rotating panoramic camera (see the first episode for more detail) and we substitute a CCD or CMOS sensor for the aperture and the film, we have a rotating panoramic digital camera. It’s slightly more complicated than that, but the mechanics are very simple.
Where do I buy one of these rotating digital panoramic cameras? The best place to get one is in your pocket – your mobile phone is capable of making very nice panoramic photos, and those are good examples of this kind of photography. To get a professional version of this type of camera, you will need to spend thousands of Euros to buy a Roundshot D3 from Seitz of Switzerland.
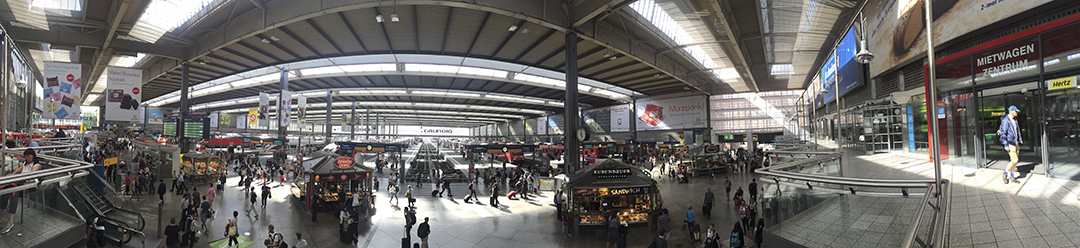
This is a panoramic image I made with my iPhone 6s. Its resolution is (at full size) 11290 x 2998 pixels and approximately 100 MB. That’s an amazing thing coming from a mobile phone. Its reproduction size at 300 ppi us 39 x 10 inches.
Unfortunately, the handy mobile phone is not capable of making a 360-degree panoramic, but instead it forces you to stop at about 240 degrees. This is explained by the fact that you are holding your mobile phone out in front of your body as you pan a scene. The parallax error of this distance (from the true point of rotation – your feet – to the camera’s film plane) is too great for software to correct; it’s impossible. As a result, our mobile phone panoramic photos are always partial panoramic images – sweeps if you will – that make up a significant part of a scene.
But, what if I could rotate my mobile phone on its optical axis?
The panoramic software included with our phones will not allow this to make a 360-degree photo under any circumstances, but the resulting images will be slightly better than those we take with our arms extended out from our body.
But – here is an opportunity. What if we take the mobile phone, which has already proved itself to be a reasonable photo-finish camera, and put that camera-and-software on a rotating base? Aha! Now we have a low-end rotating digital panoramic camera. With this combination we can make true panoramic photos that are 360 degrees – or more! In fact with this combination of devices you can just keep going, making multiple panoramic images in a continuous image (to the extent that the software will allow you to record).
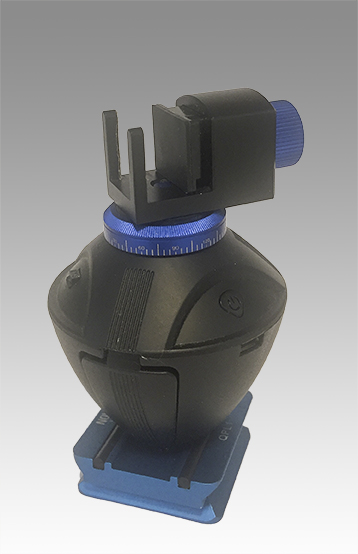
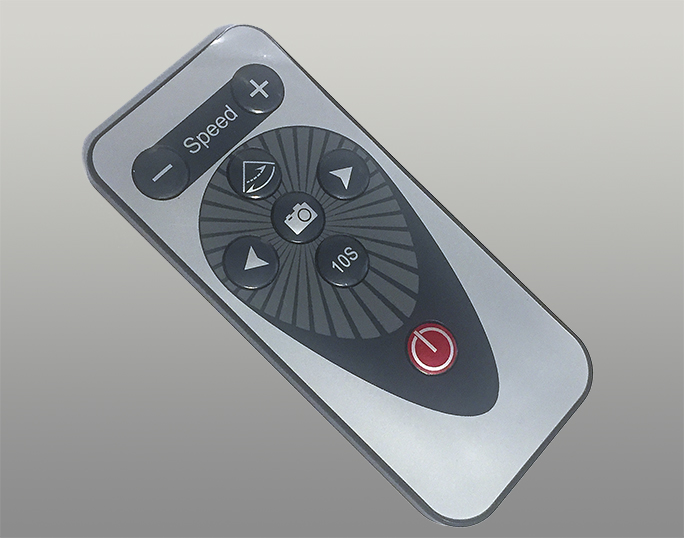
This is the motorized base and its wireless infrared controller. I mounted the €20 rotator to a €30 aluminum tripod plate! The clamp will hold a mobile phone. It also comes with a GoPro base and thumbscrew.
I have such a device. I bought it from an online store, and it shipped from Hong Kong to Germany in about a week’s time. It’s a simple, but slightly flawed, rotational base that will hold and turn a GoPro or a mobile phone to get delightful panoramic images.
This is a true panoramic image taken with my iPhone 6s and the rotating base. I allowed it to go all the way around three times, making a continuous 1080° image. It is slightly distorted, a result of the camera turning a bit slow relative to the speed of the slit-scan software. I can distort this in Photoshop to repair that, or I can take the photo again with the rotating base turning faster.
When I say “slightly flawed” I mean it has some quirks. One is that it uses a separate hand-held IR transmitter to trigger its functions. This does not work effectively in bright sunlight, which is a big problem. While standing on the Marienbrücke above the Neuschwanstein castle last week I was unable to trigger it in sunlight, so I had to put it into shade to get it started, then move it back into the sunlight. To stop it, I did the opposite. That’s inconvenient.
Second, its left and right buttons are reversed (left goes right), and third, it has a weird button that causes it to take stammering panoramic images – it turns, then stops, then turns, then stops, etc. I have absolutely no idea why, so I ignore this button. There is also a button with the image of a camera that does nothing.
The little motor device is otherwise pretty nice. It’s well-made and its motor is smooth so I don’t get vibrations in my rotational panoramic photos. I put it on a plate that is compatible with my Really Right Stuff tripod, and I have made a number of nice panos with it this way. The motor has five speeds (there is no way to know which is currently selected): 360-degree rotations take: 28.6, 23.5, 20.5, 18.5 or 15 seconds. I find that the slowest of them works best with my software. The best thing is that the base does not stop at one rotation; it will continue until stopped.
The software I use (Poloska) does not capture the full vertical resolution of my iPhone (3264 pixels on the iPhone 6s). The resulting panoramas that I get with my camera and motorized base are only 1280 pixels on the vertical, which is about one-third of the potential. I don’t know why the software doesn’t capture the entire vertical; I wish it did. Perhaps the author of Poloska – Nikita Shanin – will read this blog and update the software (please!).
I have experimented with the rotating base to determine that when paired with Apple’s photo app taking a panoramic image, it allows me to make a complete sweep in about three seconds – much faster than the time it takes me to do this with my hands, and much more smoothly. The counter-vibration component of Apple’s photo app loses no pixels and the results are slightly better than those I take by hand.
Meanwhile, I have been making panoramic photos with this combination of tools, and the results are impressive, but low in resolution.
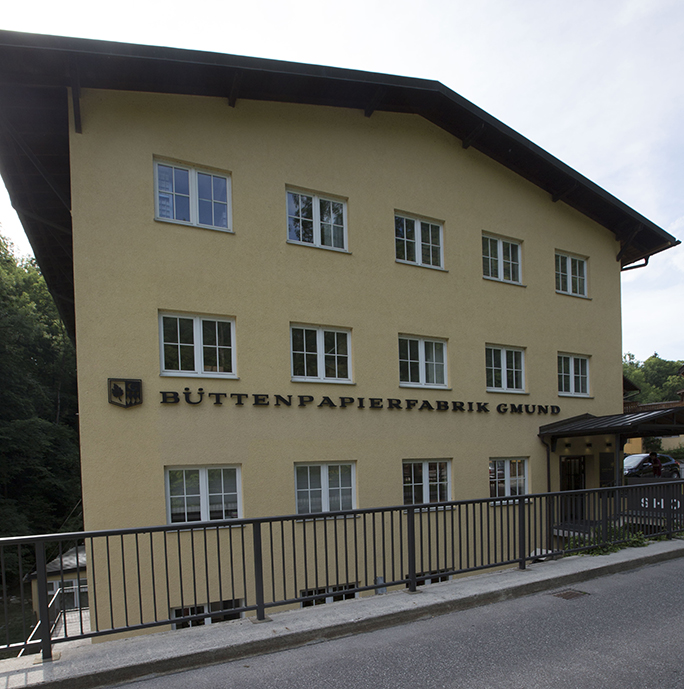
On Thursday we took a tour of the Gmund Paper factory in Gmund, about one hour south of Munich.
Gmund is the maker of some of the finest papers in the world. In their shipping area I saw pallets marked with destinations in Dubai, Portugal, Canada, Japan, and Korea. This company’s paper is in demand the world over.
The Gmund paper-making factory in Gmund, Germany.
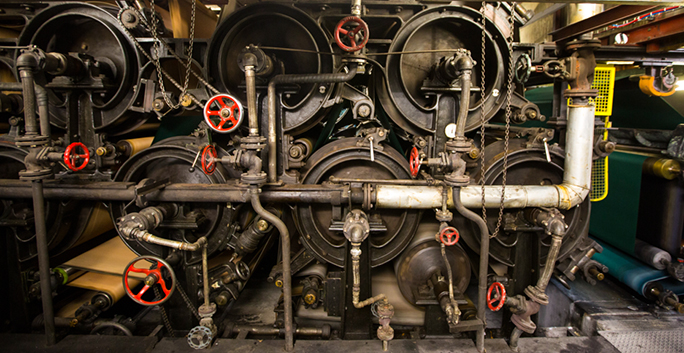
The company was founded in 1829, and its original specialty was the making of handmade sheet papers. In 1886 the company installed a Fourdrinier paper machine capable of making a continuous stream of paper 1.5 meters wide. That machine still runs today, 124 years after its installation. Gmund makes only uncoated papers, some with special textures and coatings.
I have visited much bigger paper-making plants on several occasions, but for me the Gmund factory was much more interesting because it is a small company, the machinery is more accesible, and the product is more attractive. This is not a huge, industrial operation where hard hats and ear protection are required. It’s a firm where people work in small teams to produce beautiful papers. For example, the Fourdrinier machine (the old one) was being operated by just two workers. A slurry of paper fiber and water was being fed into the “wire” end of the machine as we walked by. We were able to look into the headbox and see the paper slurry entering the machine.
(Gmund also operates a larger 3.3 meter paper-making machine, and that was included in our tour. The larger machine is more modern, but it features the same components.)
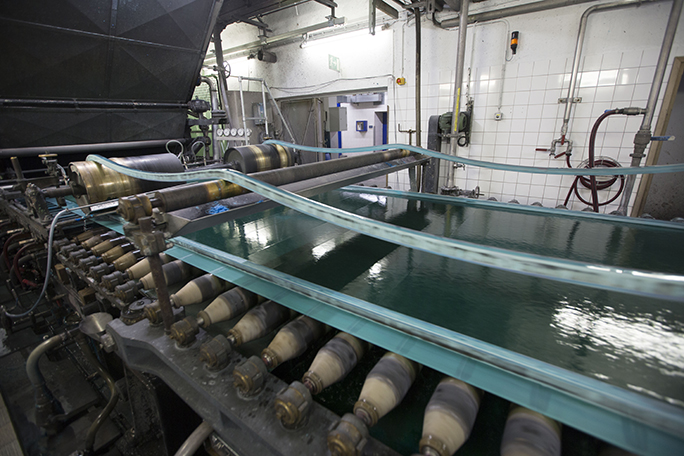
Green paper mash floats across the wire end of the Gmund Fourdrinier machine. At this point in production the pulp is about 99 percent water.
We all know about watermarks in paper. In the Gmund plant we had a chance to see the watermark wire up close. As the paper mash flows over this cylinder, the image on the wire is imparted to the wet fiber. The pattern disturbs the material to create a mark that will later show as a variation in opacity. As the paper passes over the wire (about 20 feet long), much of the water falls through the wire into a catch basin below. This is the initial reduction of water that begins the paper-making process. More than half the water is removed from the slurry in this section of the machine. In paper-making, the wire section is referred to as the wet end.
From the wire, the damp stream of paper fiber is transferred to the dry end of the machine. The “felt” is a long belt of felt that supports the stream of paper fiber as it passes from the wire end to the beginning of the drying section, and then through the drying section. The paper is carried by the felt to a series of steam-heated cylinders that heat and dry the paper gradually as it passes through the machine. Paper starts its existence in a Fourdrinier machine at 99 percent water, and as it passes through the process, the water is reduced to one percent. The large drying cylinders that smooth and heat and press the paper make it consistently thick, consistently smooth, and consistently dry.
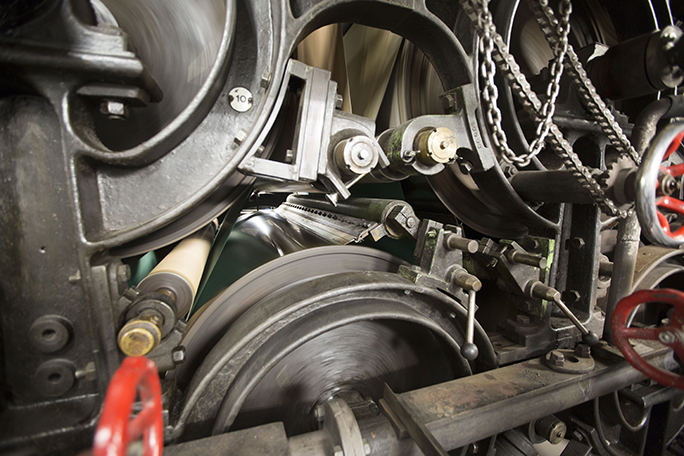
These are the first cylinders in the drying section. On the right you can see the web of green paper coming off the wire. From there, the pulp is entered on the felt, which runs through the drying section.
After the drying rollers, the roll of paper passes through a section called the calendering section where it is smoothed on chrome-plated cylinders under pressure. These rollers impart a hard, smooth surface to the paper. On the Gmund machine is a sophisticated device for measuring the caliper of the paper to ensure its consistency.
The drying cylinders have a mirror finish, which gives the paper a very smooth surface. The cleaning blade scrapes the cylinder to keep dust from traveling around the cylinder and damaging the paper on the next rotation.
At the delivery end of the machine, the stream of finished paper is measured for color consistency, slit into two narrower streams, and rolled into two rolls of finished paper. Gmund has machines that can apply texture to a roll of paper, or to press the paper against chrome plated cylinders to give it a satin surface (called super-calendering).
From there, the paper can be sheeted, where the roll is fed into a machine that cuts it into individual sheets, and stacks the sheets. All of Gmund’s paper is eventually cut into sheets. The finished stacks of paper are inspected by workers who check every single sheet by fanning the paper on a large table, looking for any defects, and eliminating any sheets with defects. After the stacks are inspected, they are wrapped into 50-sheet or 100-sheet packages, depending on the caliper of the paper. We watched as stacks of these packages were being shrink-wrapped into pallets of paper for shipment all over the world.
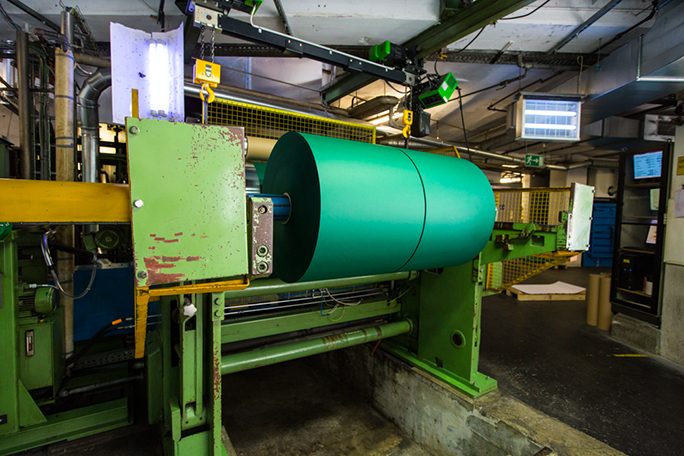
At the end of the Fourdrinier machine, the beautiful green paper is slit and wound onto rolls. It will later be sheeted and packaged as cut sheets.
As with all tours, the exit is through the gift shop, and Gmund’s gift shop is a heavenly place for people who love paper. Beautiful papers can be bought in sheets, as envelopes, or in short rolls. The colors available are impressive, as are the textures. One specialty of the company is a gold-surfaced paper that is used by the Academy of Motion Picture Arts and Sciences to produce the announcements for the Academy Awards. That paper has a fine texture and a satin-finish of gold that is applied over white paper to make the final product.
Finished rolls of brightly colored paper are stacked in the Gmund warehouse.
I find paper-making to be a delightful combination of art and science. Seeing paper-making at Gmund was seeing paper-making at its finest.
Part 3 in a series on panoramic and slit-scan photography
In my recent blogs I have discussed how a mechanical panoramic camera works, and how a photo-finish camera works.
Today I would like to turn the tables, so to speak, on the photo-finish camera. I will begin by asking what happens when you are using a slit-scan (photo finish) camera, and the camera is solidly mounted on a tripod, but the subject turns…?
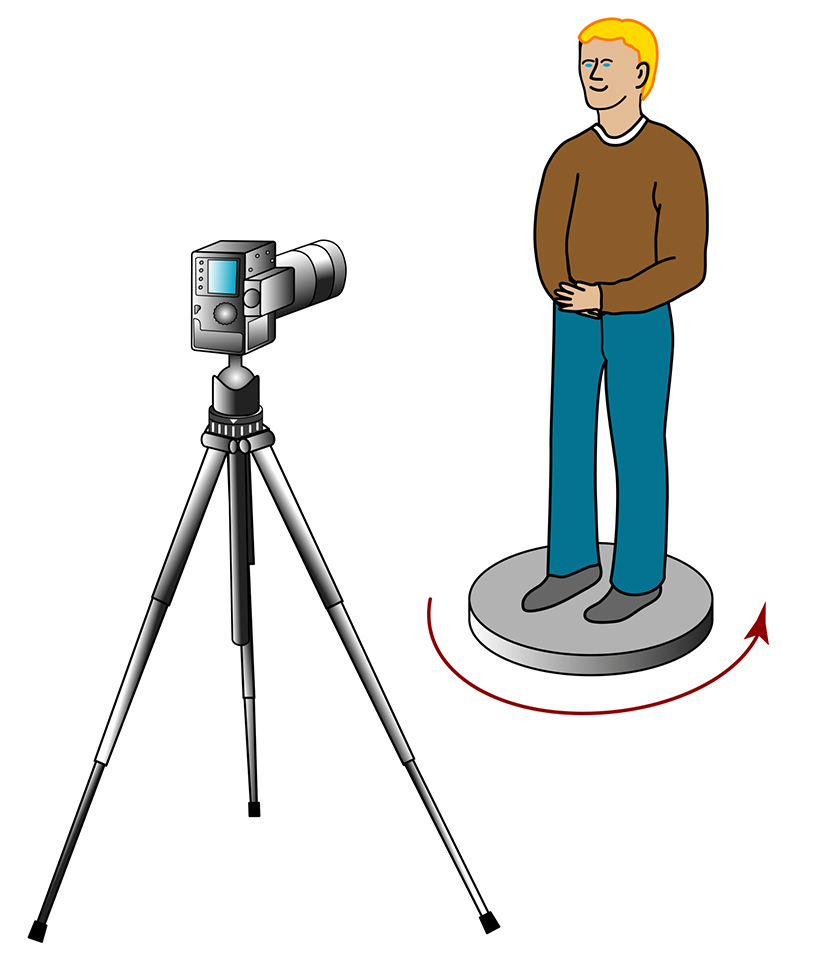
I was recently touring the Deutsches Museum with my lifelong friend Gary Stine. We came upon a display at the museum which features a turntable on which a person can turn. Included in the display were some barbells that one can hold while spinning around on the turntable to change the center-of-gravity inward or outward, thus changing the speed of rotation.
I seized the moment (carpe camera!) and made a roll-out photo of Gray on the turntable.
Roll-out photography is the inverse of photo-finish photography. The camera stands still, and instead of objects moving laterally in front of the camera, they rotate. Significant exploration of this type of photography has been done over the last century, first with film cameras and more recently with digital cameras. It has little purpose, except for scientific studies of cylindrical objects (mostly vases) where the artwork on a cylinder (or something similar) is “unwrapped” to make a two-dimensional image for the study of the surface of the object.
This is my roll-out of my friend Gary Stine. He was standing on, and turning on a turntable at the Deutsches Museum in Munich. We had no way of coordinating the rotational speed of the turntable with the camera, and I did not have a tripod, so this is a bit wobbly.
The method for doing this in a scientific environment is to synchronize the rotation of the object with the camera’s capture. This can be done with a gear belt, a chain and sprockets, or a digital encoder that sends a signal to a digital camera, controlling its speed of sensing.
As with photo-finish photography, the rate of data collection is constant. If the rotation of the object is similarly constant, then the roll-out will be accurate and proportional to the original. Speed differences between the two will result in distortion (which can usually be fixed in Adobe Photoshop).
My roll-out of my friend Gary is interesting, though not at all flattering. But scientists will be examining it for years I am sure.
My blog of day before yesterday told of the process of recording things that move in front of a photo-finish camera (also called a slit-scan camera).
This is an S-Bahn train coming into the station. Its speed was constant, except at the end (right side) when it slowed down and stopped. The camera recorded it and compressed it into this curious image.
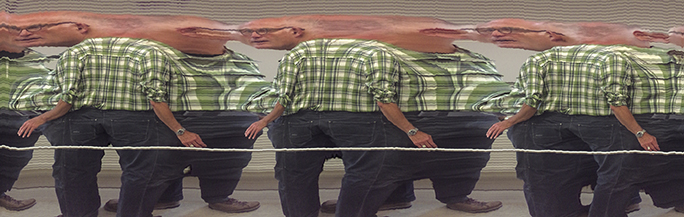
Here are two more examples of things moving in front of the camera at a relatively constant speed. People, moving in both directions in front of the camera are recorded all going left-to-right (notice in this image that some of their shadows go to the left, while most go to the right. This indicates that the person was walking from right to left). The window in the door of the ICE train is recorded by the camera in two places. That’s because the door either opened or closed while I was making the image (the door was directly opposite my camera). When the door remained closed it was recorded only as white pixels.
This image shows people moving in both directions in front of the camera. Those with shadows going to the left were walking right-to-left, while everyone else was walking left-to-right.
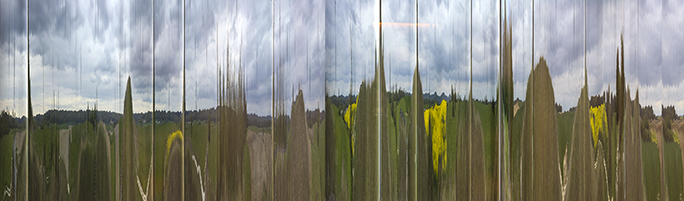
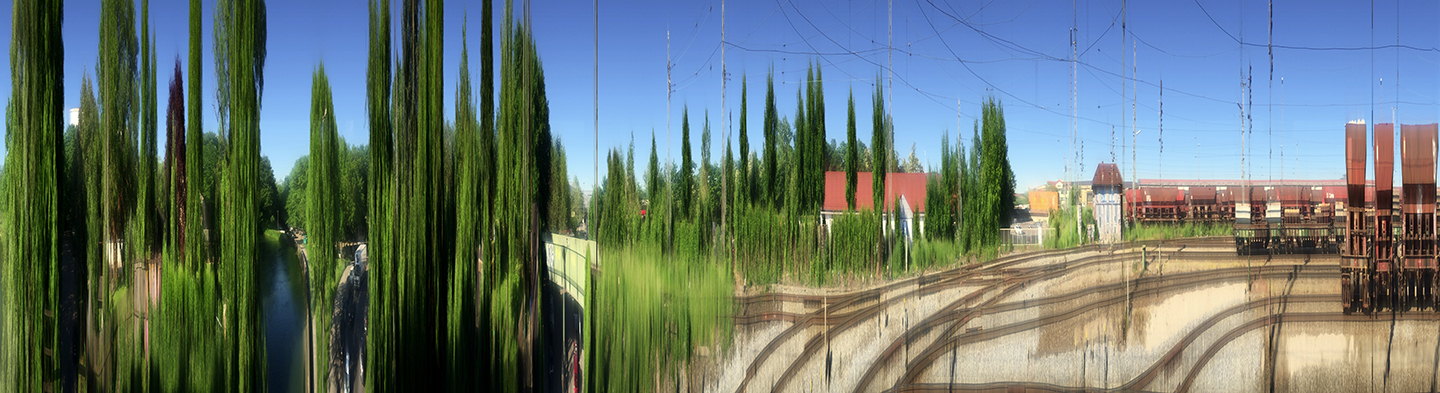
What happens when the camera moves and the subject stands still? While traveling by train in recent weeks I have had the opportunity to put my slit-scan camera (iPhone with slit-scan software) against the window and record the passing scene. When a train is whizzing along at a high rate of speed this does not produce much of anything interesting, but when the train slows down and travels at a more leisurely pace, the images possible from the window are sometimes painterly, sometimes abstract.
This is a scene taken from the train of passing scenery.
As with the photos in the last blog, anything that moves in front of the camera is recorded (faithfully or otherwise – it all has to do with speed in this case). Anything standing still is recorded as a series of stripes. Things close the the camera are recorded with greater speed than things at a distance. Trees are often recorded as a thin row of vertical dark pixels, while buildings in a middle distance are recorded close to normal.
In one scene, above, the train slowed to about 5 k/hr., and the resulting image looks almost normal. Converging tracks look almost like a still photo and there is only some distortion. Just minutes later, when the train was going 120 k/hr. the passing scenery becomes a mural of colored abstract lines:
This is an image that will go into the “avant-garde” section in my biography. It’s simply unintelligible, but it’s pretty!
When we returned from Salzburg I took a daring slit-scan image. I started the camera recording, and I carried the tripod upright as I walked through a crowd of people boarding a train. I just let it run. Sometimes I walked abruptly to the side to avoid a collision, other times I changed lanes to avoid people. Meanwhile the camera just kept recording.
If you click on this image, it will be enlarged. Click on “Full size is 5184 × 307” and it will enlarge a little more (I think you can click on it one more time). You can explore people and things in there that will show you just how odd the image is. Though it’s interesting, it’s not something I will be doing often.
In my next blog I’ll discuss the combination of digital slit-scan imaging and rotational panoramic imaging. When the two come together, you get true panoramic images, and they have the potential of being really nice.
In a recent blog I introduced you to the rotating panoramic camera, a complex mechanical device dating from the early 20th century. The heart of that camera is the roll of film, moving at a constant speed through the camera, combined with the rotation of the camera at a speed which is perfectly timed to match the speed of the film.
That’s a complex mathematical problem because the film speed is a constant, but the rotational speed must be set by putting gears of different sizes on the drive motor, making the camera turn faster or slower. The speed of camera rotation is a function of the focal length of the lens and the distance-to-subject of the image. A long lens would require that the camera turn quickly, while a shorter lens would require that the camera turn more slowly.
But what if you don’t turn the camera?
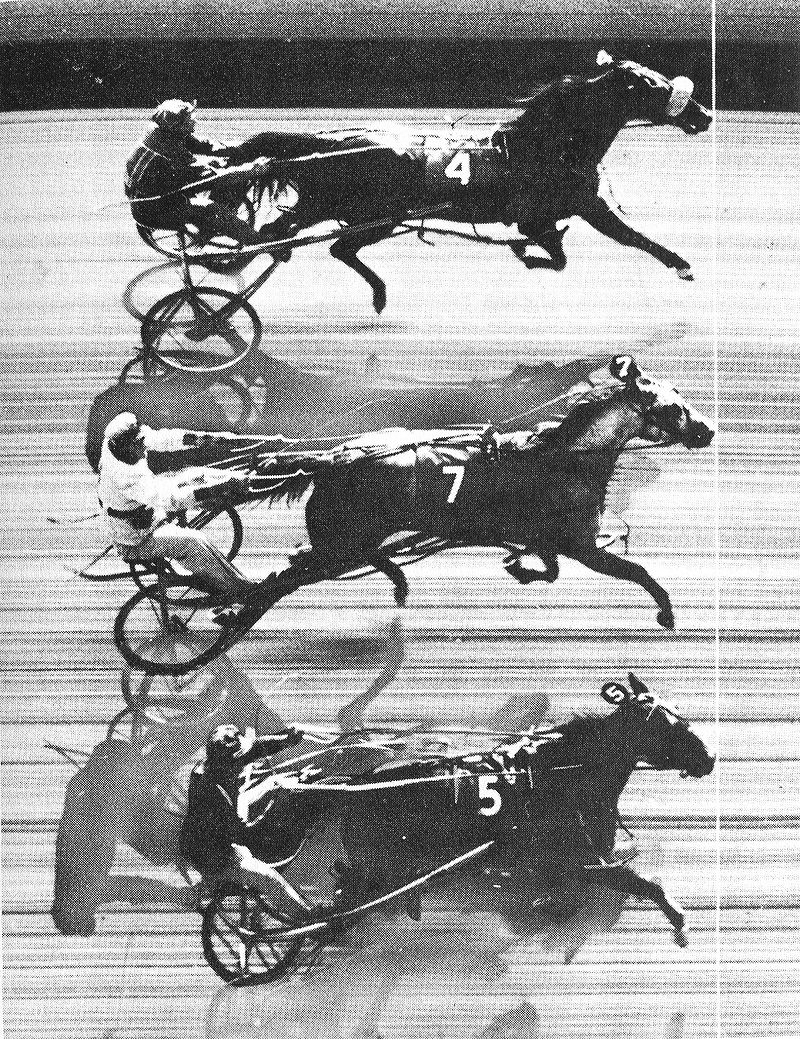
In 1939 a clever man from Hollywood figured out a way to photograph the finish of a horse race by putting what was essentially a panoramic camera at the finish line of the race track, and then not rotating the camera. The film moved through the camera at a constant rate of speed, the image was imparted to the film through the same slit aperture in the back of the camera. What resulted is called a photo-finish image. Here is a famous example:
This is a photo-finish image of a horserace taken in October, 1953. It was the first triple dead-heat in harness racing: Patchover (Ed Myer), Payne Hall (F. Albertson) and Penny Maid (E. Beede) in a Freehold Raceway (USA) Race 3. Photographer unknown, from the Gooreen collection (acquired from Wikipedia). The white line on the image was drawn with a pen after the film was processed to indicate the position of the finish line.
The inventor was an employee of Paramount Studios, one Lorenzo del Riccio, who did exactly that. He put a camera at the finish line of the Del Mar track near San Diego, California, and ran film through the camera as the horses crossed the line. What he did that day was the beginning of the scientific measurement of time using a camera. Time was marked on the film as it moved past the slit, and then whatever passed in front of the camera was recorded accurately onto the film.
Anything that stood still was recorded as a streak of lines.
Whenever there was a race too close to call, the race officials would post the word “PHOTO” on the race results board while technicians would unload the film from the camera, run to a darkroom below the bleachers, and process the film. After the film was processed, the judges would view the film and determine the winner. The photo finish remains to this day a most accurate way to determine the winner of horse races (and bicycle races, etc.).
Modern photo-finish cameras are digital, and they are very complex and expensive. But, except for the film and the processing, they do exactly the same thing that their predecessors did. Anything that moves in front of the camera is recorded accurately while anything that does not move is recorded as a stripe.
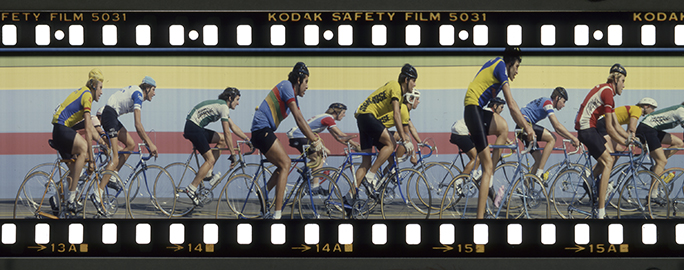
This is an image I made using my home-built 35mm slit-scan camera in 1980.
I used the image on a poster for my graphic arts business that year.
It remains one of my favorite images.
Rumpleslitscan
In 1980 I built a photo-finish camera. I took a Nikon F 35mm still camera and I glued a slit into the aperture area. I had made the slit by photographing an accurately cut thin line (made with a gelatine product called Rubylith) onto a piece of orthochromatic film in a process camera. The aperture was about 0.003 in. wide. Then I put a small electric motor on the rewind knob shaft of the Nikon. I named the camera Rumpleslitscan.
To make photo-finish images I would pre-wind an entire roll fo film into the camera, then I would go outside to photograph an event, and set the focus and aperture on the lens. Then, with the shutter open, I would attach a battery to the electric motor and wind the film back into the film cartridge inside the camera, resulting in a slit-scan photo-finish image. It worked quite well.
My ultimate objective was to photograph a bicycle race – an entire bicycle race – on one roll of Ektachrome film. After some experimentation with voltages and resulting film speed, I made a chart of estimated real speed converted to film speed, which I correlated to voltage. If I could guess at the correct approaching speed of my subject, then I could look up the speed on my chart and set the voltage to match the action and get a reasonable image on the film.
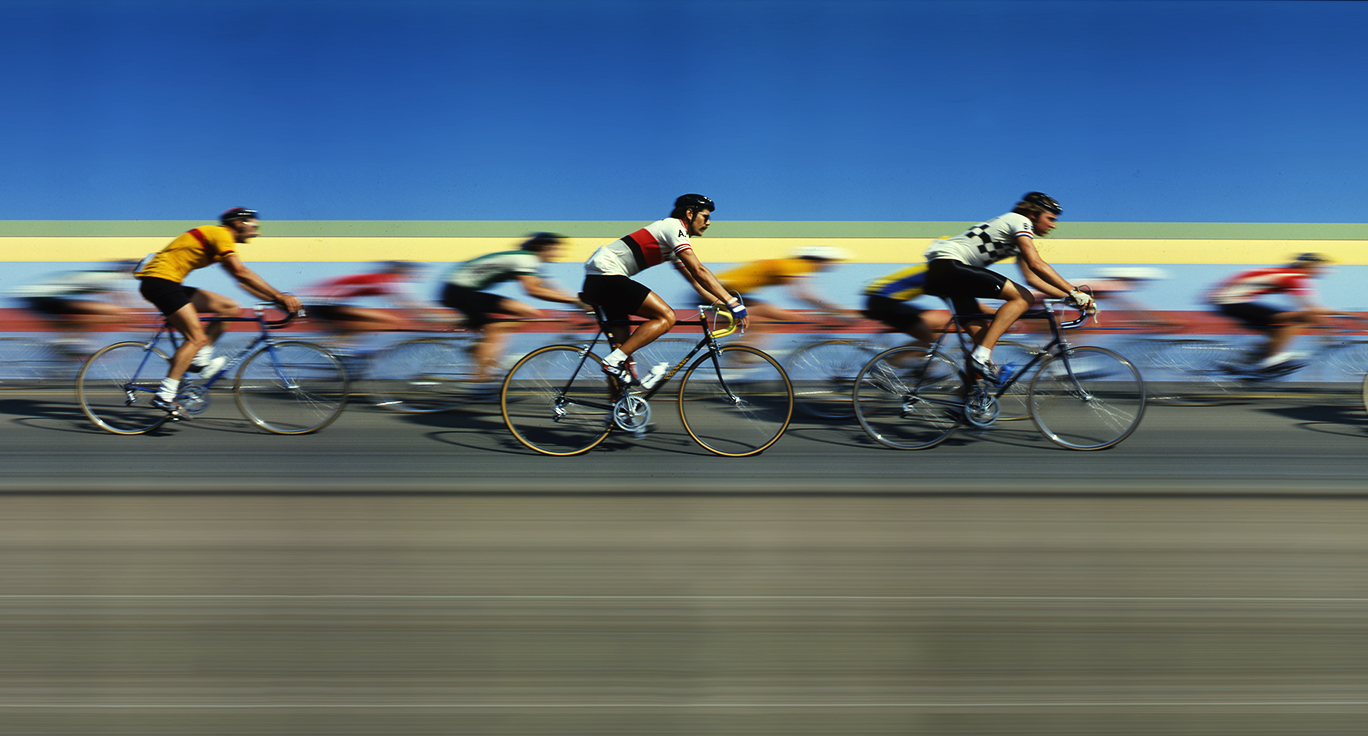
Here is an image I made with a second slit-scan camera I built. It used larger film and a bigger lens. The blurred images in the background are a result of a shallow depth-of-field setting, which created a very nice visual effect.
For power I used not-quite expended Polaroid film batteries. Each battery was just under 1.5 volts, and I could stack these batteries in series to change the voltage. It took only a minute or so to change the voltage and be ready for my exposure.
I experimented a lot using black and white film (which I could process myself) to get exposures and battery settings correct. Then I went out to make the final images.
This is a section of the larger bike race image I did with Rumpleslitscan (shown complete below). It shows the amount of detail possible in an image like this.
One of the images ended up on a poster for my company – Tintype Graphic Arts. I still have the original film from that set-up, and I have enjoyed scanning those images recently. They are pretty amazing considering the state of technology I was using.
This is the largest group I was able to capture at the bike race that day: 67 riders and a Volkswagen bus “sag-wagon” following with spare wheels and water bottles.
Modern photo-finish photography
In recent years we have seen panoramic photography move from slit-scan, rotating camera technology to stepped rotating cameras and stitching software (more on this will be coming in a future blog). The results of this technique are very satisfactory (You can read about my most recent stitched GigaPan image in this blog).
But, what about slit-scan digital imagery? Is it possible?
Yes, it’s possible, and it’s easy, thanks to several free iPhone apps (there may be some for Android also). The idea is the same as a photo-finish camera using film. You scan only one column of pixels in the center of the scene, and you record the image made by passing those one-column scans to a file.
And, as with the film technique, whatever moves in front of the camera is recorded faithfully while anything that stands still is recorded as stripes in the image.
For the past few months I have been living in an apartment next to the train station in central Munich. Every time I go outside I see trains coming and going on the tracks leading to the Hauptbahnhof. I have been taking my iPhone out to photograph those trains recently, and getting some very nice (and sometimes very odd) images. It’s heaven for me and my modern photo-finish camera.
For this I use a MeFoto tripod bracket to hold the iPhone, and a regular tripod. I station myself at the station and photograph passing trains, passing people, anything that moves. I consider it research in time and motion.
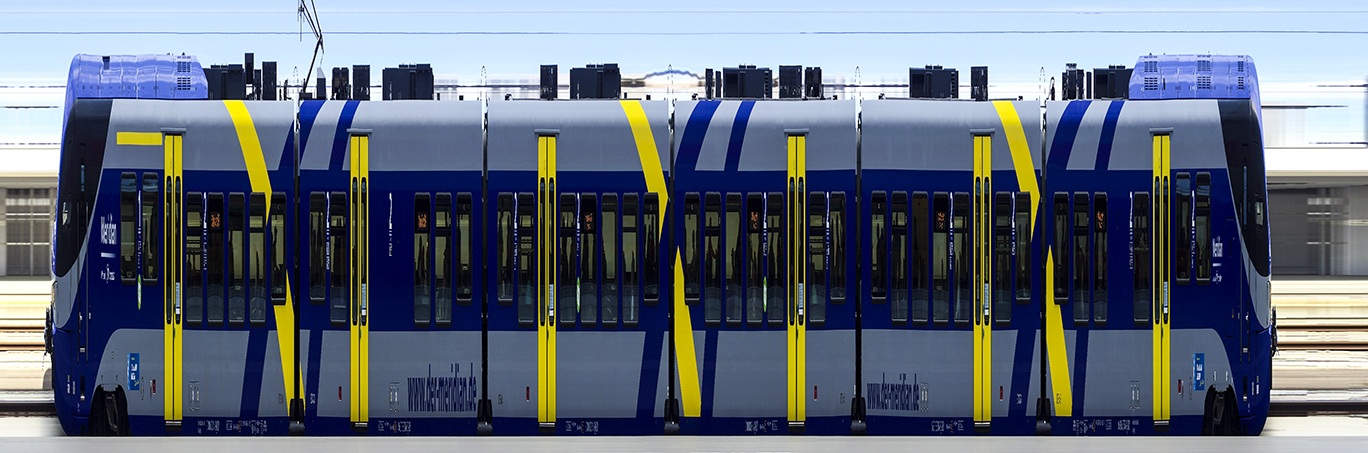
This is a regional Meridian train arriving at the Hauptbahnhof in Munich. It was traveling at a relatively slow and constant speed. That made the compression consistent.
This is the same image distorted closer to reality, but still compressed.
The results are very interesting. I can compress the length of a Munich Meridian train from 500 feet to about 100 just by capturing the train as it enters the station. Curiously, slowing trains or trains that are accelerating distort themselves (remember that the slit-scan captures columns of pixels at a constant rate of speed). Getting a train that is going at a constant speed is fairly difficult, but I have captured a few.
I made this image at a pizzeria in Rothenburg, Germany. People were just walking by, except the waitress, who walked into a doorway directly in front of the camera, and turned as she did. The people with the “skid” feet were walking right-to-left; the people with tiny feet were walking the other direction. All of the people were recorded in left-to-right direction by the slit-scan camera.
Here’s the fun part: Regardless of the direction of the train, the image recorded to the file always goes left to right. So if I record a train that is entering my scene from the right, or a train entering from my left, the images of those trains will always go from the left to the right. Lettering on the trains is mirrored when they come in from the right (in fact the entire train is mirrored). I discovered this strange phenomenon back in the 1980s with my home-built slit-scan camera. Whether the bicycles rode right-to-left or vice versa, their image was always recorded in the direction of the film. With digital it’s the same.
To grasp this mysterious concept, think about the fact that the camera is recording just one vertical column of pixels, then storing it in a stack left to right. The camera does not know or care where the image comes from; it simply records whatever is in front of the lens at the moment it records the column of pixels. It writes the columns of pixels to the growing file, then it does it again, and again….
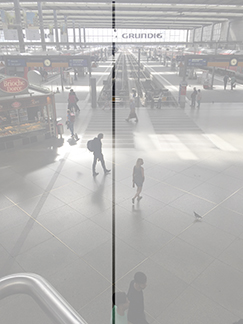
This is a time-and-motion study I did this week at the Hauptbahnhof in Munich. Notice that everyone is moving left-to-right. Since the light is coming from the top, their shadows are all cast the same. But people with “skid” feet were moving from left-to-right. This is a photo-finish image made with a digital camera.
In a study I did this week, I photographed people walking randomly in front of my camera from a second floor balcony at the Hauptbahnhof. No matter what direction they came into the scene, they are all walking from left to right in the resulting image! The camera turns some of the people around, and leaves the others alone, traveling in the original direction.
This is a regular photo, taken at the exact location of the slit-scan image above. I have highlighted the “slit” that is recorded by the software, making these odd and interesting images. Only things that move through the slit are recorded as images; the building itself is recorded as a set of stripes.
So, as moving things enter from the right, the pixels are “unwound” as they are recorded, and as moving things enter from the left, they, too are “unwound” – but in the same direction they were traveling. It makes no difference to the slit-scan camera. One thing that is even more curious is that the shadows cast by moving objects are recorded in the correct direction. Shadows cast in advance of moving things are recorded before the object enters the column, and following shadow will be recorded after the moving thing enters the column. As a result, it’s common to get images of moving things with shadows going in opposing directions.
Once you get over that concept you can really begin to appreciate the strange and delightful world of slit-scan photography.
I have a GigaPan device. It’s a computerized camera mount that moves a camera to take a photo, then moves the camera, and takes a photo, and continues doing that until a series of images are taken that complete a very large panoramic image.
I have done a lot of these over the years, and I am very fond of the device (I am not fond of carrying it and its tripod).
This is a screen shot of the GigaPan Stitch software with my 992 photo panoramic image ready to stitch. Completing the image took hours. Completing the project (retouching, uploading, etc.) took 15 hours, some of which I spent sleeping while the machine carried on without me.
The largest photo I have ever made was at Cal Poly, very near my home in San Luis Obispo. I climbed to the top of Cal Poly’s local mountain (unnamed, above the big “P” on campus) and I made a 360-degree panoramic image with the GigaPan rig that eventually stitched into an image that was too large for Photoshop to open (Photoshop’s limit is 300,000 pixels in either dimension). I wrote a blog about that. Over the years I have made numerous other GigaPan images that are high in resolution, but not so high as to break the software.
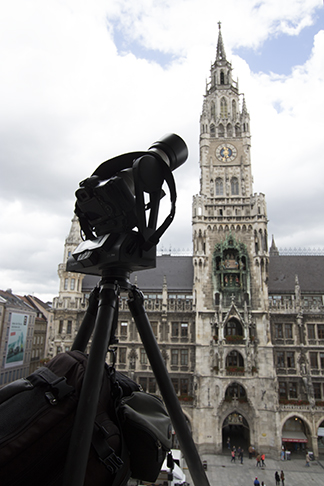
On Wednesday this week my students and I descended upon the Marienplatz in the center of Munich to make a number of photos. I brought the GigaPan and I positioned it in a fourth floor window opposite the city’s famous Rathaus, a building that was built in 1867 (and onward) in the city center.
Here is my GigaPan on its Really Right Stuff carbon-fiber tripod in the window of the business on the Marienplatz in Munich. My camera bag, with four other lenses in it is hanging on the hook in the center of the tripod to prevent it from moving.
The building is a landmark partly because of its famous glockenspiel, which plays a musical and animated program at 11:00, 12:00 and 5:00 each day. Hundreds of people stand in the plaza each day to witness this charming presentation.
My objective was to make the highest resolution photo ever taken of the building, something I believe I have now done (I welcome anyone to challenge this claim).
Several weeks ago I contacted a company that has its offices in the building opposite the Rathaus and asked for permission to use a window on their floor of the building for a few hours while I took my photos. They were open to this idea, and welcomed me into their lovely office.
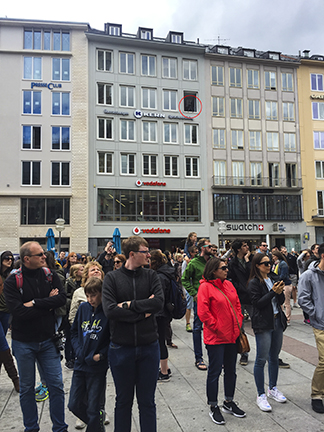
The crowd in Marienplatz waits for the glockenspiel to make its musical presentation. Up on the 4th floor, circled, is my GigaPan and camera. It took more than 90 minutes for each of my two GigaPan photo series on this day. I captured a total of more than 2,000 frames – each 63 MB in size when open.
On Wednesday I arrived, three tripods, three cameras and two backpacks in hand. I set up in the window of their offices and put my GigaPan rig in the window. Two of the tripod legs were outside the window frame on the narrow ledge and one was inside, which was a bit scary. I really didn’t want to see my equipment topple into the square, so I weighed the tripod down with my camera case (there is a hook in the center of my Really Right Stuff tripod that works well for this), and this made me more confident that it was safe.
Meanwhile, my students took the other tripods and cameras to make street-level panoramic images with those. We were experimenting with a new 3-stop neutral density filter on one camera. It looks almost opaque, and cuts the light coming through by half of half of half (which is 1/8). The reason this is a valuable accessory is that it allowed us to make 30-second exposures in broad daylight. By doing this, most of the people on the plaza disappeared from the photos, making almost eery images of the buildings without crowds of people nearby (More on that in future blog).
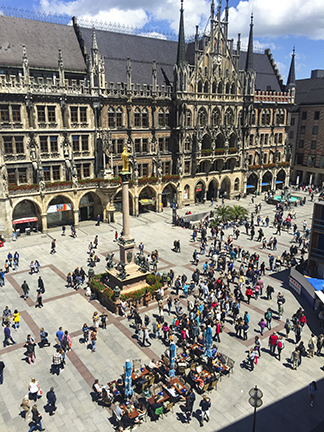
This is a look out of the window where I was working. My students are down there in the center-right with another two cameras and tripods, taking street-level panoramas and time-lapse videos.
Up in the fourth floor window I set up the camera and the GigaPan. My lens choice was the 100-400mm Canon telephoto. I set the zoom to 300mm, which was appropriate for this shot. At that focal length, the photos for the image would be close enough to zoom in and see tremendous detail, and it would allow me to finish the project in a reasonable amount of time.
The GigaPan does its work by calculating the lens’s field of view in degrees, then building-in overlaps between adjacent images so that the stitching program can put them together successfully. It asks you to position the image in your viewfinder at two spots, and by motor movement, it calculates the angles. I performed this setting, and it calculated the field of view at 4.1 degrees vertical.
After you establish the field of view, the GigaPan instructs you to identify the upper-left corner of your image, then the lower-right corner. I did both, and the GigaPan determined that I would need 992 images to complete my shot. The physical limitations were the frame of the window in which I was working, otherwise I had an unhindered view of the plaza.
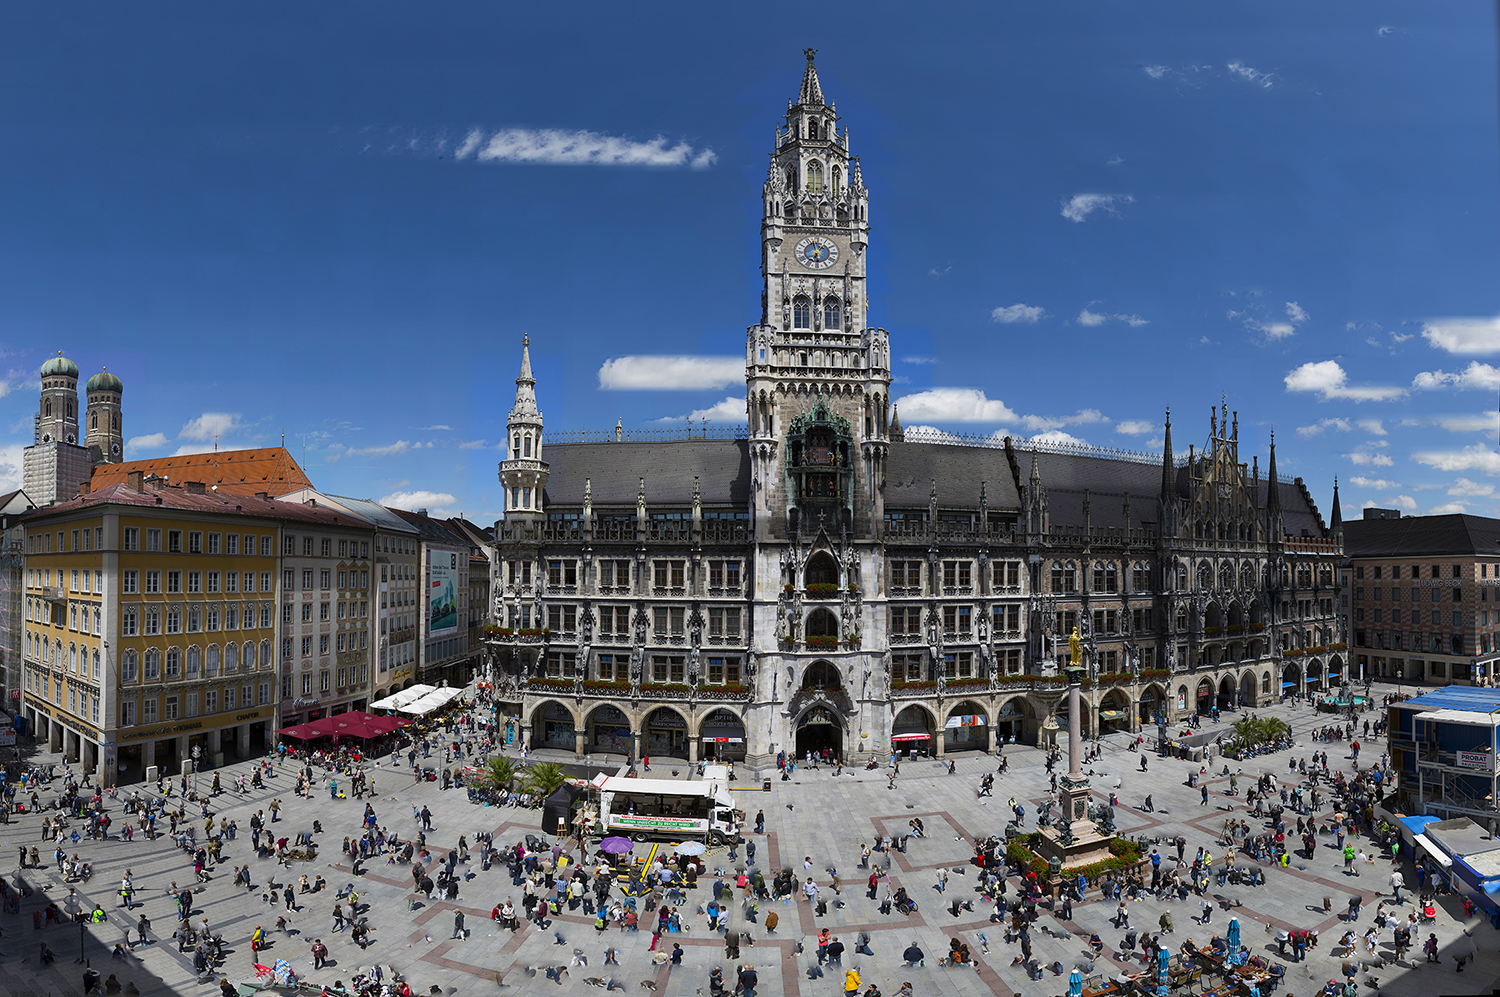
This is a reduced-resolution view of the final GigaPan image. There is mayhem in the plaza in the image because people were not photographed in their entirety (the camera was making multiple passes horizontally). As a result, there are many partial people in the image, but no one was injured in the making of this image! I promise.
The GigaPan then steps you through a series of questions to stop you from making dumb mistakes: Is the camera on? Is the zoom locked? Is focus locked? Is exposure locked? Is the strobe off? Are you sure? Yes, I indicated, and it began its work. The LCD display counts-off the photos as they are taken, and it indicates how much time remains. I needed one hour and 21 minutes to make this series of shots. The sky was cloudy with blue showing-through in patches.
About twenty minutes into the series, the sky turned dark gray and it rained. People ran from the plaza and took cover under the umbrellas of stores along the Marienplatz. About ten minutes later the sun came out again and the sky turned to a lighter gray. The photos continued all the while.
At the end of the first series of photos the sky turned a beautiful blue with scattered white clouds. I decided to do it over, so I started it again; that is the image I ended up using. In the end I captured over 2,000 photos of the Rathaus in two series.
After I completed the photos, my students and I took some group photos in the plaza then headed back to Hochschule München to begin work on the images.
The taking of GigaPan images is the easy part; the processing of GigaPan images is most tedious. Back in California I have a Mac Pro cylinder computer with six processors and 128 GB of RAM and a GPU, all of which combine to make processing of projects like this go very fast. Here in Germany I am using a MacBook Air with an Intel 1.8 GHz i7 processor and 4GB of RAM. It’s a nice lap-top computer, but it is certainly not as fast as my machine at home. This was going to take some time.
Some of my photography students in the Marienplatz at the end of our photography day there. We were quite successful with what we set out to accomplish.
In the classroom we worked on the street-level panoramas, which will turn out beautifully. I took the GigaPan photos back to my apartment for a long night of processing.
Just downloading 2,000 camera Raw photos to the machine took several hours. I use Adobe Bridge and its Get Images from Camera tool to import, rename, and simultaneously convert from Canon CR2 to Adobe DNG. This takes time, but I prefer this work flow because it is obsolescence-proof. I watched a documentary about things that are underneath London (Netflix) while this was going on. Then I watched a second documentary about zzzzzz (I fell asleep) until the job was done.
GigaPan does not know what a camera Raw file is, so in order to do the stitching I must convert all the images from DNG to TIFF in order to stitch them (cynics are sniping right now saying, “Why don’t you just use JPEG? It’s just as good and it wouldn’t require all that work!”). They are wrong; JPEG images seriously compromise the quality of the gradients in blue skies. The damage is clearly visible and it shows in these ultra-high resolution images. I prefer quality over efficiency (and I don’t think of JPEG as efficient) so I spend the time necessary to do the job right.
Converting from DNG to TIFF took about one hour using the Image Processor in Photoshop (thank you, Russell Brown!). The folder containing the images consumes 23.4 GB of disk space (just the DNG raw files).
So, late, late last night I had my 992 photos in TIFF ready to stitch. I set up the software and told it to start work. Five hours later I awoke and it was still working. One hour after that it was finished.
The image stitched beautifully. The final steps take a long time also: first one must export the GigaPan from the stitching program to the local drive. GigaPan creates a Raw file that Photoshop can read; it’s an RGB interlaced image. In this case the image is 124,076 x 84,884 pixels. Exporting that image took about three hours.
I also save my GigaPan images and their work files (there are thousands of them), this keeps a record all of the stitching parameters in case I ever need to do it over. It is possible to discard the TIFF images once the stitching is done, as they are redundant.
Once the Raw file is written to the disk, I open it in Photoshop to do minor (sometimes major) retouching and color correction. This image benefitted from some Vibrance and Saturation adjustment. Just opening the photo (at about 27 GB) took 17 minutes. Cropping the scraps off the edges took another 15 minutes. There are lots of photographic mishaps in the crowds at the bottom of this image. I will spend some time cleaning those up before I print the image.
I haven’t totaled it up yet, but this image, like most of my ultra-high-resolution GigaPan images, has taken about 15 hours.
Uploading the image to the GigaPan took about three hours. It is available for public viewing, zooming and exploring now.