
Mass storage in perspective

Blognosticator Head

I got an e-mail from a friend with a link to a Facebook page where a photo was displayed of an IBM hard drive was being loaded onto an Pan American airliner with a forklift. The disk, according to the page, was capable to storing 3.75 megabytes after formatting. That’s:

3,750,000 bytes of data
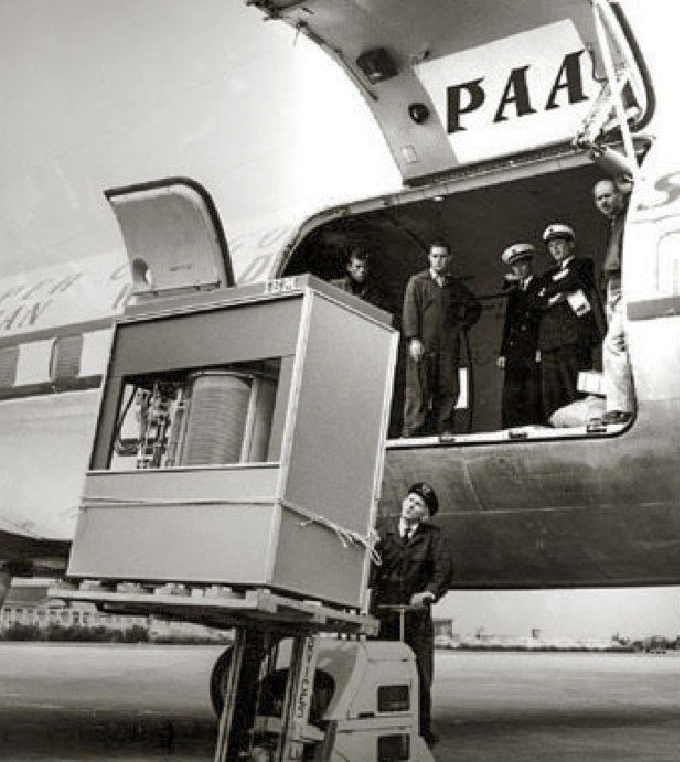
1956 IBM hard drive

This is the IBM hard drive being lifted to the waiting cargo hold of a Pan Am plane.

And, the story continued that this is about the size of one photo on an iPhone. What the article didn’t say is that the photo size on the iPhone is the compressed size in JPEG. Uncompressed, the images from the iPhone are 24 megabytes in size. That’s:

24,000,000 bytes of data

…which is about six times the capacity of that IBM drive.

I was amused by the size of the drive, and was momentarily nostalgic about the first big hard drive I ever bought (nowhere as large as the one in the photo). It was a 10 MB drive, with 7.8 MB of storage after formatting. It had a single platter 14 inches in diameter, a drive motor that was listed as having 1/10 HP, and an automotive V-belt to transfer power from the motor to the platter hub.

The drive came in a cabinet that weighed about 80 lbs. It took two to carry it using the built-in handles.

This drive cost about $10,000, and the company from which I purchased it – Mergenthaler Linotype – strongly suggested that having just one of these drives was very risky, and that I should really purchase two, so that I could use one to back the other up. So I did. These “massive” storage devices held text for our two typesetting machines, the Mergenthaler VIP and, later, the Mergenthaler 202W, which was a cathode-ray-tube typesetter. Both were extraordinary machines.

I remember the scariest thing about the 10 MB drives was the process of “optimizing” a drive. This was effectively de-fragmenting the drive’s contents. During this process, data was sequentially read from a sector, then re-written to a new sector on the drive, compacting the sectors to make the drive more efficient, and to remove wasted sectors that were left behind when files were erased.

During the optimizing process the data was stored in memory, of which there was scant little. And, if the drive failed during the optimizing process, we were out in the cold, as all of the data on the drive would then be corrupt. That was why I felt better about having the second drive, which was a mirror of the first. Whenever we optimized one drive, we would then test it thoroughly, and then optimize the other. It was a risky business, but it worked, and we were grateful not to have to use paper punch tape, which was the storage technology we used prior to having the “big” hard drives.

A couple of years later, my friend Tom and I built an electronic box that connected an Apple IIe computer to the V-I-P’s paper tape reader with a long, fat cable. With a little work we were able to use the Apple computer to mimic paper tape by signaling the receiving photosensors the same signals that a paper tape would have, and it allowed us to use the Apple Writer II word processor as our text editor instead of the AKI paper tape keyboards we had been using.

The benefits were many, chief among them the ability to edit an entire document on the screen of the computer, then to send the text to the typesetter, and have it generate typesetting on photo paper or film in its usual way. This was very clever in hindsight. We stopped using the “big” hard drives and we started using 5.25 inch floppy disks on the Apple IIe. Soon we had several Apple II computers running all of our typesetting work, and they were by far more efficient and reliable.

Floppy disks were cheap enough that we could write a customer’s job on one, then put it into the job ticket envelope for storage. If the client returned for corrections, we could easily retrieve the disk, put it back into the Apple computer, and edit it. We could save numerous versions of jobs on one disk and have room to spare.

And, as time passed, we bought a Macintosh, and a Linotronic 300, and we became one of the first typesetting companies in the United States to offer PostScript output for those early adopters of “desktop publishing.” We accepted floppies from customers all over the country, and we ran their jobs to film, and shipped them off in the mail, or when a deadline was really tight, we used the Greyhound Bus, the depot being just one block away from our shop. On very rare occasions, we took a package to the airport and paid for it to be shipped by “air express” on our small local airline. When it arrived in Los Angeles – about an hour away – it was retrieved by a courier, and then delivered to the client.

Storage systems got bigger, and over time we saw internal hard drives grow in capacity from 10 MB to 20 MB then on to 100 MB and more. They got lighter thinner and more capacious.

This last week I had a new 500 GB hard drive installed in an old Mac Mini computer. The installation and the labor came to about $100. 500 GB is:

500,000,000,000 bytes of data
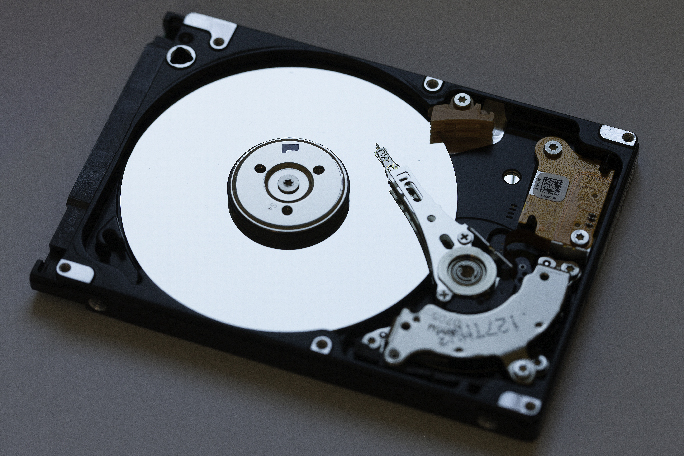
Hard drive 34 view 05

This is the 60 GB hard drive that had failed in my Mac Mini. Now it’s a curiosity for my students who will hand it around in class.

That’s 1.3 BILLION times more data than the hard drive depicted in the photo. (Don’t you love comparisons like this?)

The irony is that the 500 GB drive is the smallest drive available in the format that fits into the Mac Mini.

The drive that was replaced was a whopping 60 GB drive. When I got home I took the cover off of it – voiding the warranty – and took some photos of the splendor of its workings. What amazing technology is found inside one of these things!

The I started thinking about storage, and trends in storage. On my desk was a slightly damaged SD memory card, one with 32 GB of capacity. I cracked the plastic case off of it, and took some photos. There, on a circuit board about the thickness of a postcard, is a single chip with 853 MILLION times the capacity of the IBM hard drive show in the photo. This stuff is amazing!
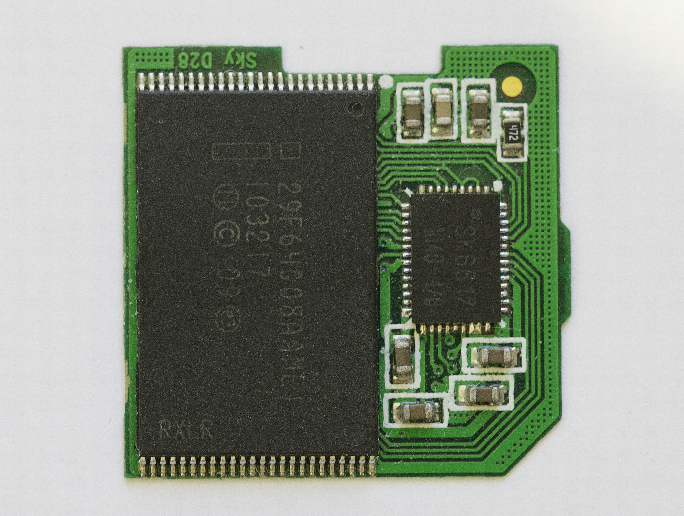
8GB SD chip

This is the circuit that I broke out of the SD memory card from my digital camera. This one contains 853 million times the capacity of the IBM drive in the top photo.

And, unlike me, these storage devices don’t forget stuff.

I aspire to be so efficient!
 

Posted in History, New technology, Printing and Printing Processes | Tagged , , , , , , | Leave a comment

Things I have never seen before

Blognosticator Head

Happy New Year from The Blognosticator!

This last week I saw two things I have never seen before, and I thought I would share them with you. And, I have a few other musings to discuss, as you will see.

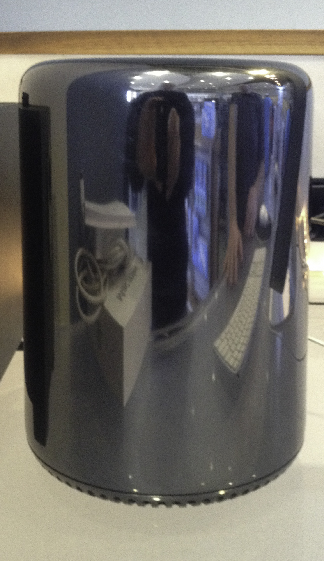
One was the new Mac Pro computer, on display at the Mac SuperStore in San Luis Obispo. It’s sleek, small, compact, and very impressive looking. I have been thinking about getting one, but would have to wrestle with the problem of offline storage if I did. That means that I would have to buy a large external hard drive enclosure to house my many terabytes of storage. That would cost a lot of money, so I think I will postpone this purchase for a while. Meanwhile I can admire its sleek appearance.

MacPro

This is the new Mac Pro computer at the Mac SuperStore in San Luis Obispo. Notice the reflection of the Mac Mini in the face of the shiny new machine. I was buying that to replace the Mini that died on Christmas Day. The Mini drives my Epson 9600 printer, and I really (really!) need that these days.

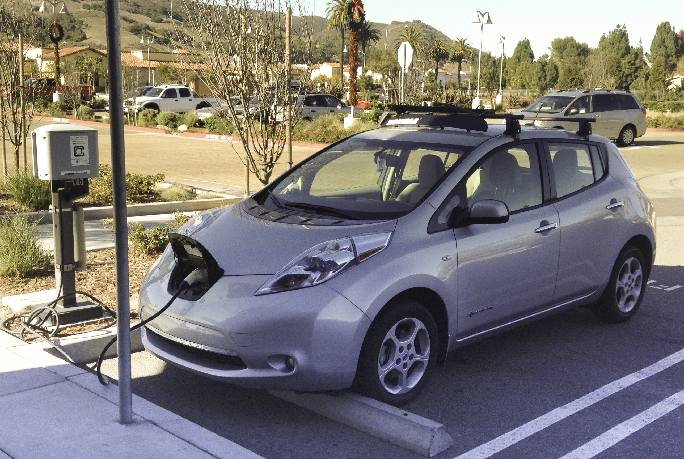
The other thing I had never seen before was an all-electric car actually using one of those parking lot charging stations we see in every modern shopping center. This also occurred at the Mac SuperStore in San Luis Obispo, so I plan to spend more time there in the coming weeks to see more miracles.

Since my first sighting though, I have seen the same all-electric car charging its batteries at the Home Depot across the road from the Mac SuperStore, so perhaps miracles happen in that neighborhood, not just at that store.

Leaf on charger 01

A Nissan Leaf plugged into the public charger station outside the Mac SuperStore in San Luis Obispo. I had never seen one of these chargers used before.

I am printing huge panels of ink-jet material this week to prepare for my panoramic exhibition at the San Luis Obispo Museum of Art, which opens in just six weeks and two days. I wouldn’t say I am panicking. I’m just feeling the pressure of this important deadline. I have a to-do list that is two feet long, and I am carefully, methodically, taking items off the list as I complete them. The most recent of these was the near-completion of lamination of the huge panoramic print that I made last month. That photo is going to be 59 feet seven inches in length when it is adhered to the was at the Museum. I printed it as 17 ten-foot sections of Epson Photo Glossy paper, each 44 inches wide. This was covered in my previous blogs on that subject.

Doug and Jeff

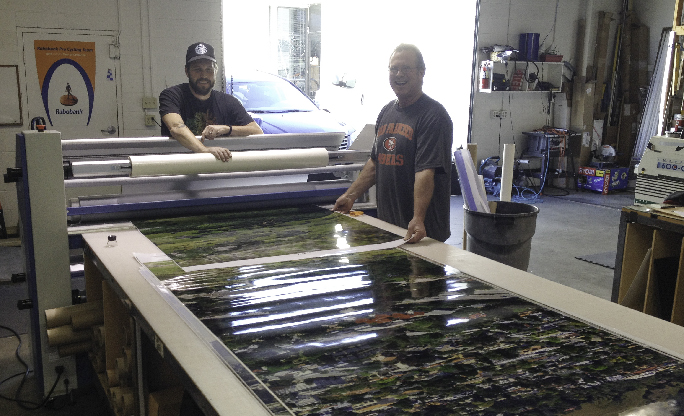
Jeff and Doug at Spectrum Images in San Luis Obispo. Their Seal laminating machine is supplemented by a fourteen-foot table that makes handling the output easy.

The prints needed to be laminated to prevent damage from the water-based wallpaper paste that will be used to adhere them to the wall. I researched this, then tested it with my wallpaper hanger expert to determine that it will work when the time comes.

The lamination was done by Doug and Jeff at Spectrum Images in San Luis Obispo on their Seal laminator. I provided the prints and the laminate (the thinnest clear laminate I could find on the market). They provided both the machine and their skills in managing 170 linear feet of material going through it. I helped by providing humorous commentary while they worked. I also nit-picked a bit as they toiled.

In the process of laminating the prints, we wrecked one, and we found digital anomalies in two others. The anomalies were digital noise, where pixels were printed where they should not have, or there were streaks of color caused by who-knows-what. So three panels are back on the printer today, New Year’s Day. I will deliver them to Spectrum tomorrow for lamination (without the humorous commentary).

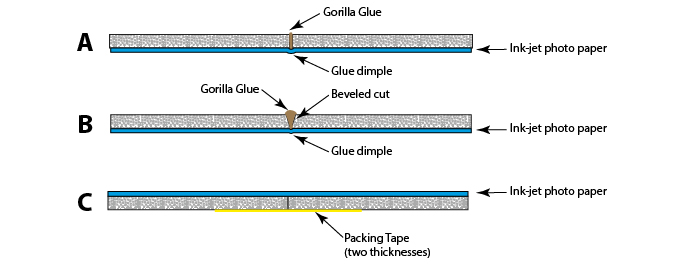
I have also been experimenting with connecting two sheets of foam core together. I can buy foam core in sizes up to 4 x 8 feet in size. Some of my prints, though, require foam core that is much larger. I have two that are 18 feet in length, and three that are 14 feet in length. I thought that it might be possible to glue two sheets together using various glues. I experimented with Elmer’s White Glue, which wasn’t strong enough, and with Gorilla Glue, which is amazingly strong.

Glueing foam core

This shows the results of my gluing experiments with foam core. The top two examples A and B show the Gorilla Glue creating a small dimple on the photo side of the joint, while clear packing tape does not make the dimple. The taped seam appears to be the best solution in my case. The photo mounted to the other side becomes the second structural member of the joint.

I couldn’t get a glue joint without a bump, however. I tried undercutting the foam core on the backside, then applying the glue, and that almost worked, but it still left a visible bump in the front when a photo is mounted across the joint.

In both cases I used standard clear packing tape on the good side, which is the pressure-sensitive adhesive side of the foam core. This tape worked wonderfully to hold the board together. So, I decided (my wife suggested this) to try using the packaging tape by itself on the backside of the foam core, then simply mounting the photo on the sticky side. This turned out to be the solution that works. The result is a barely visible seam where the photo crosses the seam. I am considering making the seam on a bias so that the line is not perpendicular to the foam core edges. This may result in a less visible seam.

These are the minor tribulations of a man preparing for an exhibition at an art museum. I wake up in the night thinking about different methods for attaching foam-core-mounted prints to sheetrock walls, or methods for getting the huge photo panels safely to the museum on the day we set up the show without dinging the foam core (which is surprisingly difficult).


Posted in Adventures, Art, New technology, Panoramic Photography, Photography, Printing and Printing Processes | Tagged , , , | Leave a comment

Dear Blognosticator readers – all 60,000 of you

60000 number

We have reached a milestone on this 31st day of December, 2013: 60,000 readers!

Your continued interest in the blogs has been inspiring to me, and I thank each and every one of you.

A lot of interesting topics have been covered, and your interest in them pleases and surprises me. Here is a list of the most popular blogs, ranked from most popular – those blogs which have attracted more than 1,000 readers:

An iPad and EyeFi card bring the Holy Grail to pro photographers: 6,792

More Mysterious Forces at work:
using Mac OS to repair corrupted JPEG and EPS files: 6,176

How to read a micrometer: 3,072

Why do people (people) put numbers (numbers) in parentheses?: 2,287

Drawing on the iPad is a joy with Paper: 2,212

The origin of the Stencil font: 1,720

Web-safe colors – time to move on!: 1,640

You are also a diverse group. You represent readers from 173 countries, ranked here according to readership. Thank you, personally, to my reader is Saint Vincent and the Grenadines!

Views by country:

United States 28,722
United Kingdom 4,361
Canada 2,949
Australia 1,765
Germany 1,270
India 1,199
France 966
Netherlands 852
Italy 659
Philippines 636
Spain 540
Brazil 483
Turkey 440
Singapore 434
Sweden 417
Belgium 382
Hong Kong 373
Malaysia 366
Indonesia 339
Mexico 337
Thailand 330
New Zealand 328
Poland 322
Japan 321
Finland 311
Switzerland 303
Denmark 298
Russian Federation 290
Republic of Korea 276
South Africa 271
Czech Republic 269
Portugal 260
Norway 240
Israel 232
Greece 214
Ireland 213
Pakistan 206
United Arab Emirates 201
Romania 195
Austria 192
Argentina 162
Ukraine 146
Saudi Arabia 146
Viet Nam 143
Hungary 143
Taiwan 122
Serbia 114
Lithuania 113
Croatia 103
Slovenia 96
Egypt 92
Chile 89
Bangladesh 83
Colombia 82
Slovakia 79
Bulgaria 75
Nigeria 55
Sri Lanka 51
Virgin Islands 45
Jamaica 44
Peru 44
Ecuador 43
Panama 40
Puerto Rico 39
Lebanon 36
Latvia 36
Estonia 35
Iceland 34
Bahrain 33
Morocco 33
Jordan 32
China 31
Costa Rica 30
Ghana 30
Algeria 30
Qatar 28
Luxembourg 27
Venezuela 27
Maldives 25
Uruguay 24
Malta 24
Cyprus 22
Mauritius 21
Guatemala 20
Belarus 20
Oman 20
Trinidad and Tobago 20
Cambodia 19
Iraq 18
Dominican Republic 18
Bosnia and Herzegovina 18
El Salvador 16
Macedonia 16
Kenya 16
Kuwait 16
Ethiopia 16
Myanmar 16
Brunei Darussalam 14
Tunisia 12
Albania 12
Guam 12
Armenia 12
Georgia 11
Moldova 11
Laos 11
Yemen 11
Macao 10
Isle of Man 10
Nepal 10
Bolivia 10
Tanzania 9
Kazakhstan 9
Paraguay 8
Mozambique 8
Mongolia 8
Réunion 7
Bahamas 7
Bermuda 7
Honduras 6
Cayman Islands 6
Guyana 6
Sudan 6
Martinique 6
Saint Kitts and Nevis 6
Palestinian Territory 5
Uganda 5
Saint Lucia 4
Syrian Arab Republic 4
Andorra 4
Senegal 4
Uzbekistan 4
Azerbaijan 4
Zimbabwe 4
Belize 4
Libya 3
Grenada 3
Madagascar 3
Côte d’Ivoire 3
Cuba 3
Suriname 3
Afghanistan 3
Eritrea 3
Barbados 3
Angola 3
Guernsey 3
Fiji 2
Haiti 2
Cameroon 2
Solomon Islands 2
Faroe Islands 2
French Polynesia 2
Namibia 2
Jersey 2
Zambia 2
Seychelles 2
Botswana 2
Gabon 2
Monaco 2
Malawi 2
Burkina Faso 2
Djibouti 1
Tonga 1
American Samoa 1
Tajikistan 1
Benin 1
Guadeloupe 1
Antigua and Barbuda 1
Northern Mariana Islands 1
Iran 1
Nicaragua 1
Togo 1
Lesotho 1
Bhutan 1
Saint Vincent and the Grenadines 1

There is also a dark side to blogging. I have had 91,441 spam hits on the blog site since its inception in July, 2011, 67,535 this year alone. Almost all of these have been effectively tagged as spam by Akismet, a commercial service to which I subscribe. So, thank you, Akismet, for making my life 91,441 times easier.

I try to write at least once each week, sometimes I do much better. And, I try to keep writing about topics that I think my readers will enjoy. You really seem to want to know how to read a micrometer! My journeys around the world and within my own neighborhood are also of interest to you.

I am lucky to be able to command such an audience. Thank you all for your continued interest in the Blognosticator.

Happy New Year!

– Brian P. Lawler

December 31, 2013


Posted in Adventures, Business, History, People | Tagged , , , , | Leave a comment

Pencil for Paper by 53

Blognosticator Head

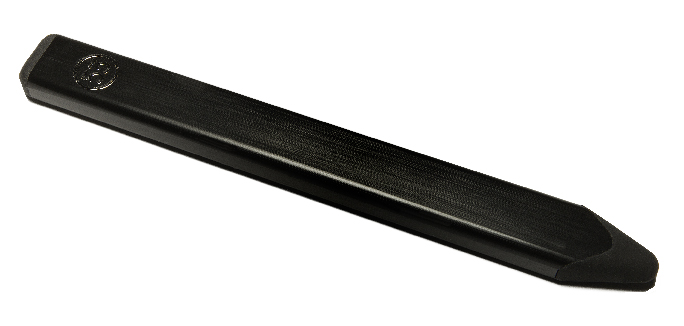
It’s a stylus with a rubber tip on both ends. It works with the Paper app on iPads.

IMG_0006

I absolutely love Paper, the app by 53. I have been using it for well over a year on my iPad, and I have done many sketches and drawings with it, some of which have become parts of commercial illustrative work. I wrote about the app in a blog in 2012.

Paper, for the uninitiated, is a drawing app for iPad. It was the first app that has ever felt like real drawing to me. I have tried others, and found them less than perfect, usually far less than perfect. When I first tried Paper, I fell in love with its feel. I could draw, just like I draw on paper, using my finger on the screen of my iPad. The tools are fresh and fluid, and they work very intuitively. I soon added a rubber-tip stylus from Griffin, which I like a lot, and that made Paper even more effective.

Griffin stylus

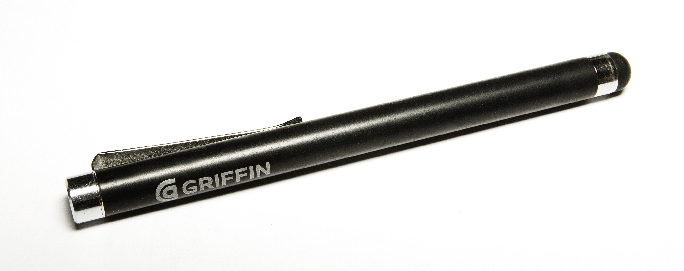
My Griffin stylus has served me well for a couple of years, but it’s not working well these days and I don’t know why.

For some reason, my Griffin stylus no longer works. I’ve tried washing it with soap and water, cleaned it with alcohol, and cleaned it with Windex, none of which help. Pencil comes along at just the right time.

Pencil for Paper 03

This is Pencil for Paper by 53. It’s an aluminum device with soft rubber tips on both ends. One is for drawing, the other is for erasing.

In the first release of Paper there were only seven colors, and the colors were not the primaries or secondaries. They were an odd assortment of colors chosen by the company that develops the app: 53. Those of us who love Paper learned to love those colors, and were soon rewarded by 53 with a complete color palette that allows us to select colors, to blend colors, and expand the palette. It’s delightful.

Then they added a rewind tool, which allows you to go backward, erasing your work in reverse to a point where you could begin anew. The rewind acts like an undo feature that is animated. Once selected, one can rewind or “wind” again to the point where you want to restart your drawing.

Enter Pencil for Paper. I saw this when I upgraded to a new iPad Air in October. 53 offered me this accessory when I was renewing my app from the iTunes Store.

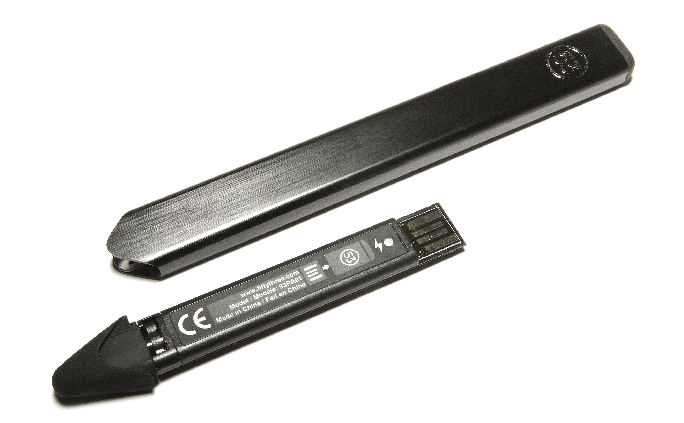
The Pencil is an aluminum bar with rubber tips on both ends (they also offer one made of wood). The pointed end comes out, revealing a USB plug and a circuit board. You plug it into a USB receptacle on your computer to charge its internal battery. Once it’s charged, you reinsert it into the Pencil and it’s ready to draw.

Pencil for Paper 13

This is the electronics part of Pencil, removed from the shell. On this device you will see a USB plug, which goes into a computer to be charged. The charge lasts an hour or more of continuous use.

The two ends of the Pencil behave differently. One is for drawing and blending, the other end is for erasing.

With Paper running on the iPad, you touch the Pencil to a circle on the left side of the toolbar, and it activates the Bluetooth communication between Pencil and app. Its most impressive feature is called palm rejection, which prevents your hand from creating marks while you are drawing with the Pencil. Drawing with Pencil is otherwise effortless. It’s smooth and easy.

Technical sketch

This is a technical sketch I made using Pencil. It worked quite well, but occasionally frustrated me by blending when I just wanted to continue drawing.

I’ve had the Pencil for a week now, and have had a chance to test it thoroughly. For lettering it’s fine. I love the way I can draw letters with a fluidity not common on a computer device. For detail drawing it’s not as good in my week-long experience. It has a tendency to misread my intention to draw with its intention to blend. I wish there were a way to tell it to be more discrete.

Pencil lettering

Freehand lettering is very nice with the Pencil. I love the way it and its companion app work on my iPad.

I also find that I like drawing with the Pencil when it has not activated Bluetooth. It works as a passive stylus, and it’s very pleasant. It also doesn’t try to blend when you approach a line you have already drawn.

So, hat’s off to 53 for this clever new pencil. I think it will help me a lot as I work with the iPad to make illustrations.

 Read my original post on Paper by 53.

Posted in Art, Gadgets, New technology, Technology | Tagged , , , , , , | Leave a comment

’tis the season to make Biscotti and Photoshop masks

Blognosticator Head

Every year about this time I get out my recipes and I make a load of biscotti to give away as gifts, and a few for myself.

I love biscotti, and I love making them. Years ago I was given a recipe by my friend Tim Mantoani, a photographer in San Diego. This recipe is from his grandmother Lorraine, who makes the best biscotti in the world. A few years ago, I took the recipe and modified it a bit, and published it in a recipe book my students made for my course in Advanced Typography.

Biscotti Ingregients 3

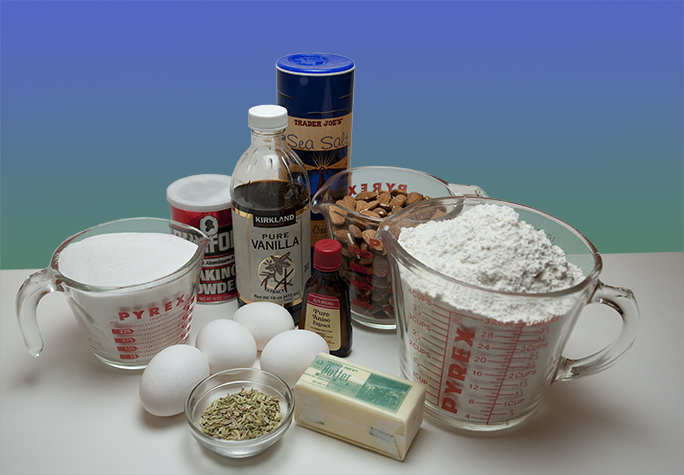
The biscotti ingredients: sugar, vanilla, baking powder, eggs, fennel, butter, anise extract, almonds, flour and a pinch of salt.

I have published it twice, and modified it a number of times to suit my typographic taste.

I also baked the cookies and photographed them for the recipe book, which was fun and tasty. It was also a great opportunity to do some table-top product photography, and to embellish the resulting photos to show these extraordinarily flavorful cookies.

After the photos were complete, I decided to change the setting from plain white sweep to a color background, and I needed to modify some of the reflections and highlights in the photos. These changes and corrections were to prepare the photos for print. In the world of advertising photography, this is a routine process of making a product look a little better, a little sharper, a little prettier, and bigger than life.

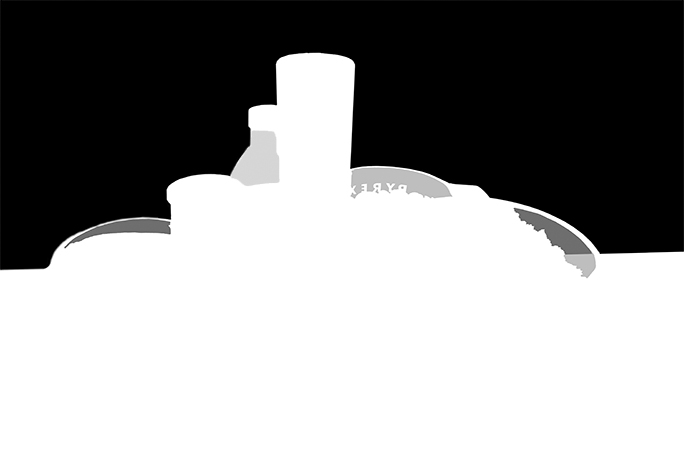
Biscotti mask

This is the biscotti mask. Notice the gray areas, which represent partial transparency for the background. The gray area on the right has two tones: one for the background, one for the tabletop.

The photography is straight-forward. I lit the shot with a single softbox suspended over the subject, and a little forward of center. I shot these photos with my Einstein strobes, which I love for their color consistency and overall quality.

After opening the image in Adobe Camera Raw, and adjusting the color temperature a bit to get my neutrals neutral, I opened it in Photoshop, and began the process of making the photo better to please the art director. While this work was continuing, I was enjoying biscotti and herbal tea, a great complement to Photoshop.

For the photo of the ingredients I needed to draw a mask to remove the backdrop. I did this first by choosing a channel with the greatest contrast between subject and background, and I copied it, then pasted it into the mask layer for the image. With Levels, I darkened the darks then lightened the lights to make a high-contrast drop-out mask. I then dropped a new background behind the image, a gradient of green to blue.

Detail of gray in mask

This detail shows the mask with its various levels of gray to reveal more of the background – but not too much.

This worked very nicely, but there are areas in the photo where flour, almonds and sugar are in glass measuring cups, and the transparency at the tops of those cups needed to be added to the mask. The result of this is that the color background is allowed to show through the glass at a fraction of full value. To do this I painted on the mask with gray in the tops of the cups. I used a half value gray, and it looks perfectly convincing in the final image.

And, at the edge of the flour cup there is a difference between the backdrop and the table top, which I had to acknowledge with a change in the density of the mask. This prevents the measuring cup from looking like it isn’t sitting naturally on the table top.

Once the mask was complete, I made small adjustments in the way that the background shows through the bottle of vanilla, and then I declared victory and moved on. I think I also did one pass of Unsharp Mask on the image to make it appear a bit crisper.

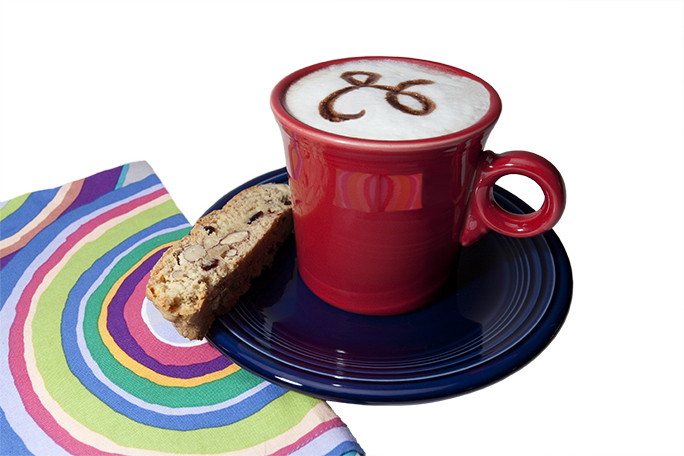
Coffee with biscotti no BG

Here is my second photo, showing a single cookie with a cup of coffee. It was a nice photo, but it needed “something” so I added a mask and dropped in a new color background, shown in the next photo.

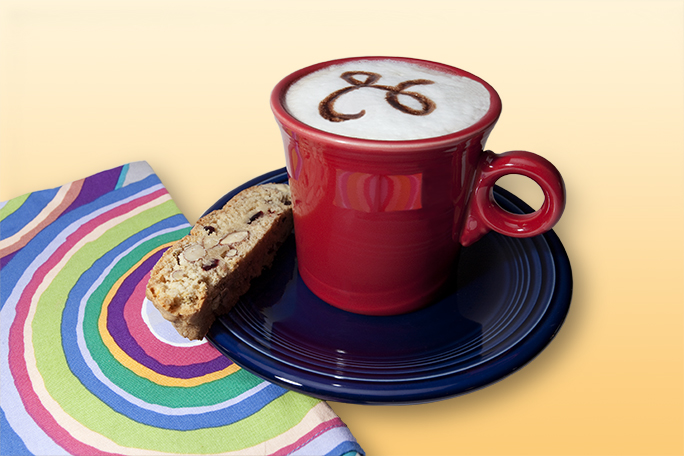
The coffee cup and boscotto (singular) on the blue plate also needed a bit of work. Though the original image was nice photographed on a plain white sweep, it needed something to add a little more color. I decided to mask the white background out and replace it with a gradient complementary color, one I selected from the colorful napkin in the photo (the napkin comes from Picking Daisies, a San Luis Obispo specialty store).

Coffee with biscotti

Here is the second photo with its added mask, and a shadow.

Once that mask was complete – and it was much simpler than the other mask – it looked OK, but it needed a little something, so I added a shadow. To make the shadow, I copied the mask, inverted it, blurred that a bit with Gaussian Blur, then I drew modifications to the shadow that I wanted. In the end, the shadow is convincing and it adds quite a bit to the photo. The last step was to sharpen the individual cookie on the plate, which I accomplished by selecting it with the Quick Selection tool, and applying Unsharp Mask. I pushed this pretty far, knowing that the cookie should simple crackle with sharpness. The result looks good enough to eat.

Coffee with biscotti 35 shadow

Here is the shadow for the coffee cup photo. I made this with an inverse copy of the mask, then I blurred it, and painted in some changes to make it look for realistic.

For the cover of the recipe pages I included another variation of this same photo, also sharpened to enhance the appearance of the biscotti. In that image I also had to add a blur of red in the lower-right corner to fill the triangle of space left between the plate and the edge of the page. This is obvious when you know it’s there; otherwise it’s just more of the plate.

When I was finished, I had eaten most of the biscotti, so I made another batch!

Click here for a PDF of the finished Biscotti Recipe

The recipe is included here for you to try. These cookies are delicious, and I thank Tim’s Nana Lorraine every time I make them and enjoy them.

Posted in Photography, Photoshop techniques | Tagged , , , | 2 Comments

I’m going to be an energy magnate!

Blognosticator Head

In my spare time, between teaching and preparing for a photo exhibition opening in February, I have been installing solar panels on my roof. I had decided to do this several years ago, and had found the price of the project too high for my modest salary. I postponed a couple of times.

This summer the price of solar panels dropped by about 25 percent, and I worked summer quarter (earning a little extra money), and my wife and I had earned our way into the high-tier price of electricity in our home/office.

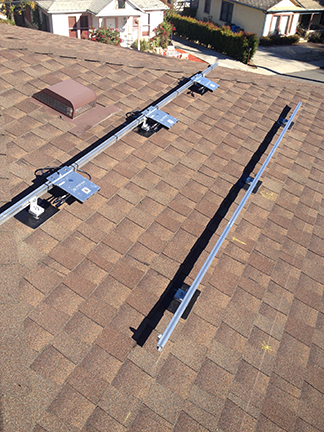
Rails 2

This is my second railing set, which will hold three panels when complete. Along the top rails are the inline inverters, mounted to the aluminum rails. The black plates are the watertight flashing sheets that are inserted under the shingles. A stainless steel stud comes up through those flashings to become the base of the brackets that hold the railings. You can see my chalk lines on the roof indicating where the rails should go, and the yellow marks showing the location of the rafters.

Pacific Gas & Electric Company, our electricity supplier, charges residential customers according to a “baseline” amount, then they add a bit if you go over that baseline. When you go over by a lot, which we do every month, they really pile it on.

Here is a typical month for us:

Our baseline is 291.2 Kwh

Baseline: $0.1323 per Kwh 291.2 Kwh                                 $38.52

101-130% of baseline: $0.1504 per Kwh 87.36 Kwh          $13.13

131-200% of baseline: $0.3025 per Kwh 203.84 Kwh      $61.66

201-300% of baseline: $0.34.025 per Kwh 247.6 Kwh     $84.30

Total                                                                                          $197.62

Most residential electricity consumers don’t get into the 201-300 percent tier. To do that you need a Konica-Minolta digital printer, a NAS server, two Mac Pros running continuously, a Mac Mini running continuously, and a wide-format Epson ink-jet printer which is run several hours on most days. I have all of those things and more. And, we run a regular household on top of (or underneath) all of that.

It’s costly, and it was starting to bother me. So I asked my local solar power company to quote on a system of eight photovoltaic panels for my roof. San Luis Obispo enjoys 300-plus days of sunshine each year; it’s a very sunny place, and my house sits in the sun without any shading from trees or other structures.

And, it’s the right thing to do.

We as a nation and a society use far too much petroleum, coal and uranium to make electricity to run our NAS servers and our Mac Pros. Where there is ample sunshine, we should be generating electricity from the sun.

Brian on roof

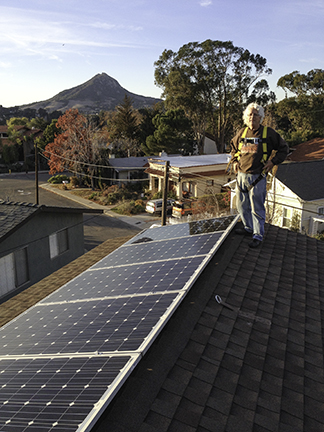
This is me in my handsome body harness (not attached to the anchor in the center) standing on the roof this afternoon after finishing the installation of the first five panels. The roof anchor is permanent, attached with stainless steel screws to a rafter. With that I can visit the panels occasionally to wash them. On the left is a three-foot clearance between the panels and the eave; this is to allow firefighters access to the roof.

I accepted the quote from the local solar company for the panels, the racking and hardware. Then I hired a licensed electrical contractor, and began the work of getting photovoltaic panels on my roof.

I decided to pay the contractor to punch through the back of my electric load center, to install the conduit to the roof, and to install the primary wiring from the panels to the box. Though I have done residential electrical work before, I thought I would rely on a professional when it comes to drilling holes in the roof. I have neither the tools nor the experience to do that myself.

The rest of the job I have done myself. This includes inserting waterproof flashings into the shingles, mounting aluminum brackets to the rafters, and then installing the railings, inverters, wiring and the panels on the roof. It has been fun, and only a little scary. I bought an OSHA-approved body harness and roof anchor system, which is required for safety, and I snapped myself onto the safety line every time I ventured up onto the roof to work. As roofs go, mine is gently sloped. I don’t envy those who have steep roofs, as that would be be much more difficult.

I drew six pages of highly detailed construction drawings and took those to City Hall, where I applied for and received an owner-builder construction permit for my project. The city is concerned that all the terms of the National Electrical Code are met for such projects. They are also concerned about wind and snow load (in a place where it has not snowed for 200 years).

The flashing is reasonably easy, though finding the rafters can be challenging. Fortunately my rafters stick out the ends of the roof. So, I would lie down on the edge of the roof, then feel around under the eave until I found a rafter. Once located, I used a construction square to mark its position on the composition roof with yellow chalk. From those marks I was able to extrapolate the position of each rafter. Then I drilled into the rafters to sink long steel screws holding the stainless steel brackets that hold the solar railing in place.

Once the railings were installed I put up the inline inverters. These are clever watertight DC-to-AC inverters that are connected to each individual solar panel. The inverters are then wired in series to a junction box, delivering 220 VAC power to the line. The line travels down to the load center, where it goes into the breaker panel through a standard 20 Amp 220 VAC circuit breaker. This feeds the electricity into the box, making it available to the home, or, if you make more than you use, it feeds out into the electrical grid, and you get a refund from the electric company.

The power savings potentially generated by my panels looks like this:

My electric bills last year totaled $2,371.39. The high-tier amount of those bills was a total of 2,971 Kwh at $0.34025, for a total of $1,012. Annual Solar power production of my new system is estimated to be 3,279 Kwh, which will allow me to reduce the high-tier power to zero, then dip into the third-tier power. My estimate is that I will save $1,102 annually on my electric bill.

The pay-back of the system, after a federal tax credit of 30 percent, should be five years and eight months. After that time I will be generating about 35 percent of my electricity with the panels fully amortized. And, to me that is a good deal.

In the lifetime of the system, which is guaranteed for 30 years – and made in America – I will generate a total of $33,000 worth of electricity. This will probably not actually happen because the efficiency of the panels drops slightly in their lifetime. But, the price of electricity will most likely go up in the coming years, so this may equalize over the life of the panels.

And, I can feel good about my investment in solar panels, contributing to the power I consume without consuming fossil fuels. I like this plan.

All things considered, it has been an interesting adventure to learn about solar panels and how they are affixed to a residential roof. It has also been an adventure to learn how to make waterproof penetrations to my roof to add the solar system to my home.


Posted in Adventures, New technology, Technology | Tagged , , , , , | 1 Comment

The 32,767-pixel limit: I should learn to read dialog boxes!

Blognosticator Head

That didn’t work quite as planned.

In my large scale printing project, I started late last night to print the first of 17 strips of my huge panoramic photo 44 inches by ten feet in length.

My original photo is in excess of 28 GB, and cutting it into sections of 44 inches with an overlap of one inch provides me with enough resolution to print at graphic arts quality – 300 ppi – at full size. In fact, I had more resolution than needed: 343 ppi.

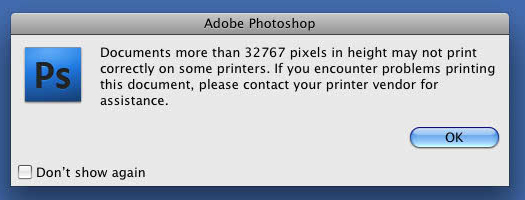
32,767 pixel limit

Don’t call us! Contact your printer vendor for assistance. What on Earth are they going to do if Photoshop won’t print a photo that large?

So I loaded the first file, and started it running (and attached the paper to my new take-up reel described in my last blog). I stayed up past midnight monitoring the take-up reel, and when I decided that everything was working well, I went to bed.

Somewhere between full consciousness and REM sleep, I noticed sounds coming from the printer that sounded like the end of the job. I thought that was good, then I heard the printer start up again. That was odd. But I fell asleep and dreamed of piezoelectric ink-jet nozzles snuggling up against my leg (it was actually my cat).

In the morning I discovered that the printer had printed 109.22 inches of my photo (the original is 120 inches tall), then put a half-inch gap in the photo, and continued to print the rest of the image. This is, of course, unacceptable.

In preparing the photo for printing I do vaguely remember a dialog box popping up on the computer saying something about images with more than 32,767 pixels causing trouble on some printers. In my desire to get this project going, I clicked the OK button. It turns out that 32,767 pixels is 109.22 inches. What an amazing coincidence!

So it appears that Photoshop has a problem with printing images greater than 32,767 pixels. I have 171 square feet of expensive Epson photo paper to prove this! This error has cost me both time and money. This output will have to be scrapped, and the loss is about $50, which hurts.

So this morning I am experimenting with actually reading the dialog boxes that show up on my computer screen (my late mother would be so proud of me!). I re-calculated the size of my files, and have settled on a new resolution of 280 ppi, which is more than adequate for ink-jet printing at 1,440 spi. At that resolution, I am printing a file of just 1.12 GB instead of the original file that was 1.69 GB. It’s amazing what a few pixels can do to your productivity.

From now on I will be sure not to print images of greater than 32,767 pixels. I promise!


Posted in Color Management, Mistakes you can avoid, Panoramic Photography, Photography, Photoshop techniques | Tagged , , , , | Leave a comment

A do-it-myself take-up reel for a wide-format Epson printer

Blognosticator Head

I’ve mentioned in a few of my recent blogs that I am preparing a photographic exhibition at the San Luis Obispo Museum of Art that opens on February 14, 2014. I’m in the thick of preparation now, making prints, mounting prints, taking the final photos for inclusion, etc.

My garage is filled with huge sheets of self-adhesive foam core, my office is lined with boxes of Epson Premium Glossy Photo Paper, Premium Luster, and three complete sets of ink cartridges that I have stockpiled for the coming flood of output.

View of San Luis Obispo from Daniel's Point

The show features my panoramic photographs, and my headline photo is a huge panoramic print of San Luis Obispo that will be mounted on the long wall at the Museum. That photo will be 58 feet, 7 inches in length, and ten feet tall. I’m printing the photo on my Epson 9600 wide format ink-jet printer on Epson Premium Glossy Photo Paper.

Earlier this year I made a test print of my big photo on Epson Premium Luster paper, and I gave that print to John Kleek, the wallpaper specialist who will be putting the photo onto the wall. He tested my print, and while he was adhering the print in a test, the ink started running. It turns out that water-based wallpaper paste soaks right through Luster paper, making a mess of the image. Mr. Kleek was also concerned with the thickness of the Luster paper (260 gsm), which was causing him difficulty in mounting the print to the wall.

I changed to the thinner Epson Premium Glossy Photo paper, which is about half as thick (170 gsm). The problem of water-solubility I solved by laminating the photo paper with a very thin heat-set laminate film, which seals the image side of the paper, which stopped the ink from running. In a second test, Mr. Kleek was successful in getting the Epson Premium Glossy Photo paper to adhere to his test wall.

That print, totaling 580 sq. feet, I am printing as 17 sections, each printed on the 9600 printer as a strip 44 inches wide and 10 feet tall. My friend Doug is laminating the prints for me on his laminating machine, and he prefers long rolls to many short rolls. So, I am printing five of these sections at once, making a roll of printing over 50 feet in length with a small gap between the individual sections.

Epson take-up reel 005

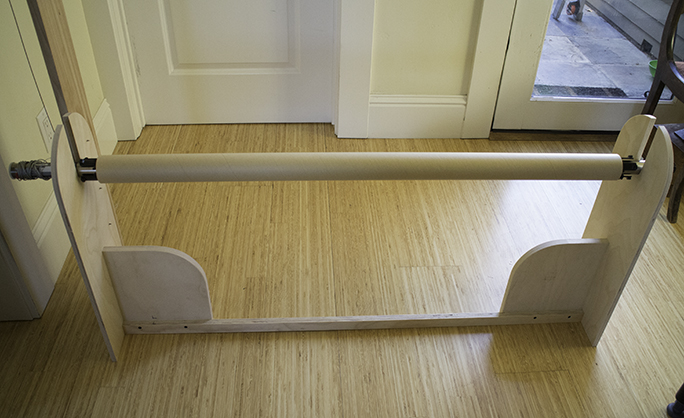
This is my take-up reel assembly. On the left-rear is a post which holds pulleys and the counterweight system. The spindle is an extra one that is from an older Epson ink-jet printer I used to have in the office.

For that I needed a take-up reel for my Epson printer, so I made one in my wood shop. It consists of an extra Epson steel spindle that sits in twi cradle pieces mounted on a crossbar. I made no attempt at making a bearing surface; the spindle turns against the wood, which works fine. To roll up the paper as it comes out of the printer, I needed some form of motive power on the spindle. I considered an electric motor with a gear housing and a microswitch, but that was getting awfully complicated. Instead, I bought two pulleys at the local hardware store and fashioned a motor of sorts that uses a stack of steel weights on a thin cable wound around the spindle. As the paper comes out of the printer, the roll takes-up the paper, and the weights get slightly closer to the floor.

Epson take-up reel working

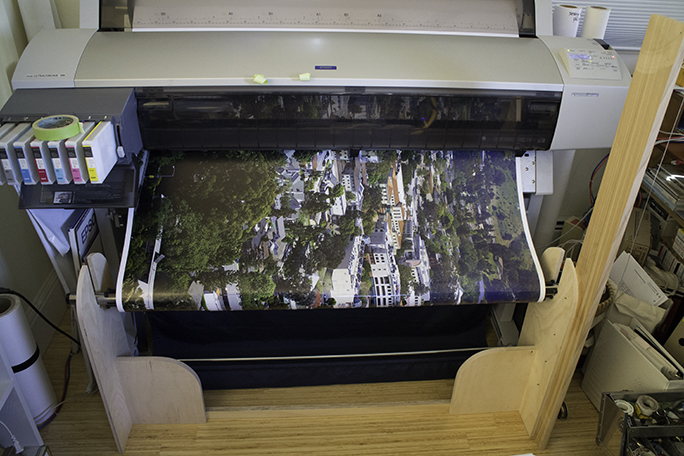
This is my first section of my huge photo mural being printed, then rolled-up on my take-up reel. It’s a simple device, and it’s working well. I will be running 170 linear feet of 44-inch paper through the printer in the coming days.

I’m running the first big print now, and the system is working well. I plan to start a second section before I go to sleep, so I will have to wind my cable to the top before I start counting sheep.

I used malleable steel washers as my weights. Each one weighs about a quarter-pound, and has a keyhole in the center. I can thread any number of these weights on the end of the cable by slipping a bolt swaged to the end of the cable through the keyholes. I have added seven of these big washers so far, and it seems to be working fine.

To attach the end of the cable to the spindle, I drilled a small hole, and tapped a 6-32 thread into the hole. Then I attached an electrical lug to the end of the cable, screwed that to the spindle, and that provides a solid termination to the cable. This combination of low-tech hardware provides me with a simple solution to winding up a long roll of ink-jet printing. My costs? I have spent about $30 so far, the wood is all scrap, and labor is cheap too.


Posted in Art, Gadgets, Panoramic Photography | Tagged , , , | Leave a comment

The Boy Mechanic rides a Faraday bike

Blognosticator Head

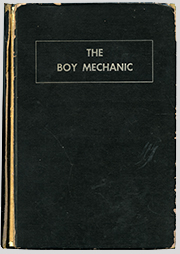
As a kid I read The Boy Mechanic cover to cover many times, so many, in fact, that it’s almost worn out, as you can see in the photo, below:

Boy Mechanic cover

This is my tattered copy of The Boy Mechanic, published by Popular Mechanics in 1952. I pored over every page for many years in my childhood. I still love to read it from time to time because it brings back memories of garage-built projects.

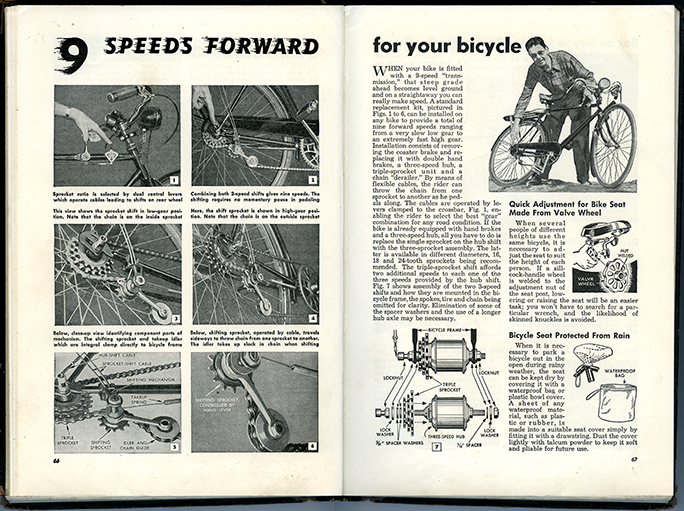
One of the most intriguing projects reported in the pages of that book was about a bike with nine gears. All of my friends rode one-speed bikes in the 1950s, and the idea of multiple gears was really exciting. My sister’s bike had three speeds, changed with a Sturmey-Archer internal planetary gear box in the rear hub (that was the cat’s meow!).

Boy Mechanic article

…and this is the article that I read many times about a three-speed derailleur that had been added to a 3-speed planetary gear bicycle. Wow! Nine speeds! You couldn’t go any faster than that!
Over the years I got nicer and nicer bicycles including the finest one I ever had (1970) which was a Raleigh Professional, with Reynolds tubing, all Campagnolo Nuovo Record equipment on it, and skinny racing tires that went flat too often, so I changed from sew-up tires to tube tires, lowering the status of my “racing bike” to the level of “road bike.” I rode that one for about two decades, and I still love it. It is now in the possession of my favorite son, Patrick, who took it apart, then rebuilt it as a fixed-gear bike, then took it apart again, which is where it sits today. Oh well.

My current bicycle is a wonderful commuter bike that was given to me by friends for my birthday in 2006. It’s a Specialized Globe, an all-aluminum bike with lightweight fenders, a chain guard, a built-in generator, headlight and taillight, and a nice cargo rack on the back with two panier bags. I ride this bicycle every day, and I love it. Since getting it, I have saved about $5,000 in Cal Poly parking permits, thousands of dollars in gas I never bought, and I have earned the right to call myself a bicycle commuter. I have riden about 8,000 miles give or take a few, and the bike continues to serve me well.

Faraday in office 02

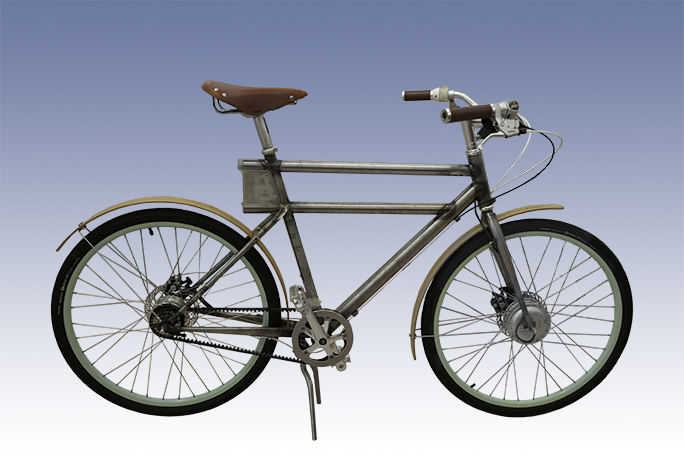
This is the prototype Faraday Porteur bicycle I rode last Wednesday. This one features a 350 watt electric motor on the front hub, dual disc brakes, lightweight bamboo fenders, and an eight-speed Shimano gearbox in the rear hub. Notice that it has not been painted yet (This was also the most difficult Photoshop drop-out mask I have ever drawn!). The batteries are hidden inside the down-tube; electronics are located below the seat post.

But, I have found a new love – the Faraday Bike. This bicycle is the brainchild of Adam Vollmer who designed it for a competition in Portland, Oregon, to create the perfect commuter bicycle. It is made of lightweight steel tubing, it looks like a retro French bicycle, and it has (insert the drum-roll here) an electric motor hidden in the front wheel.

The Faraday is an objet d’ bicycling art, sporting gorgeous lettering, handsome leather accents, an eight-speed internal gearshift by Shimano, dual disc brakes, and the motor.

But it’s not an electric bike, it’s an electric-assisted bike. In order to cause the motor to power the bicycle, you must pedal. If you stop, the motor does nothing. And, it’s designed to respond to your level of pedaling. The harder you work, the more it helps you.

Faraday Bike 06

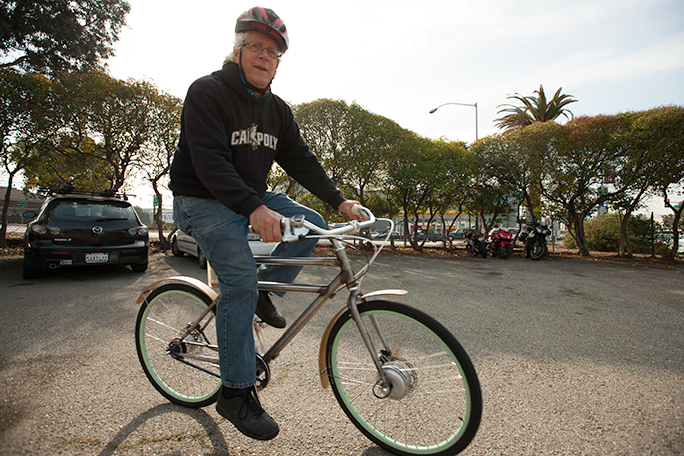
That’s me on the bike, riding in circles in the parking lot adjacent to Faraday’s headquarters in San Francisco. It was a beautiful day in San Francisco, and I enjoyed my test ride on the Faraday. Photo by Patrick Lawler

Vollmer’s company is headquartered in San Francisco, where bicycling is incredibly popular. It’s also the home of some of the steepest streets in the world, and that’s why the Faraday Bicycle is so smart in that city. He and a small corps of engineers have been tinkering on the design for several years, and I had a chance last Wednesday to take a test ride in San Francisco.

I signed the requisite legal release, put on my helmet, then headed out into traffic to see what this beautiful bicycle could do. I rode along Eighth Street, around the traffic circle, then headed up the steepest hill I could see – Kansas Street. That street is not so steep that it rates much more than being out of breath on a regular bicycle, but it was a great hill on which to try the Faraday. I shifted into a slightly low gear, I think it was 3, and pedaled up the hill. I was out of breath at the top, but it was much easier than riding my regular bike up a similar hill.

I then turned and rode back down, enjoying the feel of the disc brakes. My Globe has caliper brakes. Once I reached the bottom of the hill, I rode down one of San Francisco’s busy main streets, cruising at a comfortable 20 mph, and keeping up with traffic. I could feel the boost of the motor, but only slightly. I kept up with automobile traffic for several blocks, navigated back to the Faraday building, and returned the bike to its owners.

My ride was hard to describe. It wasn’t thrilling; it wasn’t like a rocket pack. It was much more subtle. I told the group at Faraday that it was like the invisible hand of Keynesian economics gently pushing me as I rode up the hill. I’m not sure that metaphor works for a bicycle, but it sounds sophisticated.

Faraday plans to make its first production run of these bicycles in early 2014. I’m on the waiting list. I am now figuring out how to pay for this beautiful two-wheeled wonder, and then where to put it. My wife and I live in a small house with no storage space. Something will have to go. Both will be a challenge!

Author’s note (February, 2017):
As you may know, the Specialized Globe bicycle mentioned in the story above was turned into a pretzel when I was hit by a pick-up truck on January 27, 2014. I spent the following six months recovering from a fractured pelvis while not riding a bicycle. In July of 2014 I bought a beautiful Celeste (blue-green color) Bianchi commuter bike. Then, a month later I took delivery of my own Faraday bicycle (serial number 35). I have been riding both bikes since then, and am absolutely in love with my Faraday! It’s the most beautiful and sophisticated bike I have ever owned. It’s nearly silent, and it’s like riding on a cloud – every day.

Posted in Adventures, Gadgets, New technology, Photoshop techniques | Tagged , , , , | 3 Comments

Resurrecting Ottmar Mergenthaler

Blognosticator Head

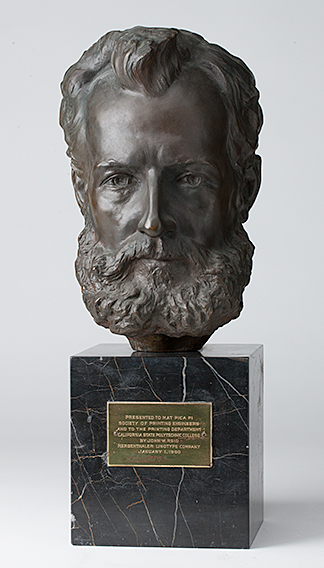
In 1960, John W. Reed, President of the Linotype Company, presented a bronze bust of Ottmar Mergenthaler to the students of Cal Poly’s Printing Department (now called Graphic Communication). The bust is about 2/3 life size, and is mounted on a 6.5 inch cube of black marble.

Original bust

This is the original bronze bust of Ottmar Mergenthaler, given to the students at Cal Poly in January, 1960.

During the last quarter our department has had the pleasure of having Professor Frank Romano as a visiting professor, working with our students in a class on publishing. This is the third time Mr. Romano has donated his time to our students. He has also been an influential contributor to the department’s efforts to expand our printing library and our collection of antique printing equipment.

Among his many interests, Mr. Romano has an encyclopedic knowledge of the Linotype Company and its various products. Frank has written extensively about Ottmar Mergenthaler and the company he built to make the famous Linotype machine that transformed the printing industry, transforming printed communication around the world.

To honor Frank, the faculty decided to present him with a duplicate of our bronze bust of Ottmar Mergenthaler. The job landed at my feet, and I took it through to completion. I began by finding a bronze foundry, one located in Paso Robles, California, just 40 miles away from my home. I took the original Mergenthaler bust to the foundry to show it to them, and get a quote on its replication. The company is Genesis Bronze, a supplier of fine art bronze statues of all sizes. Their work is extraordinary, and their craftsmanship is stunning.

Allen heats mold

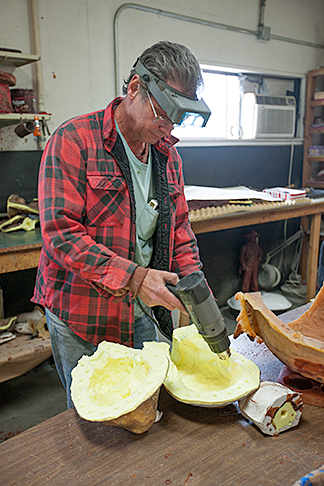
Allen Baxter, one of the craftsmen at Genesis Bronze, heats the latex mold of Ottmar Mergenthaler. Heating the mold allows the wax to flow more evenly inside it without leaving bubbles or voids.

We agreed on a price, and they agreed to carry out the casting in a mere 21 days, which is apparently less than the normal turn around for such a project.

My second task was to procure a block of marble just a bit larger than the original. This proved to be much more difficult than I had expected. I went to the local mortuary and asked about getting a block of marble. I was told that it could be done, but it would cost many hundreds of dollars and would take eight weeks. I didn’t have eight weeks. Apparently marble monument-making is not a local trade any longer; gravestones and monuments are made “somewhere else” and shipped to the local mortuary on completion.

Allen pours wax into mold

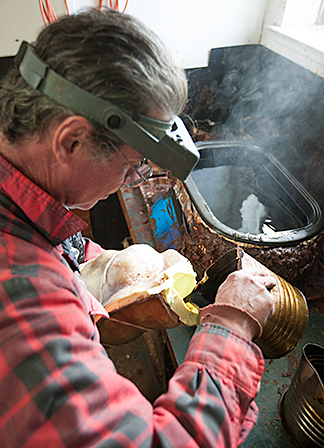
Here, Mr. Baxter pours molten wax into the latex mold. In the background is the cooker filled with wax for the process. The layer of wax is built in several steps using wax that is cooler and cooler to add thickness to the wax master.

I took my search to the Internet. I called every regional stone and marble company, and was met with almost universal responses: too much, and too long to produce. I had to search deeper. I tried searching for trophy parts, and was successful finding small blocks of marble and granite, but nothing as big as I needed – seven inches cubed. I finally tried sculptors’ suppliers, and I found a company in southern California that specializes in marble and granite for sculptors. That company is called Unique Marble and Iron in Chula Vista, California.

I contacted the company’s owner, Michael Zapata, and explained what I needed, and told him how quickly I wanted the block of stone. His response was, “If you need it in 21 days, I’d better get to work!”

Allen proud of wax

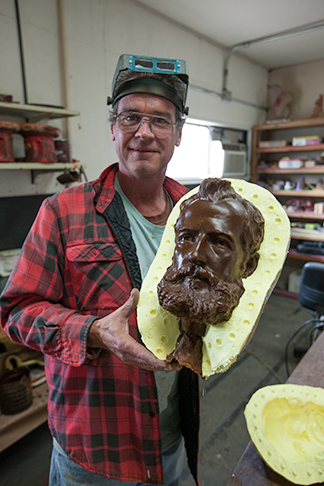
After the wax hardens, it becomes the master for the bronze casting. Here, Mr. Baxter proudly displays his work on the wax master, still in half of the latex mold.

In the weeks between then and now I went to Hong Kong for a week, returned, and taught a week of classes. Then I started to call and check on progress. At Genesis Bronze they had made the latex mold and the wax master, and had prepared the “lost wax” ceramic mold for the bronze. They were ready to pour. I called the marble dealer, and did not receive a response. The copper plaque on the front of the marble I ordered from Owosso Graphic Arts in Owosso, Michigan; that part was easy, and the package was waiting for me when I returned from Hong Kong.

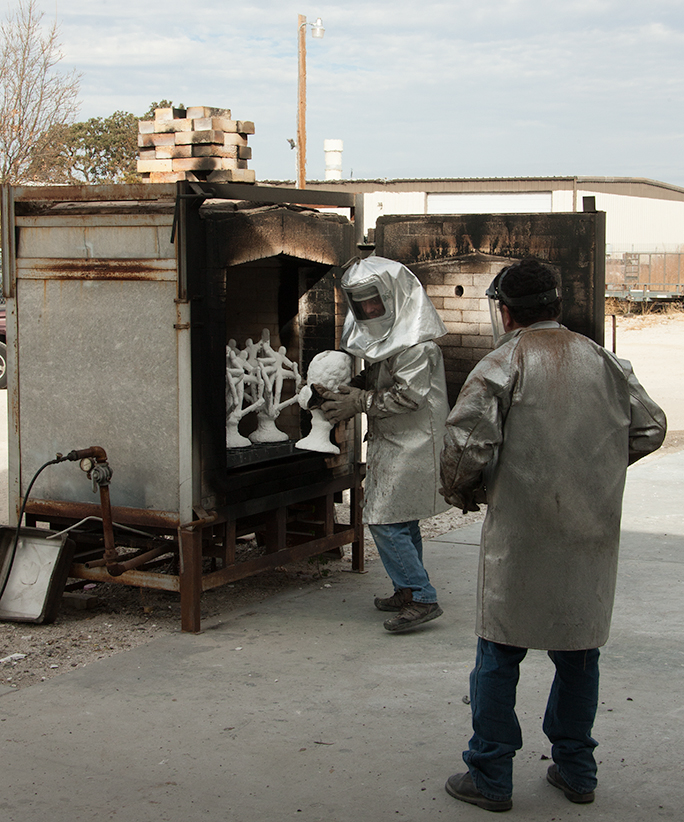
The bronze foundry invited me to come and watch the pouring of the bust, and that excited me. I grabbed my camera bag and hurried up to their shop, where the ceramic mold of Mergenthaler was sitting on the concrete skirt next the their kiln. A man in a fireproof suit was carefully moving molds of various projects into the kiln, where they were heated to about 1,400° F in advance of being filled with bronze. Nearby, the forge was being fired with pressurized air and natural gas to melt the bronze within.

Keith retrieves mold

Two other workers of Genesis Bronze, Keith and Alfonzo, retrieve the ceramic casting mold from the kiln, where it has been heated to about 1,400°F.

While the heating process proceded, I was invited into the shop to see how the wax is poured into a mold to make the wax master, which is an exact duplicate of the original sculpture. The mold is made of latex that is cast around the original object. A craftsman named Allen demonstrated on my mold how he gets the wax into the mold, sloshes it around to adhere to the latex, then repeats the process to create the wax master. This is precise and difficult work resulting in a wax object that is exactly the shape of the final bronze piece. He explained to me that the process is so precise that a fingerprint on the original will translate into a fingerprint on the final bronze object (one must avoid fingerprints!).

Keith and Alfonzo beaker

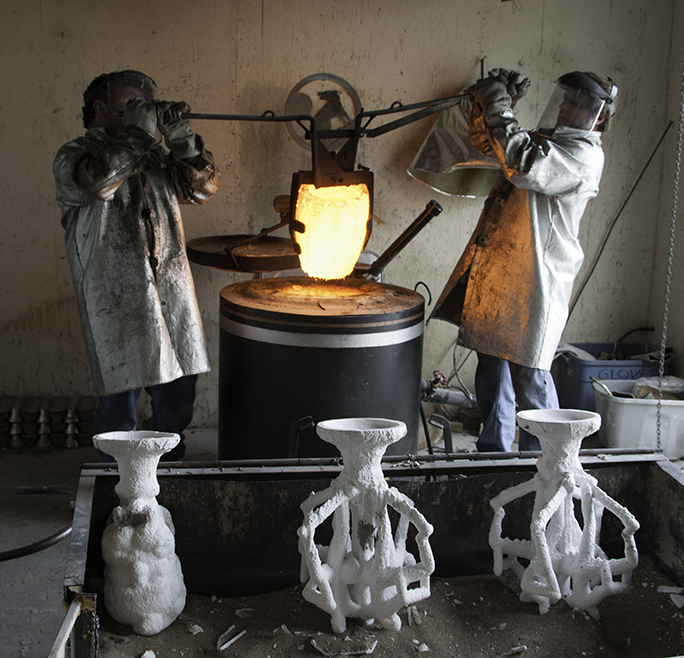
Here, Alfonzo and Keith lift the crucible from the forge, in preparation for pouring the molten bronze into the mold. Mergenthaler is on the left; other projects are on the right.

The wax master is the key part of the “lost wax” process. It is connected to a wooden pole and submerged in a slurry of silica which adheres to the outside of the wax. After this step, the wet silica is rolled in silica “sand” and the process is repeated until the silica forms a shell around the wax that is about one-half inch thick. This process is repeated on the inside of the wax master. A “riser” is built of wax that extends out of the silica shell, then small wax “sprues” come out of the silica to make a path for air to escape when the bronze is poured into the silica casting mold.

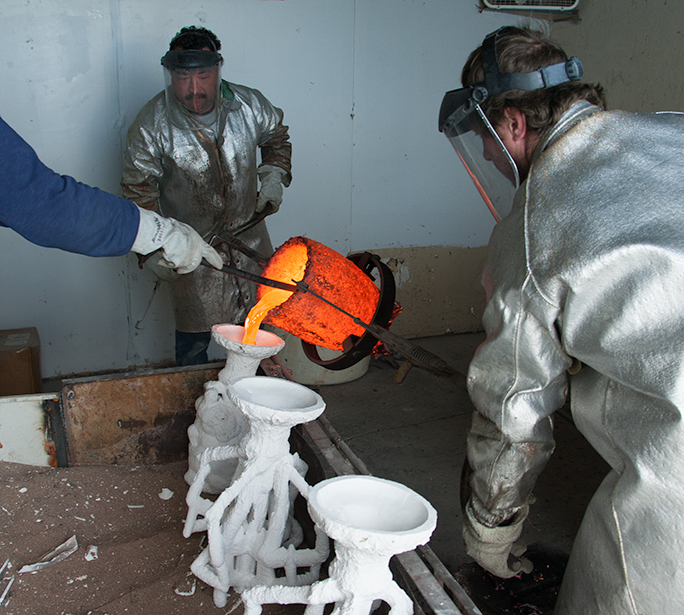
Keith and Alfonzo pour

The molten bronze fills the casting mold, filling the void left behind when the wax was burned out in the kiln. The process of pouring took only a few seconds.

The wax is still inside this mold representing the final casting. To remove the wax, the hardened silica casting mold is put into the kiln, and the wax is melted out, leaving a void inside the mold where the bronze will go.

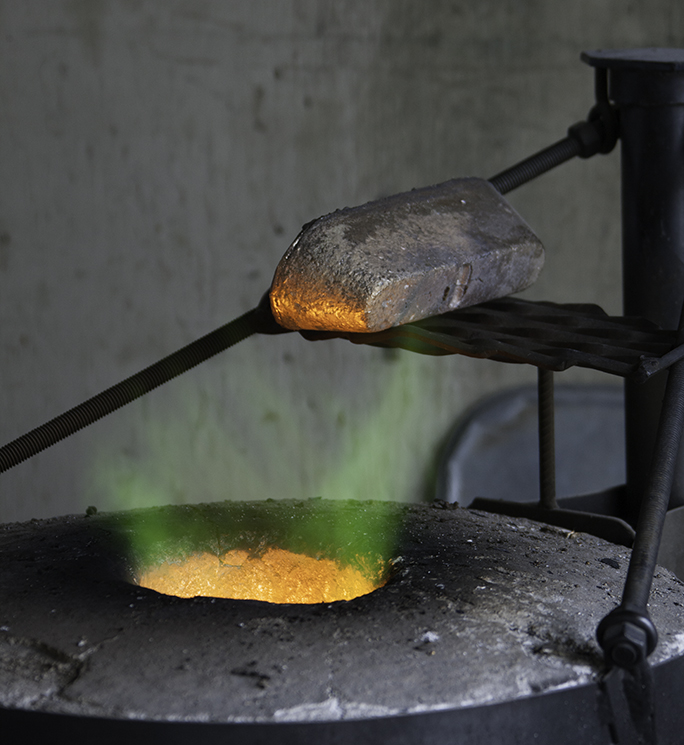
Once the wax is gone, that casting mold must be heated to about 1,400° F to make it ready for the molten bronze. Failure to do this can result in bubbles or the shattering of the mold when the hot liquid bronze hits the ceramic mold. Getting the casting mold to that temperature took about 45 minutes. Meanwhile, bars of bronze had been placed in the crucible in the forge, and were being heated to melt the metal.

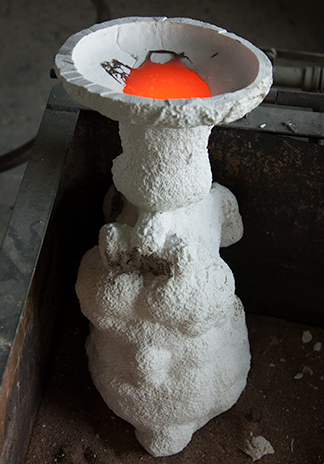
Red-hot bronze in mold

The bronze is red-hot in the top of the casting mold; it took about 30 minutes to cool to the point where the mold could be broken off of the casting.

Once the mold was at the right temperature, two men wearing silver suits removed the mold from the kiln, and transferred it to a box of sand in front of the forge. The mold was placed upside down so that the riser was upright.

Then in a process that took only seconds to complete, the two men removed the crucible from the forge, and lifted it with tongs, and poured the bronze into the casting mold. It was over before I was fully prepared to photograph the process. They moved along the line of molds, pouring bronze into each one. Then they replaced the crucible in the forge, and added another bar of raw material to the pot, and started the intense flame again.

Mergenthaler emerges

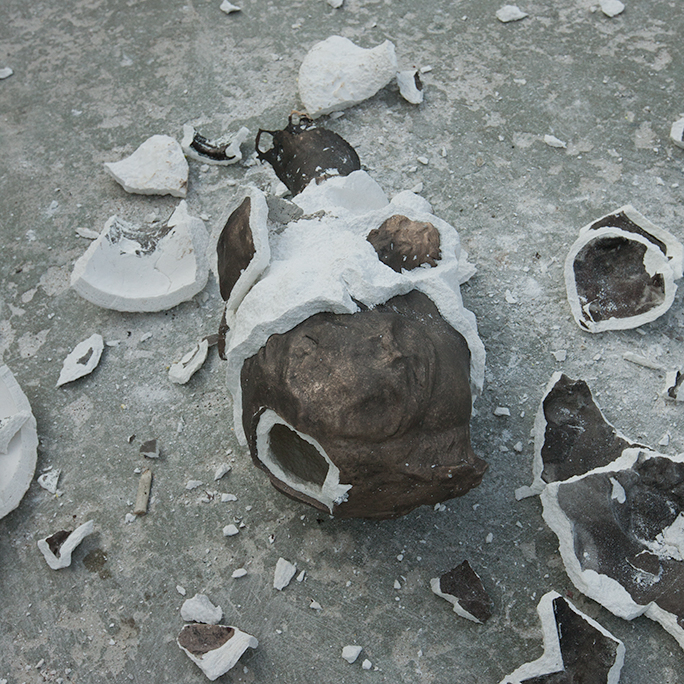
Mergenthaler’s bust on the ground as the casting mold was broken off. The hole in the top of his head was made to allow access to the internal surfaces. The missing piece was then welded-in to close up the top again.

Ottmar Mergenthaler’s riser glowed red-hot in the mold. Heat radiated from the mold that I could feel more than four feet from the sand box where he lay. I took photos, but kept my distance.

After about 30 minutes of cooling time, the mold was moved to the concrete skirt outside where the workers struck the ceramic mold with a hammer, causing it to crack and break off of the bronze, which was still very hot. They did this repeatedly until most of the casting mold was gone. Then they sprayed cold water on the broze to cause more of the ceramic to shatter off. Then one fellow picked up the bust, placed it on a table, and started working it with an air hammer to remove the remaining ceramic.

Melting forge

This is the top vent of the forge where the bronze bars are melted into liquid to pour various castings. The bar on top is being dehydrated for the next load.

In a matter of minutes I could see Mergenthaler’s handsome features emerge in bronze, an exact replica of the original sculpture.

I left that day to allow them time to finish the work, and I returned to pick it up a couple of days later. It is a stunning piece of work, and as promised, an exact replica of the statue we took in a few weeks earlier.

New bust

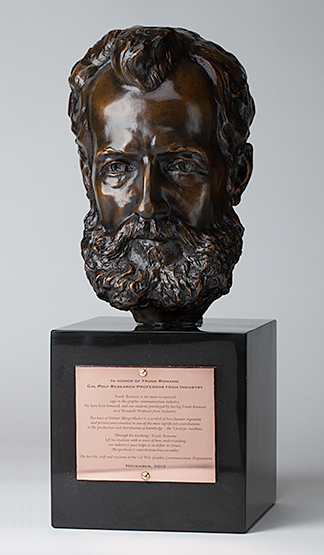
This is the new bronze bust of Ottmar Mergenthaler, mounted on the beautiful block of black marble, and with the plaque affixed. It is truly a work of art.

On Friday evening at about 6:30 the UPS man delivered the most beautiful block of black marble to my doorstep. I now had all the parts to complete the project.

Over the weekend, I attached the bust to the marble base, attached the plaque to the front, and polished it up for presentation.

And, tonight the faculty got together to honor Frank, and to present him with his very own statue of Ottmar Mergenthaler. He was thrilled.

Posted in Art, People, Typography | Tagged , , , , , , | 3 Comments