

I’ve mentioned in a few of my recent blogs that I am preparing a photographic exhibition at the San Luis Obispo Museum of Art that opens on February 14, 2014. I’m in the thick of preparation now, making prints, mounting prints, taking the final photos for inclusion, etc.
My garage is filled with huge sheets of self-adhesive foam core, my office is lined with boxes of Epson Premium Glossy Photo Paper, Premium Luster, and three complete sets of ink cartridges that I have stockpiled for the coming flood of output.

The show features my panoramic photographs, and my headline photo is a huge panoramic print of San Luis Obispo that will be mounted on the long wall at the Museum. That photo will be 58 feet, 7 inches in length, and ten feet tall. I’m printing the photo on my Epson 9600 wide format ink-jet printer on Epson Premium Glossy Photo Paper.
Earlier this year I made a test print of my big photo on Epson Premium Luster paper, and I gave that print to John Kleek, the wallpaper specialist who will be putting the photo onto the wall. He tested my print, and while he was adhering the print in a test, the ink started running. It turns out that water-based wallpaper paste soaks right through Luster paper, making a mess of the image. Mr. Kleek was also concerned with the thickness of the Luster paper (260 gsm), which was causing him difficulty in mounting the print to the wall.
I changed to the thinner Epson Premium Glossy Photo paper, which is about half as thick (170 gsm). The problem of water-solubility I solved by laminating the photo paper with a very thin heat-set laminate film, which seals the image side of the paper, which stopped the ink from running. In a second test, Mr. Kleek was successful in getting the Epson Premium Glossy Photo paper to adhere to his test wall.
That print, totaling 580 sq. feet, I am printing as 17 sections, each printed on the 9600 printer as a strip 44 inches wide and 10 feet tall. My friend Doug is laminating the prints for me on his laminating machine, and he prefers long rolls to many short rolls. So, I am printing five of these sections at once, making a roll of printing over 50 feet in length with a small gap between the individual sections.
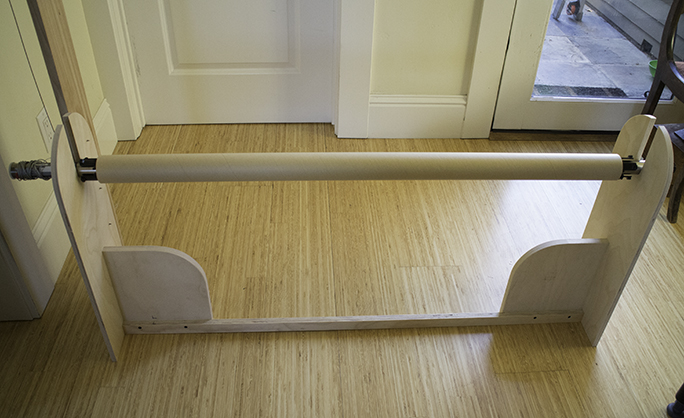
This is my take-up reel assembly. On the left-rear is a post which holds pulleys and the counterweight system. The spindle is an extra one that is from an older Epson ink-jet printer I used to have in the office.
For that I needed a take-up reel for my Epson printer, so I made one in my wood shop. It consists of an extra Epson steel spindle that sits in twi cradle pieces mounted on a crossbar. I made no attempt at making a bearing surface; the spindle turns against the wood, which works fine. To roll up the paper as it comes out of the printer, I needed some form of motive power on the spindle. I considered an electric motor with a gear housing and a microswitch, but that was getting awfully complicated. Instead, I bought two pulleys at the local hardware store and fashioned a motor of sorts that uses a stack of steel weights on a thin cable wound around the spindle. As the paper comes out of the printer, the roll takes-up the paper, and the weights get slightly closer to the floor.
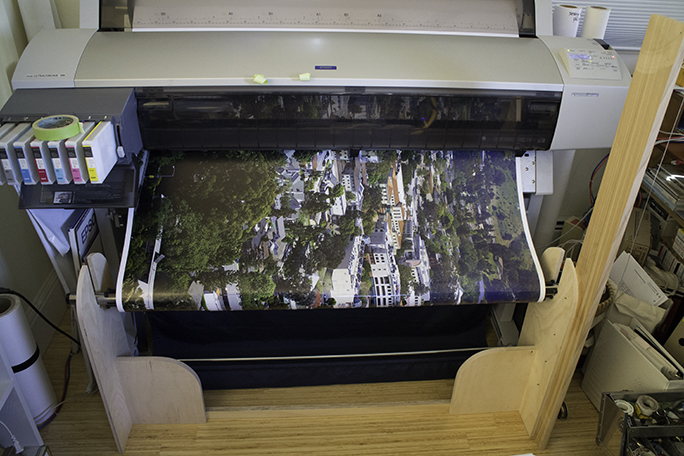
This is my first section of my huge photo mural being printed, then rolled-up on my take-up reel. It’s a simple device, and it’s working well. I will be running 170 linear feet of 44-inch paper through the printer in the coming days.
I’m running the first big print now, and the system is working well. I plan to start a second section before I go to sleep, so I will have to wind my cable to the top before I start counting sheep.
I used malleable steel washers as my weights. Each one weighs about a quarter-pound, and has a keyhole in the center. I can thread any number of these weights on the end of the cable by slipping a bolt swaged to the end of the cable through the keyholes. I have added seven of these big washers so far, and it seems to be working fine.
To attach the end of the cable to the spindle, I drilled a small hole, and tapped a 6-32 thread into the hole. Then I attached an electrical lug to the end of the cable, screwed that to the spindle, and that provides a solid termination to the cable. This combination of low-tech hardware provides me with a simple solution to winding up a long roll of ink-jet printing. My costs? I have spent about $30 so far, the wood is all scrap, and labor is cheap too.