
Planning and preparation pay off

Blognosticator Head

How do you explain to students, children, associates, business partners – anyone – how important it is to plan?

I am a pretty good planner, and I was especially careful to plan my photo exhibition that opened last Friday at the San Luis Obispo Museum of Art.

I started 18 months ago with a written list of objectives, and then I expanded that to include details of how I would promote the event, invite guests, teach seminars, print photos, mount photos, order foam core, mount photos of foam core, and much much more. I followed the list line by line, checking it several times every day to ensure that I hadn’t missed any opportunities or deadlines. I used color to indicate the status of a topic: black for planned, green for a project begun, magenta for a project completed.
Print

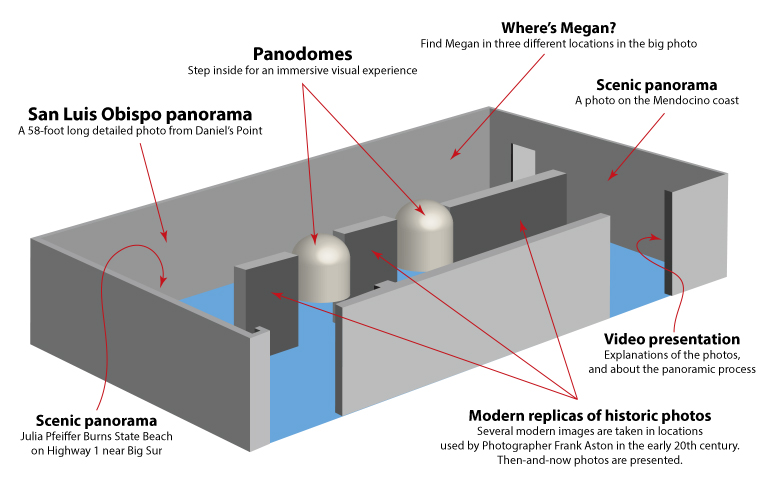
This is an illustration I drew to show the overview of my exhibition of panoramic images at the San Luis Obispo Museum of Art. This was draft 2 of that plan; the first one hadn’t left enough room for people to see the big photo.

Let me tell you about self-adhesive foam core. It can be purchased in stock sizes up to 4 x 8 feet, and it ships from Chicago. Arranging to purchase enough of it to make it worthwhile to ship here was a concern. I thought I needed only ten full size sheets, plus two cases of 40 x 60 inch, and two cases of 32 x 40 inch material. I ordered it all at once, and it arrived on a huge pallet in a big truck. I live in a small house on a one-way street, and needless to say, I don’t have a fork lift. I arranged to borrow a pick-up truck, and I drove it to the trucking company warehouse where the nice folks there helped me to cut the straps and load it off of the pallet and into the truck.

I used up all the big sheets, and because I spoiled two of the largest photos in the show, I needed to order another ten sheets of the same material. This time the pick-up wasn’t available, so I loaded it onto the roof of my station wagon, tied it down, then drove it home – very carefully.

Another challenge with foam core is humidity. Several years ago I ordered a case of 32 x 40 foam core from the same supplier in Chicago. It arrived, and I mounted photos on it. A few days later, those photos bent into arcs which were impossible to flatten. It seems that the humidity on one end of the journey was different enough from the other end of the journey that the moisture escaped, but was trapped on the adhesive side. It wasn’t a disaster, but I did learn a lesson – let the foam core acclimate before applying a photo to it.
Print

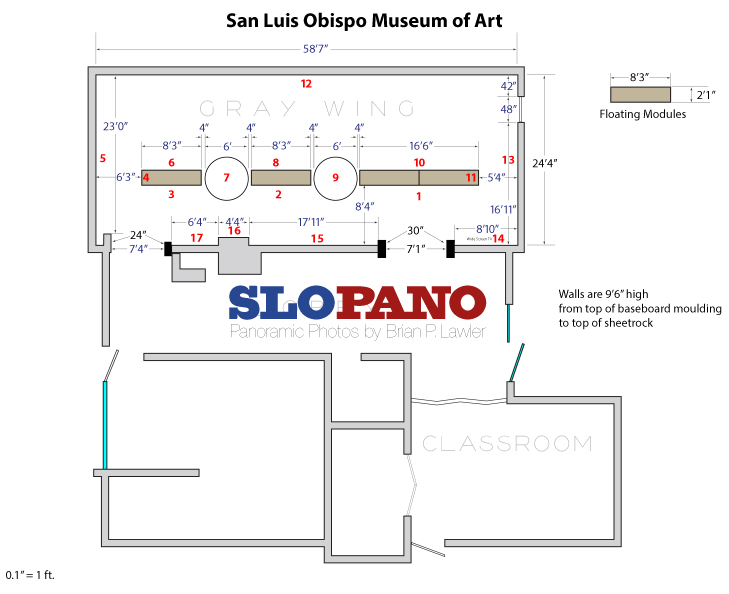
This was my precise floor plan of the museum. I went to the museum twice with tape measure and clipboard in hand to get the measurements, and then I went back to double-check my work. This paid off, because everything fit exactly as I had planned.

I worked with various suppliers to have enough paper and ink on-hand to make all the prints I needed. I never ran out (except once when I ran out of paper for a day due to a shipping error). There were nights when I was printing my huge 58-foot long panorama when I changed ink cartridges in my Epson 9600 two or three times. I always had extras on the shelf. There was just too much to lose if anything went wrong to take chances, so I ordered extra ink and paper.

I knew when the photos had to be moved from my home to the museum, and I knew when the Panodomes needed to be finished. It all had to come together at the same time, and there was little room for error (none for the largest prints because I didn’t have time to reprint those).
Print

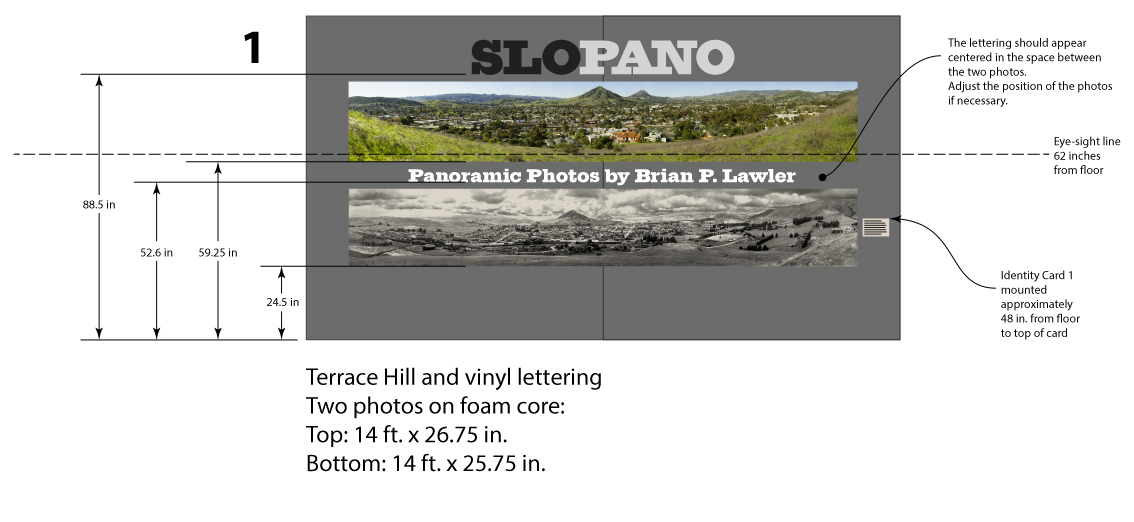
This is one wall of the museum from my scale model. It includes sight-lines, dimensions, and scale illustrations of each item I wanted on the wall, exactly as I wanted it placed.

I printed a large exhibition catalog and poster, and ordered cardboard tubes for the posters. A pallet of printing showed up in a big truck, and the driver kindly cut the straps and unloaded the pallet from his truck to my driveway. I moved all of it inside that evening. Floor space was at a premium in my living room. The downstairs bedroom was filled with boxes of folded catalogs and huge sheets of foam core.

With just 15 days left before moving day, I packed my saddle bags on my bike with cameras and tripod and strobe flash equipment, and I pulled on my jacket, and put on my gloves, and checked my helmet, and rode off to school. The day was to be filled with event photography of International Printing Week, and I am the “official” photographer for that event.
People look at big pano 06

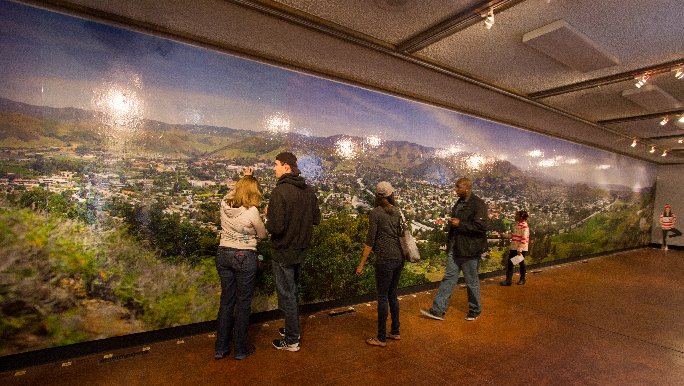
This is the big photo – 58 feet, 7 inches in width – across the long wall of the museum. In this photo you see people examining the detailed photo and looking for their homes, offices, schools – and three images of Megan (she’s over on the right).

About a mile from my home, as I rode through a busy intersection in the bicycle lane, I was struck from the side by a pick-up truck. Moments later I was on the ground, fully aware that I had been severely injured by the collision. I froze. All sorts of crazy thoughts went through my head: how would I get the photos out of the house? Was my back broken? Could I still open the exhibition on time? Could I move my toes? What was that pain in my right hip? It was fascinating, and very frightening.

I heard sirens, and I knew they were coming for me.

That event changed everything. I spent three days in the hospital, then three days in a friend’s home, then four days on the first floor of my home (I couldn’t get up or down stairs). Eventually I made it upstairs by sitting on one stair, and scooting my butt to the next stair, and so on. Standing with a walker on either end was stunningly painful, but I managed. A friend of a friend I didn’t even know brought a ramp to my house and installed it at my kitchen door. That ramp allowed me to shuffle up and down from the driveway so I could get to my physical therapy sessions.

I was getting a little bit better every day. And, the show deadline was fast approaching.

I had organized a team of volunteer helpers to get the photos out of my house and to the museum, and had concocted a scheme to hand-carry the photos to the museum because there was no truck readily available of a size to transport them to the museum. That scheme turned out to be folly because it was raining just two days before the move date. Rain would ruin anything it touched, and I couldn’t risk that, so the museum rented a 16-foot truck for the transport.

It didn’t rain on moving day.

My friend Catherine Trujillo came over one day and announced that she would simply take over the event – lock, stock, foam core and barrel. And she did a spectacular job of it. Though I still had some minor responsibilities, the exhibition shifted from being entirely on my shoulders to being entirely on her shoulders. She ran, she planned, she organized the teams and the truck and the deadlines, and everything worked.
Visitors look at Camp SLO 01

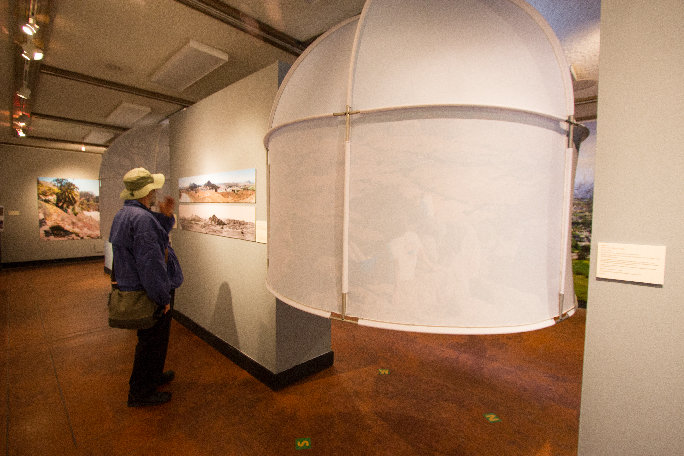
In this photo you see a couple studying the two photos of Camp San Luis Obispo on the wall. To their right is one of my Panodomes, containing a spherical image taken from the top of 1,559-foot Bishop Peak on the edge of the city. People stand inside the domes to enjoy the view from the top of the mountain, or the image of an oak forest.

Mounting the photos on the museum walls was taken over by the museum staff who worked from my detailed drawings. These came from a scale model I made last fall, and from the floor plan I made last summer. Though I was not able to help, I showed up in a wheelchair and I observed their work. It was expertly done!

On opening night I got dressed in my new suit (purchased in Hong Kong, and described in another blog), and my wife delivered me in my wheelchair to the gallery of the museum. The crowds gathered, I made my introductory comments, and we had a successful launch. It was more successful than I would ever have imagined.

This allowed me to put the sound of sirens behind me and enjoy the excitement of seeing my panoramic photos printed on huge sheets of foam core, mounted on the walls of the museum.

It all came off as planned.

Except for the unplanned part, and despite that, it still came off as planned because I had a plan.
 

Posted in Art, History, Panoramic Photography, People, Photography, Printing and Printing Processes | Tagged , , , , | 2 Comments

My alma matercopter

Blognosticator Head

I was visiting the Warbirds museum at the Paso Robles Airport early last month with my friend Jim. This museum has a collection of old airplanes, trucks, and other items related to the military from the 20th century. It’s an all-volunteer organization.

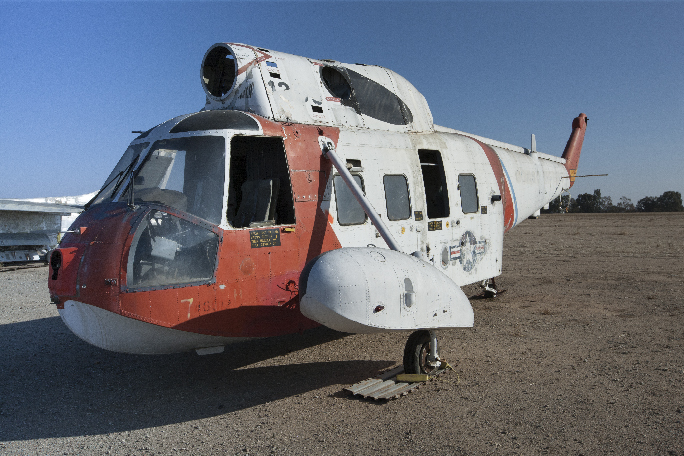
As we got out of Jim’s car and I started to look around, I noticed the hulk of a Coast Guard helicopter that looked familiar to me. I once served in such a machine, as a photographer while I was in the U.S. Coast Guard Reserve. It was interesting seeing one again. I walked over toward it, and I took a couple of photos.

USCG Helicopter 1395

There were some men and women standing by the nose of the helicopter talking about it, discussing the fact that this model featured a boat-shaped hull at the base of the fuselage. Yes, I said, they could float in water, but it was the last thing on Earth a Coast Guard pilot would do with his craft. If they ever went into the water (I never saw that happen) they would have to be completely overhauled before being put back into service.

I walked around the right side, and read on side by the sliding door SAN FRANCISCO. What a coincidence! This was not just any Coast Guard helicopter; this was one of two machines I served in as an enlisted man in that service! I once sat in that open door, shooting photos of waterfront facilities on the San Francisco Bay, listening to the pilots talk to air traffic controllers and to each other.

Almost all the photos I took from this helicopter and her sister ship were turned over to the Coast Guard when I landed after each mission, so I don’t have much “evidence” of my service in these wonderful craft. But, I do have a strip of six frames of Tri-X black and white film that I somehow took with me one day in 1973.

These frames are not related to the shoreside documentation project. Instead they document a rescue we performed while we were out that day when a private pilot made an emergency landing on a beach near Pescadero, California. The Coast Guard was alerted by the Highway Patrol, and since we were already aloft, working along the Bay on the south of San Francisco Airport, we diverted to Pescadero and landed on the beach to investigate the problem.

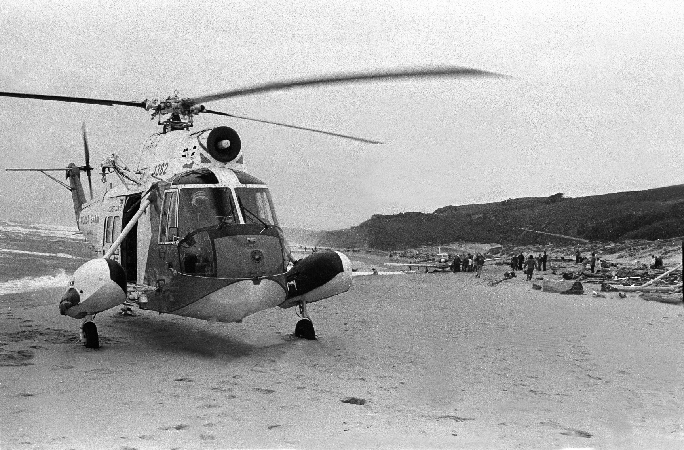
USCG Helo at Pescadero

This was our Coast Guard helicopter on the beach at Pescadero, California. In the background you can see the small plane also on the beach, surrounded by people who came out to see what was happening. The pilot of our helicopter never shut down the engine, leaving the rotors turning the entire time we were on the beach. This was a routine measure to prevent a problem starting the engine with onboard batteries.

The emergency landing was forced by a problem that occurs occasionally in small planes – the pilot ran out of fuel. He had claimed engine failure on the radio, but when we arrived, the man was begging for some aviation gas so he could take off and fly back home. Probably not engine failure!

The Coast Guard did not routinely carry AvGas. Sikorskis run on Jet A, which is similar to kerosine and diesel fuel. A second Coast Guard helicopter was summoned with five gallons of AvGas, and it arrived shortly after we did. Soon, the pilot of the small plane was making efforts to have people push his aircraft to the hard-packed sand to attempt a take-off from the beach.

The copilot of my helicopter walked over to talk the pilot out of this folly, suggesting instead that he have the plane towed across the sand to the nearby paved highway, and attempt the take off from there.

At that point, both Coast Guard helicopters returned to our regular duties, all of us wondering how the event on the beach would end. I never read about it in the newspaper, so I must assume that the careless pilot must have successfully gotten his plane to the road, or perhaps he had it disassembled and trucked back to his home airport. That would have been the sensible thing to do.

It was fun to see “my” old helicopter. It made me slightly nostalgic, and I confess to being rather surprised at how primitive it looks compared to the sleek Jay Hawk helicopters used by the Coast Guard today. This was a trusty machine, and it served us well. It’s nice to know it now lives in my county.


Posted in Adventures, History | Tagged , , , , , | Leave a comment

The largest panoramic photo in city history

Blognosticator Head

SLO PANO opens on Friday evening.

Almost a year ago I finally found the best location for taking a photo of San Luis Obispo. I had been climbing the local mountains seeking the perfect spot. I scoured available historic photos to see what other photographers had done. Three times I hiked up the side of Cerro San Luis Obispo, making GigaPan images. The view from that mountain is really hard to beat.

The other problem I had was a lack of rain. We have been suffering from a drought for several years here, and what little green we had last spring wouldn’t last. I knew I had to get the photo as soon as possible or the mountains would turn golden brown. But the green is so much nicer, I wanted to get the photo with green hills in the background.

John Cleek mounts pano

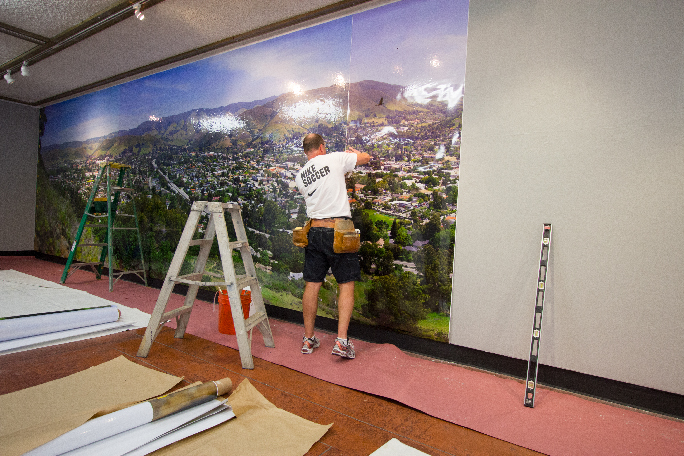
Wallpaper genius John Cleek puts up a panel in my photo entitled Daniel’s Point. He’s working on panel 8 here (out of 17). He would finish the next day.

Finally, on April 13th, the magical combination of clear skies, green grass, and the availability of my friend Megan occurred. I loaded my GigaPan onto my back pack, grabbed two charged batteries for the camera, assembled my gear and hiked up the side of the mountain to my secret spot. I was ready!

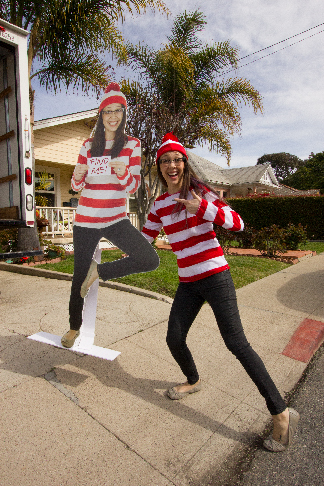
Megan’s part in the operation was to appear in the photo. I purchased a Wenda costume from the Where’s Waldo web site (Wenda is Waldo’s girlfriend), and I gave that to Megan. On this day she rode her bicycle to the first spot we had agreed on, and stood there until the GigaPan swept past. “Sweeping” is an exaggeration here, as the GigaPan doesn’t go very fast. I needed over 1,500 photos to complete this image, and it was going to take more than an hour to get them. I think the count of images in each row was 95.

Megan with Megan

Here is Megan holding Megan. The stand-up foam core version of her will be in the corner of the museum inviting patrons to find her in the big photo.

After the first image with Megan in it, she moved to the second location and I captured her there. But the third location was problematic because it was in the same horizontal row as the second. Megan pedaled across town to the third location while I paused the GigaPan in anticipation of her arrival. When she got there I started it again, and got her in the final location. Then she went home and I kept shooting for another 45 minutes.

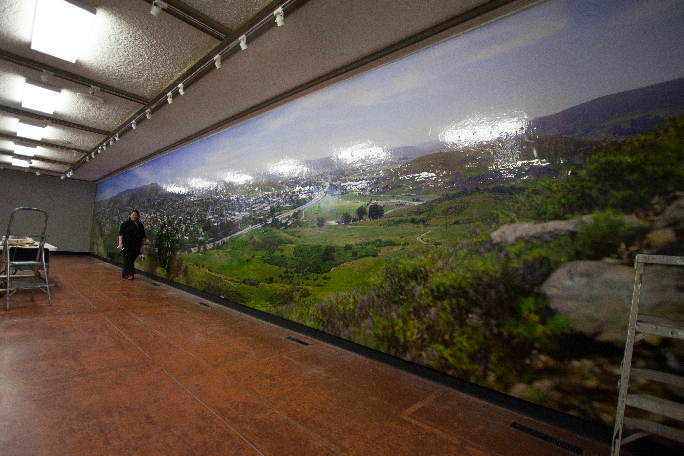
This image turned out well. It is my signature photo for the exhibition, and it appears on the long wall at the San Luis Obispo Museum of Art 58 feet 7 inches long. It’s ten feet tall. I printed this image in 17 vertical sections, each 44 inches wide. If you look back into my December blogs you will see several dealing with the large file limitations of Photoshop and of the Epson printer. You will also see how I solved the problem by purchasing a commercial driver for the Epson printer that overrules all limitations (that product is called Mirage).

When the 17 panels were printed, I had them laminated with a very thin polyethylene gloss laminate material. This was to prevent the ink from being dissolved by the water-based wallpaper paste used to mount the images on the wall.

On Tuesday morning, my friend John Cleek arrived with his associate Rob to do the installation. He had spent part of Monday coating the wall with a lacquer-based paint that acts as a resist to the water-based adhesive. This will allow us to remove the photo at the end of March when the show is over.

John and Rob slowly and methodically coated each of the panels, then applied them to the wall. I stopped by a couple of times to check on their progress. By Wednesday afternoon the photo was fully installed, and it’s really, really large!

Removing photos from house

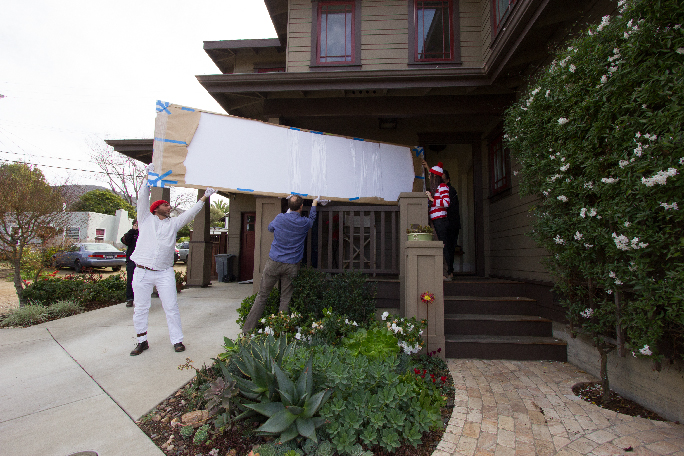
Several of the 14-foot photos emerge from my front door and out over the bannister. From there they were loaded into a box truck for the short trip to the museum.

On Tuesday morning a team of friends arrived at my house to help me get the photos out of the house. I had been printing and mounting them since November, and I had filled the living and dining rooms completely with photos. Several of these are 14 feet long, others only six. What part of the room was not occupied by my huge photos was taken by the printed poster and catalog I had printed for the exhibition. My wife and I spared two spots at the table where we could have breakfast.

I confess it had never occurred to me how to get the prints out of the house. It just wasn’t on my list. I was completely absorbed by printing and mounting. Transport? What transport? Fortunately my team of volunteer friends rallied and figured out a way out, over the bannister on the front landing, and out to the driveway. The group packed everything in foam core, wrapped it up in kraft paper, and built special foam core corner protectors to ensure that the fragile photos would not get dinged on their way out of the house, or into the museum.

Cate with Daniel's Point photo

This is my friend Cate standing next to the 58-foot Daniel’s Point panorama. It’s great to see it printed and installed. Prior to this, I had seen it on my computer display only; I have never attempted to print it before this.

A photographer from our local paper came over to document the move, which as a photo subject didn’t push the needle very far on the excitement scale. And, the museum provided a rental truck long enough to accommodate the long foam core mounted photos. I was out on the street, observing from my wheelchair. My dear friend Cate Trujillo had taken over responsibility for the show, and I was genuinely grateful for her help. In my condition I am in no condition to accomplish much, and moving the photos would have been very difficult for me to coordinate.

They loaded me and my wheelchair into a car and we drove the dozen blocks to the museum. By the time we got there, and got me out, the photos were all inside the building. There was hardly anything left for me to do. The mounting of the images is being handled by the museum staff.

Brian outside Museum

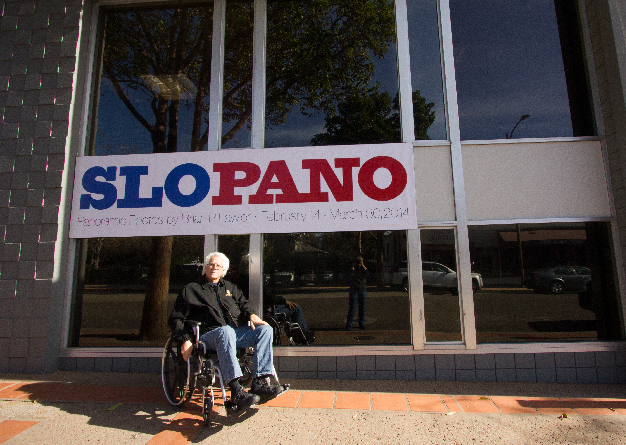
…and here I am outside the museum by the sign advertising my exhibition. It has been 18 months in the making. I’m excited about the opening; I doubt that I’ll sleep much tonight.

And, as I wrote in yesterday’s blog, the panodomes were assembled and installed with special steel brackets that attach them to pairs of ceiling beams in the building.

I am quite confident that my 58-foot photo is the largest in the history of the city, and I am even more certain that the Panodomes are the first anywhere. The whole exhibition is coming together nicely. I just hope that they have really good cheese and crackers at the reception tomorrow evening!


Posted in Adventures, Panoramic Photography, Photography, Photoshop techniques, Printing and Printing Processes | Tagged , , , , , | Leave a comment

SLO PANO opens tomorrow

I’m slowly recovering from my bicycle mishap with a pick-up truck. I go to physical therapy three days each week, and I have graduated from a walker to crutches. Here is the latest on my work to open a panoramic photo exhibition at the local Museum of Art:

In one of the last scenes of The Princess Bride, Inigo Montoya and Wesley are framed in the window of Prince Humperdinck’s castle, about to leap to freedom. Inigo looks at Wesley and says, “I’ve been in the revenge business so long I don’t know what to do next.”

And Wesley replies, “Have you considered piracy?”

Yesterday I found myself thinking something similar while looking at my 58-foot panoramic photo in San Luis Obispo’s Museum of Art. I’ve been in the panoramic photo business so long I don’t know what to do next.

SLO PANO Title lettering

The exhibition opens tomorrow, Friday, February 14, at 6:00 p.m.

It was on a windy Saturday in August, 2012 that I made my first sketch of this event. Within a week I was pitching my proposal using my iPad to the museum staff. It would be a show of panoramic photos, with fencing, murder, capture by pirates, and even a photo or two. My proposal was accepted, and I was told that the museum had a full calendar for nearly two years – they would let me know.

Panotube sketch

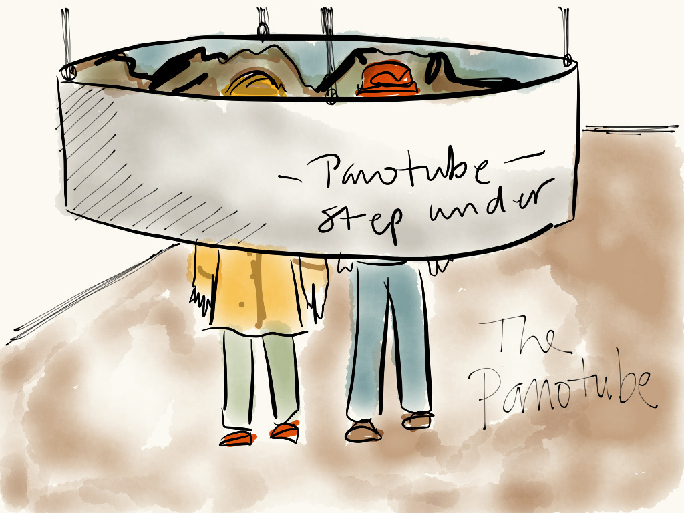
This was my iPad sketch of the Panotube, a cylinder inside of which an image would be printed. The tube evolved into a dome, and the photo evolved from a cylinder evolved into a spherical panorama printed inside a hemisphere.

Within weeks my exhibition was on that calendar, a mere 17 months in the future. So I started assembling the photos to exhibit, and I started taking new photos to include in the exhibit. I made a Master Plan, and I added everything to that plan that I could imagine: whom to invite, when to do publicity, when to get a banner printed, what color the walls should be, and much more.

At first the collection was all pixels in folders. I climbed the local mountains with my camera and my GigaPan rig. I scoured the collection at our local History Center, looking for historic images that I could replicate. I talked quietly among history buff friends to learn of the existence of old photos. I had seen a few here and there, and I knew that I could locate them if I kept at it.

In June of 2013 I began in earnest to gather the photos and other materials that would be in the exhibition. My Master Plan began changing color from black (planned) to green (completed but not mounted) to magenta (completely ready). I wrote copy, I designed a logo for the exhibition. I had bookmarks printed with the dates, and started handing them out. I was shameless! When I was in the hospital three weeks ago, I handed these bookmarks out to the nurses and X-ray technicians who were hustling me around the building. I didn’t hand any out in the ambulance, but I assure you it was only because I didn’t have them with me.

Last year I began work on a component of the show that I had originally conceived as a cylinder suspended from the ceiling. These cylinders would have panoramic photos printed on the inside. Though I had seen one permanent installation of a panorama inside a cylindrical structure, I had never seen one like those I envisioned. These would be soft panoramas, printed on Spandex fabric and suspended inside a tensile structure of tent poles. I drew sketches and dimensions, and I made a paper mock-up of such a photo.

Cut Lycra sheets on floor

This was the Spandex fabric for the prototype Panodome laid on the floor so we could figure out which panel was sewn to what other panel.

The Panodome idea was born. I had taken a spherical panoramic photo earlier in the year at Montgomery Woods in Mendocino County. That image started at the sky and continued to the Bracken ferns at my feet. How cool would it be to transform the cylinder into a hemisphere with a spherical panorama printed on the inside? This had to be the solution to a problem no one had ever had before.

At an event called Pecha Kucha, held last April, we had a speaker who made a presentation about his career designing tents and backpacks for North Face, among others. This was my new best friend! I introduced myself, and soon he and I were in the early stages of making a prototype of my immersive domes.

By last June I had the first photo for the Panodome figured out. It is an interesting concatenation of a cylinder with a Mercator-projected cap. I carefully calculated how to get a panorama to behave like a globe, I studied Mercator projections, and I designed a template in Adobe Illustrator that would fit both the required format and my panoramic photos.

John marking tubes

John Cutter in his laboratory. This is a wonderful environment where tents, bicycles and back packs are designed and built. Our Panodome project was the perfect fit for our combined talents and interests.

The tent designer is John Cutter, and we have a lot in common. We’re both bicyclists, both love to build things, both interested in Mercedes Sprinter trucks, and many other common topics which we discussed while we were cutting, bending, pinning and serging (a special sewing technique). I leaned on my friends at Voler, a maker of Lycra Spandex athletic clothing in Grover Beach, California. They have the technology for making dye-sublimation prints on Spandex, and I engaged them to make the first prototype dome. It probably didn’t make much sense to the workers at Voler to see these huge panels of trees and blue sky coming out of their machines last summer.

Meanwhile, I continued to gather and prepare to print the rest of the images in the exhibition. I built a precise scale model of the building and populated it with foam core walls. I made 1:24 scale miniature photos of my panoramas and glued it all together to get an idea how the exhibition would look. On several occasions you would have seen me crawling on the floor of the museum pushing a long yellow measuring tape between two surfaces, scratching notes on my clipboard.

The largest of the photos would be 16 feet long, and about six feet tall. Several others would be 14 feet long, a few more would be about 13 feet long. I had to develop a method for splicing foam core together to accommodate a 14-foot print. I ordered and received a pallet of 4 x 8 foot self-adhesive foam core. It arrived by truck one day. The driver didn’t know he was delivering to a residential address. Without a fork lift we couldn’t unload the material, so he took it to his company’s loading dock and I picked it up later with a borrowed pick-up truck.

In November, working to my grand plan, I began to print the images for the show, ticking them off the list as I went along. I printed all the 60 and 72-inch prints first because I could print and mount those by myself on our dining room table. After coming up with a solution for putting two (or three) sections of foam core together, I tried my hand at one of the 14-footers. The first was a complete success.

My living room started to be filled with these prints, and we lost the use of most of our downstairs living area while I made my exhibition.

John on serger

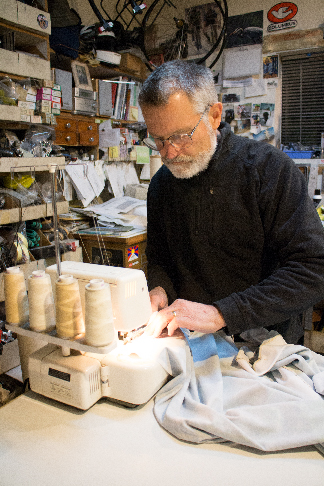
Here, John serges a seam into the prototype Panodome. The serger is a four-thread sewing machine that makes a stretch seam while simultaneously shearing the waste off the edge of that seam. These machines are used on all sorts of stretch fabrics, and they are handy because they don’t use bobbins.

Also in November, John Cutter and I finished the first Panodome, and we stood outside it and admired it. Then we climbed inside it and admired it. After a few adjustments, we modified our patterns, and I prepared the final two images for printing. These two were off to Voler in mid-December. On the fourth of January I picked up a long roll of printed fabric, brought it home, and began the process of cutting the Mercator shapes.

Panodome showing inside

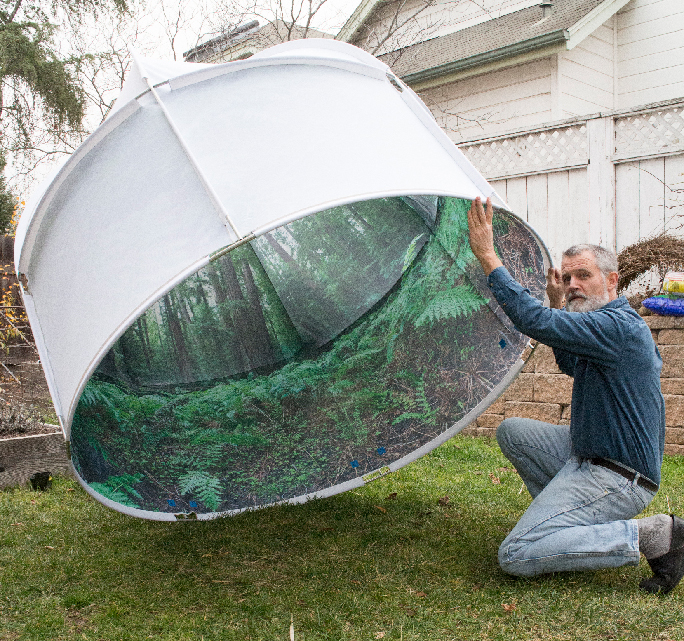
John Cutter with our completed prototype Panodome. A few small changes were made, then we began in earnest to complete the final two domes.

My living room filled. A pallet of catalogs and posters arrived from the printer. I filled our guest bedroom with boxes of printing. This was a room already bursting with 4 x 8 sheets of self-adhesive foam core standing on-end.

My wife and I were down to two places at the dining room table where we could eat. These rest of the house was taken up with photographs.

Everything was going according to plan when I was hit by a truck on my way to work at the university on my bicycle. Lying on the pavement, I thought about approaching sirens, my deadlines and my panodomes, and the excruciating pain coming from my mid-section. Was my hand broken? How would I get the 14-foot prints to the museum? I never lost consciousness, but I was worried that I might lose my mind.

But the show had to go on! I was hospitalized, so my dear friend and collaborator on many projects, Catherine Trujillo stepped forward and said, “I’ll take over the show. You just get better.” I agreed.

Feet in Panodome

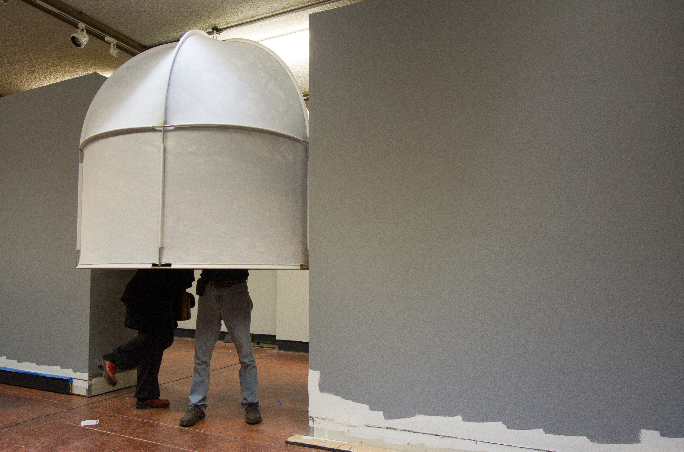
Just like the original sketch of the Panodomes, visitors’ feet are visible at the bottom of the dome at the Museum. This is one of the two final Panodomes in the exhibition. Images will be mounted on the adjacent walls today.

More on SLO PANO tomorrow!


Posted in Adventures, Art, New technology, Panoramic Photography, People, Photography, Photoshop techniques, Printing and Printing Processes | Tagged , , , , , , , | 10 Comments

A bit of pavement hugging

Blognosticator Head

Greetings, Blognosticator readers,

I was involved in a collision between me on my bicycle and a pick-up truck on Monday morning. I am now starting my healing and recovery. I made some new friends from the local Fire Department, I got to ride in an ambulance, and I got to see the inside of a CAT scanner several times.

I spent three days in the local hospital, was released to the care of friends who own a one-story home, and now am at least able to use a computer again.

I can type, but I can’t walk.

I’ll be working on that in the coming weeks and months.

And, expect more of my usual fare on the Blognosticator soon. I am doing my best to return to a “normal” life as soon as possible.

Best wishes to you all,

Brian

Posted in Adventures | 5 Comments

New Shaping Tool in Illustrator

Blognosticator Head

I’m on a roll here with the three newly improved tools in Adobe Illustrator. I like them all.

The last of the three is the Shaping Tool, which I have always known as the Modify Anchor Point tool. It is a tool I use often enough to know the keyboard command to get it – Shift-C. It’s useful for changing the direction of anchor points, to cause a tangent to abut a curve, and to make curves into angular tangents. It’s very helpful.

The new version of that tool is called the Shaping tool.

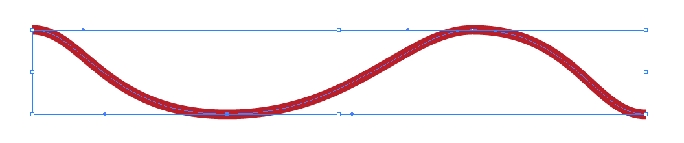
Ribbon before

Ribbon with anchor points

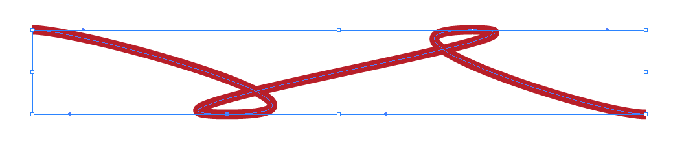
I used the Shaping tool on the path at the top, pulling the control handles in the opposite direction, thus making the curves double-back on themselves. Though this is not something I do often, it is occasionally valuable.

It does impressive things to components of illustrations. Choosing it (Shift-C) allows you to click on an existing line and turn it into a curve, with tangent anchor points automatically created at its corners.

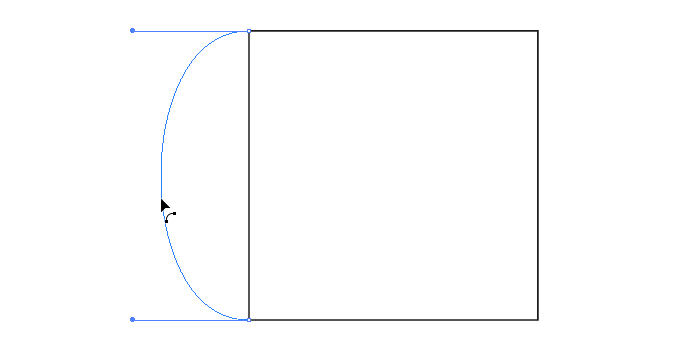
Shaping tool example

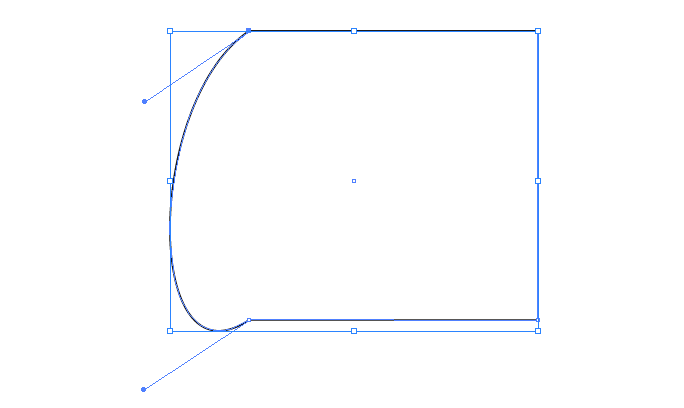
This is the effect of shift-dragging on the vertical line on the left of this rectangle. The line is converted to a curve. The shift key makes the two anchor point handles on the ends symmetrical.

The Shaping tool will also allow you to change or reverse an anchor point’s characteristics, reverse an anchor point’s handle (and thus the curve’s direction or angle-of-attack), or change a curve into an angular chamfer (or vice versa).

Chamfer illustration

In this illustration I changed the round corners into chamfers by clicking on each anchor point with the Shaping tool. This can also be accomplished now with the new Corners tool set to chamfer.

The Shaping tool, when applied to the tip of a control handle, allows the curve coming from that handle to be adjusted irrespective of its adjacent curve.

Ogee shapes

I modified the shape on the left to become the shape in the middle with the Shaping tool, then I modified the interior angles with the new Corners tool to round them to a 0.3 in. radius.

The new functionality of the Shaping tool changes straight lines into curved lines. Adding the shift key forces both control handles on those curves to be the same length, and thus making the curve symmetrical.

Toast Shape

Without the shift key, the Shaping tool allows me to drag the vertical line on the left, converting it to a curved line emanating from the straight lines it touches.

The Shaping tool can be accessed with the menu (with the pens), by using the keyboard combination Shift-C, or by adding the Option key when using the Pen tool.

It takes a bit of practice, but it’s a great new tool.

Posted in Art, New technology, Software | Tagged , , , | Leave a comment

Illustrator’s new pencil tool

Blognosticator Head

I wrote a few days back about using the new Corners tool in Illustrator, which is delightful. I draw a lot in Illustrator, and I enjoy this new feature because it allows each corner in a polygon to have a different corner radius. This also allows me to leave some anchor points as angular corners if I choose to.

Adobe claims that the new Pencil tool is “completely new.” It is, “completely.”

Cloud squiggle

This cartoonist’s cloud was about three seconds’ work with the new Pencil tool. The lines are smoothed, and the path closed automatically by the new tool, saving minutes of clean-up.

I use the pencil tool rarely because it’s so accurate that it makes jittery lines with even careful mouse or stylus movement. The Pencil tool, combined with the Smooth tool was a successful combination in previous versions of Illustrator because the Smooth tool took out that jittery quality.

The new Pencil tool combines the two into a much better drawing tool, one which allows for freehand illustration, but then adds the quality of a smoothed line. I have been experimenting with it, and I declare it a success. I’m impressed!

Pencil tool palette

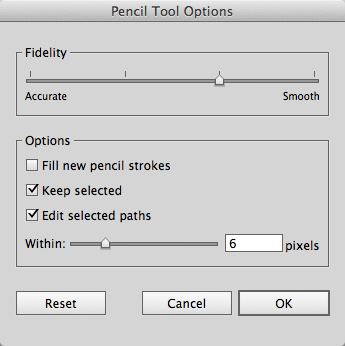
This is the new control palette for the Pencil. Across the top is the key slider.

Adobe has added a control panel to the Pencil tool, accessible by double-clicking on the tool icon. In that control panel is a slider that goes from Accurate to Smooth. By sliding the slider to the extreme left, it makes the Pencil tool behave as it always has. Sliding it the other way makes the tool into a serious participant in an illustration.

Here I drew a couple of squiggly lines using the extremes. Though they are very similar, the lower one benefits from the smoothing of the new Pencil settings. It’s subtle, but effective.

Horizontal squiggly lines

And here I used the new Pencil to draw some freehand spirals. The spiral on the left is drawn with the Accurate setting, and the spirals on the right are smoothed. I like the results a lot better in the smoothed version.

various spirals

These spirals show how nicely the new Pencil tool smoothes lines. In the third example you see my pencil drawing captured on the screen. The last example is that same spiral after the new Pencil tool smoothed it.

The new Pencil tool also behaves better at the end of a closed path. When you approach the starting line, the tool senses its proximity, and will close the path as you draw. The old version of the Pencil could not do this.

In general the new Pencil behaves better, it doesn’t mysteriously delete lines you just drew, and it makes the life of an Illustrator illustrator better. A tip of the pencil to Adobe for adding this new feature to Illustrator.

Posted in New technology, Software | Tagged , , , | Leave a comment

Another GREPping drama

Blognosticator Head

My dear wife is producing a book for a local author. He has typed his own manuscript in Microsoft Word, and it’s going to be about 300 pages.

The author has a habit of substituting the letter l (el) for the numeral 1, and is not entirely consistent about it.

189l

In this example, the letter l is used instead of the numeral 1. It’s pretty obvious here, but in a 300-page manuscript it’s harder to find. Using GREP, one can fix all of the possible conditions where this might happen.

I remember my typing classes in the early 1960s on clunky mechanical typewriters. Back then the numeral 1 wasn’t even on the keyboard. Using the l key instead was the only way to do it.

So, as he types he occasionally types l950, or l970s, or 196l, or some combination of those uses of the letter instead of the number.

This evening my wife and I spent a few minutes to fix all of the errors in the book using InDesign’s implementation of GREP. It involves just two search strings, and it zooms through the entire manuscript in about one second each, repairing the els, replacing them with ones.

There are only two possibilities of l’s showing up in numbers in his text:

l followed by a numeral (as in l9… or l8…)

a numeral followed by l, (as in …6l or …8l)

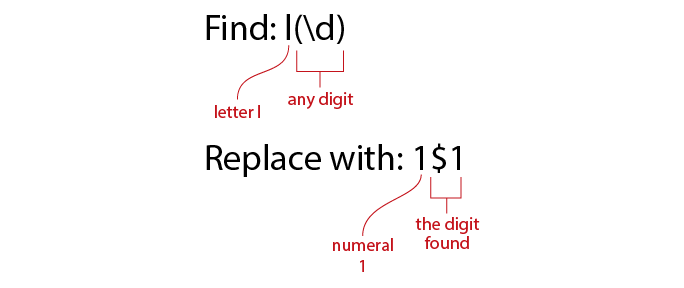
And, to fix them, one uses the Find and Replace function in InDesign. Choosing the GREP tab, let’s find the first examples, those of l followed by a numeral. Following is the GREP search string for letter l followed by any digit:

GREP for letter 1

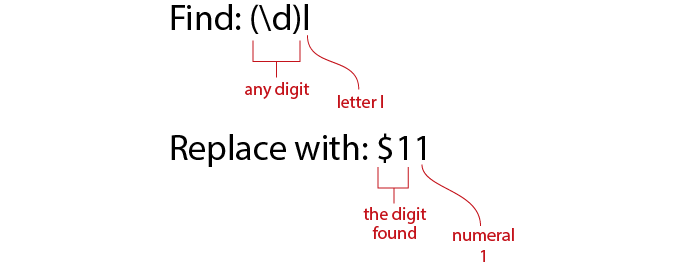
And, this is the GREP search for the opposite situation, any digit followed by the letter l:

GREP for letter 1 2

It’s smart when searching with GREP to use the Find button, then the Find/Change for subsequent searches rather than the Change All button. This, in case you have made an error in entering the GREP command. It prevents new errors from being inserted into the manuscript. Once it looks like it’s working correctly, it will be safe to click on Change All.

Once that set of searches is complete, reverse the commands to search for the other pattern, and do it again. The whole process takes less time than it took me to write this blog entry.

And, it’s fun!

(We geeks love GREP)


Posted in Printing and Printing Processes, Software, Typography | Tagged , , , | Leave a comment

Studying Illustrator’s new corners tool with Chinese food

Blognosticator Head

Everyone loves Chinese food, especially take-out, where you can carry it home, and eat it around the table while chatting with friends and family.

I brought some home the other evening, and while slurping on some soup, I started studying Illustrator’s new corners tool. Interesting (slurp), curious! (slurp). I found myself thinking that it has been quite a while since any new tools came out in Illustrator. And, I like this one.

Chinese food boxes are like one of those wonderful Chinese wooden puzzle boxes. I looked at mine, and tried to figure out how it is made to hold liquids without leaking, and how it’s folded to complete the take-away requirements of a food package. (slurp) So, I finished my soup and cleaned the box out, then broke it open (just two glue points!) (slurp!).

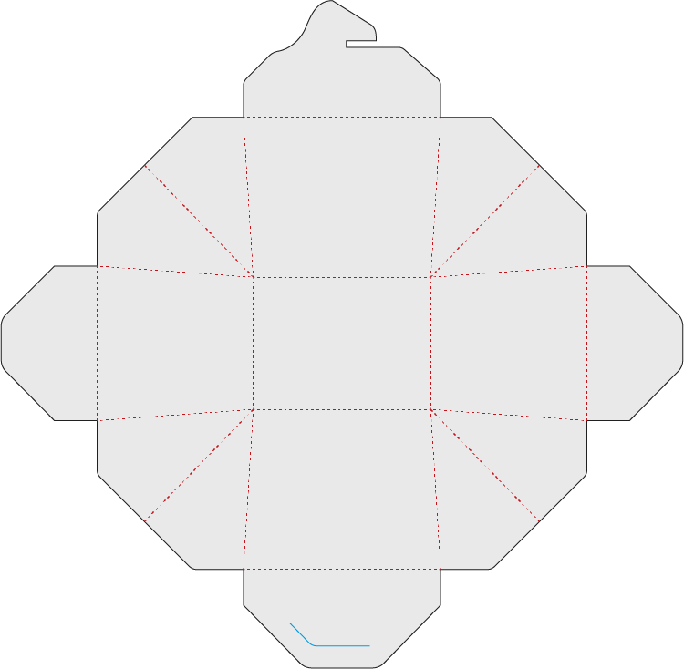
Chinese food box

This is the die-line for the Chinese food carton. The dotted red lines are creases, and the blue line is the cut line for the notch to slide into when folded. Notice that the sides are tapered.

Changing cultures for a moment, the Chinese food box is an example of excellence in Origami folding. It’s all made from one piece of folding board, coated with a polyethylene surface to make it water-proof. These boxes are typically printed with red ink, “Good Luck!” printed on the face (mine says “Happiness”). Once they are printed, they are die-cut and scored. The concertina folds complete the construction. It’s really simple. Except that it’s not that simple.

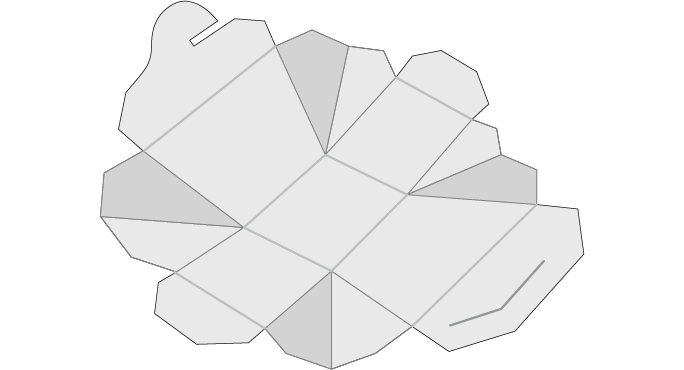
Chinese Food box, folded

With the creased box on its way to being made into a carry-out container, it’s easy to see how complex a cutting and folding process this is.

Who thought it up? Who has the patent on Chinese food boxes? I did a quick Google patent search and found one Canadian patent for a folding carton that sounds similar to the one I was dissecting. I’m sure that I can find more if I try. The box I was studying has no patent number or claim printed on it.

It could be that the Chinese food box has been around too long, and has become so common, that it’s considered un-patentable in the U.S.

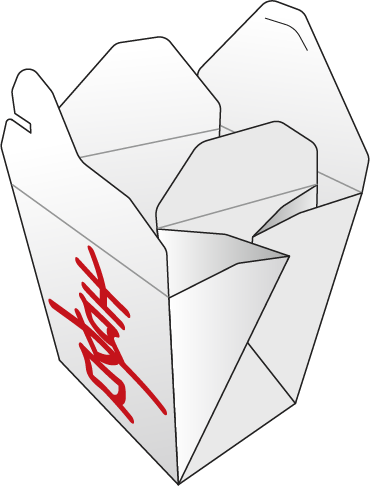
Folded box finished

My finished illustration includes a variety of rounded corners done with the new Round Corners tool in Illustrator. It’s nice to be able to round one corner without rounding others. It’s also nice to round one corner at one radius, while rounding others in the same object to a different radius.

While I was drawing the box, and considering its many folds and creases, I received an update to Illustrator CC. Among its several new tools is a round corner tool that is really nice. After creating any angular intersection of lines, it’s possible now to create rounded corners using a technique of clicking and dragging on new circular targets that are created by Illustrator.

One can round one corner of a polygon, or round all of them simultaneously. It’s delightfully clever. It also allows for three different styles of corners. The first is a standard round corner, the second is an inverse round corner (one that curves inward), while the third is a chamfer, an angular corner that (curiously) has curve control handles.

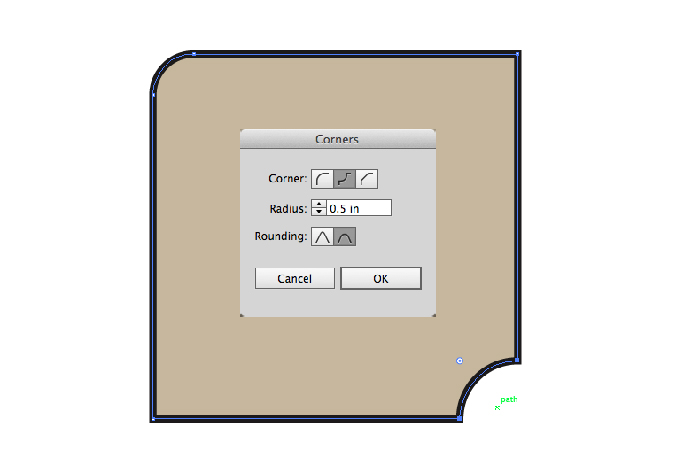
Round corners palette

This is a rectangle I drew to demonstrate the Corners tool in Illustrator CC. Upper-left is a .5 round corner. Lower-right is a .5 in. inverted round corner. One can also select absolute or relative control over the corner calculation – a feature I have not explored yet.

I used the round corners function while drawing these various illustrations of the Chinese food box. In my final drawing, many of the corners are rounded, while others are strict angles, dictated by the ease-of-use intended for the carton.

Round corner single control

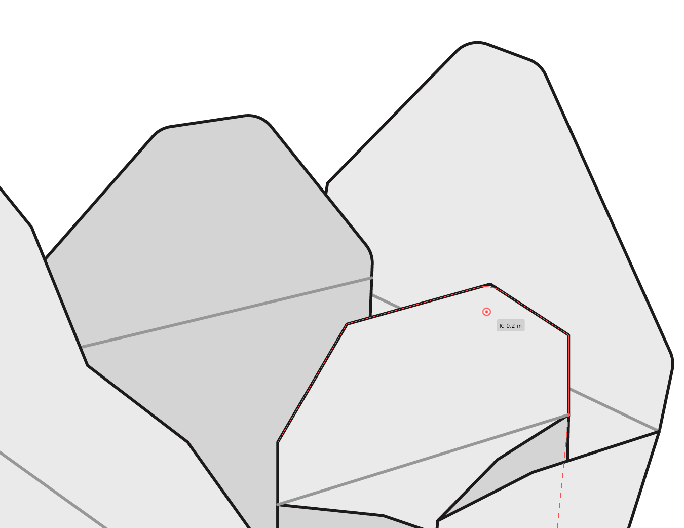
The little red dot is the control for the new Corners tool. By clicking and pulling on it, the angular intersection is converted into a curved corner. The tiny dialog adjacent to it is the radius in numbers. If you select more than one corner you can change several corners to round corners simultaneously.

I am pleased that Adobe added these functions to Illustrator, as that program has gone a long time since the last useful addition.

Now, if they could just fix the Save As function to include a pull-down to save in the latest format, instead of putting that obnoxious and totally unhelpful dialog about saving in a legacy format, blah… blah… blah.

I hate that.


Posted in Art, New technology, Printing and Printing Processes, Software | Tagged , , , | Leave a comment

It must be a Mirage!
My large file printing problems are solved

Blognosticator Head

Following this blog, you have been exposed to the trials of printing very large photos on a wide-format Epson ink-jet printer.

I have been feeling like a beta tester the last month or so, discovering all of the reasons why a certain file can’t be printed. Reading Adobe’s lame error dialogs that ask you to contact your printer vendor (Adobe certainly doesn’t want you to contact them, god forbid!).

I learned that Photoshop doesn’t like to print jobs with more than 32,767 pixels in either dimension, and then I learned that Photoshop won’t correctly print any image greater than 2GB, and then my Mac Mini’s hard drive failed on Christmas, requiring me to start over again on printing technology, discovering that some small change in Epson’s printer drivers doesn’t like photos larger than about ten feet long.

It starts to sound like I’m complaining.

When the old Mac Mini came back repaired, I reinstalled the (newer) Epson printer drivers, and it seemed OK. I was able to print ten-foot photos without difficulty, but when I tried to print a 14-foot panorama, the printer huffed and puffed, then it advanced three very expensive feet of Epson Luster paper, cut that paper and dropped it on the floor. Thinking this might just be a quirk, I restarted the programs on the Mac Mini, sent the job a second time, and it generated another three feet of blank paper and dropped that on the floor. This was starting to look like a trend.

SLO PANO Title lettering

I need a solution, and time is running out. I am now down to four weeks to my show’s opening reception, and I am feeling the heat of the deadline.

I wrote to my friend Dan Steinhardt at Epson. He’s knowledgeable about these things, and I complained to him (sorry, Dano), and he recommended that I use a popular Windows-based RIP called QImage on my Mac, with Bootcamp and a copy of Microsoft’s Windows 7 operating system, and I gave that some thought.

Changing RIPs in the middle of a photo exhibition didn’t appeal to me, because RIPs affect the way dot patterns are drawn on the paper, and I worried that my prints might look different. I was also concerned because I am brain-dead when it comes to configuring and repairing everyday problems on Windows computers. I didn’t want to have to add that skill to my résumé on short notice.

So I bumbled on, making some pretty big and awfully expensive mistakes as I prepare for my photo exhibition. I printed all the easy prints – those under ten feet in length, and I printed a few of the informational prints just to get them done. But the big gorilla in the room was the need to print several very large panoramas in one piece each. These range in size from 14 feet to just over 18 feet in length.

Yesterday, the Fairy Princess appeared to me in a dream (she sometimes empties the dishwasher late at night) and reminded me of some software from Germany that I learned about at the GATF Color Conference in Scottsdale, Arizona. I had picked up a brochure about it…. What was its name?

Mirage web site

And then I remembered it was a Mirage! I looked it up on the Interwebs, and within an hour I was in possession of a 14-day test trial of Mirage software for my Epson printer. Not just “in possession,” I was running with the new software in less than an hour.

Mirage is a RIP (see the comments at the end). It is also a better printer driver than those supplied by Epson. It is available in several versions varying in price – but not in features – according to what size printer you plan to run. The version for my 44-inch Epson 9600 is $648.91. If this were not a solution to my problems, I would have a hard time spending that much money for this.

By comparison, Bootcamp for the Mac is free, a copy of Windows 7, Home Edition is less than $100.00. The Windows QImage RIP I would have needed is $69.99, and the time I would have spent getting it running is unknown. So, I am spending much more to solve the problem – permanently – on my Mac Mini than I would have spent building the Windows partition and running the Windows RIP. But, I am in more familiar territory here, so I can justify the expense based on the fact that I need the Mirage software for many future jobs, which will pay for it many times. (Good justification, eh?)

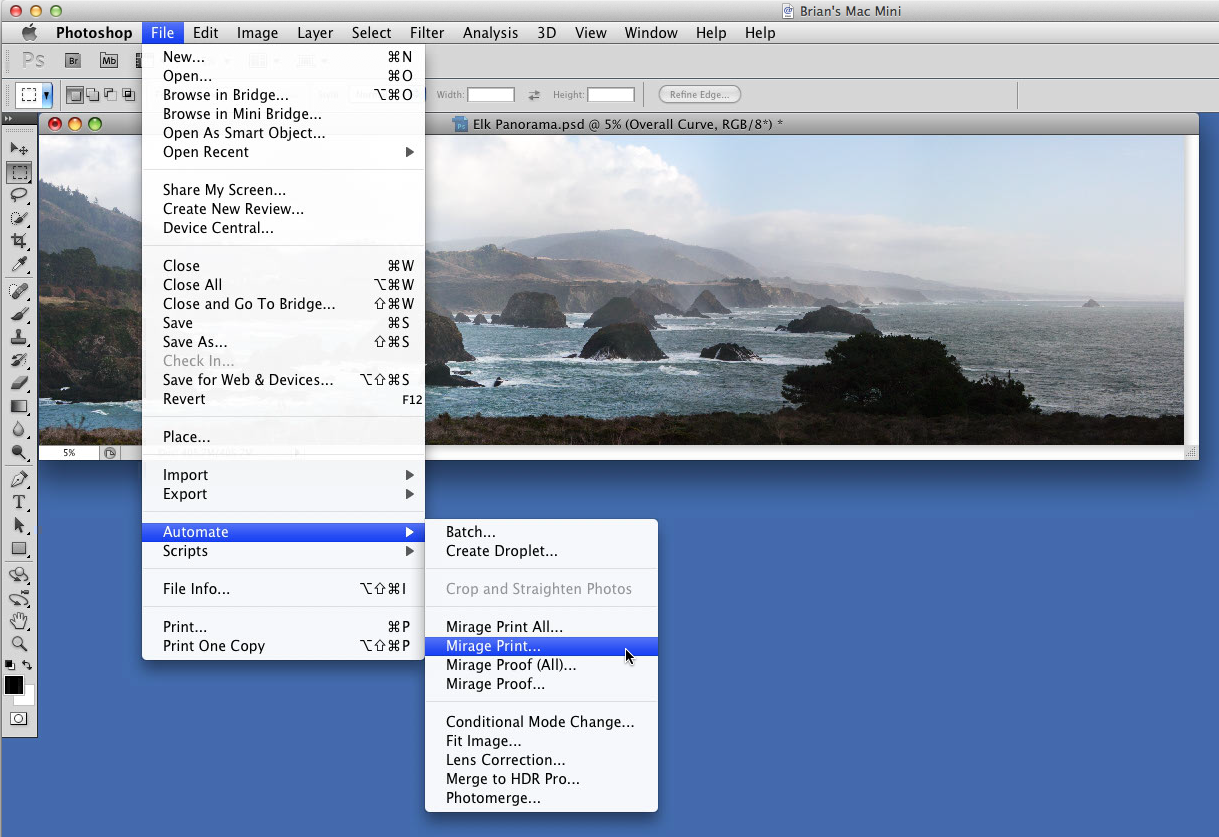
Mirage Automate menu

The controls for Mirage software are found under the Automate menu in Photoshop.

Mirage states that their drivers will print any image that you can open in Adobe Photoshop – that means any image up to the 300,000 pixel limit of that program. That’s nearly ten times as long a file as the stock printer drivers and Photoshop will support on their own. That is the feature I need most right now.

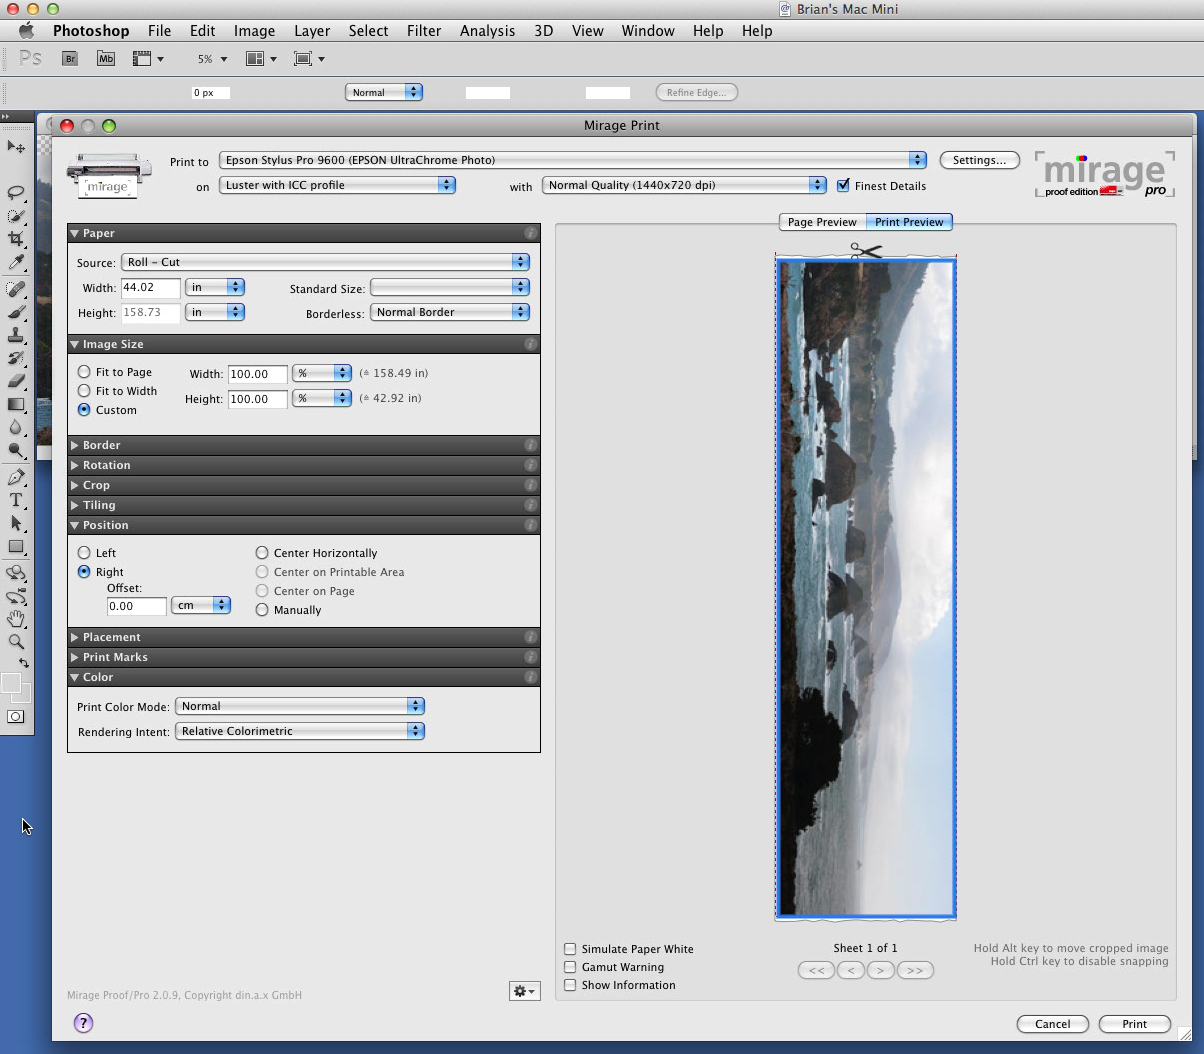
Mirage Main Palette

This is the Mirage control palette. On the left are the various sections, each of which open to reveal controls for the details of the setting. On the right is the overview of the image to be printed.

There are several other compelling reasons to get Mirage software. One is that is does image nesting. It has several settings for that nesting including one to make the printing with minimal waste, one to make a grid of columns and rows – which would make cutting images apart easier, and one to optimize for minimal cutting. I regularly print posters for a local bank, making two-up poster sets on the Epson printer. They way I have been running these for years is to gang them together in Photoshop first, adding cutting marks, then printing them. With the nesting features of Mirage, I can just choose two posters, tell Mirage to print them together, and it will do the rest.

And, since Photoshop CS 5, when Adobe stupidly removed the feature that allowed us color experts to print a profiling test chart without any color management applied, the only way to print such a pattern target is to use the Adobe Color Printer Utility application (which was a really stupid answer to their really stupid removal of the feature). With Mirage, there is a simple means to print a target on any Epson printer without any color management applied.

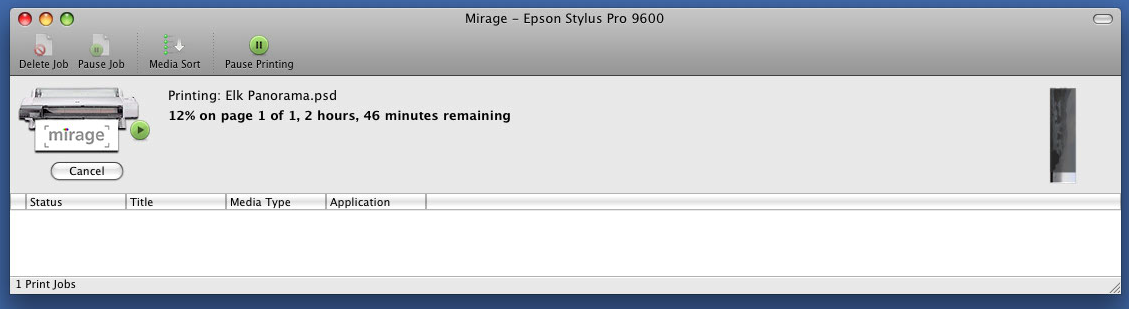
Mirage Queue manager 2

Once the job is started, the Mirage Queue takes over and tells you percentage of completion, and hours and minutes until completion. Printing begins within seconds of start, and spooling continues while the printer begins to image.

The Mirage driver software supports a host of Epson-supplied ICC color profiles, which the software chooses according to the substrate you select. If you want to use your own ICC profiles – and I do – it allows you to create a custom medium, applying your own color profile. Selecting that medium is easy; it shows up in the list of available media when you start the software.

And, Mirage allows the creating of Proofs, which is the function of having the printer simulate a printing press. In Photoshop’s printer pane, this same feature is available, allowing the user to choose the printer’s profile, then to add a simulation profile and rendering intent to make a proof. Mirage software puts this in its own category called Proof, and affords the same controls.

I’m approaching the end of my first day with Mirage software, and so far my productivity is up, up up! I have made two 14-foot panoramic photos so far, and I am printing the third. The software tells me that I have one hour and two minutes left (the Epson drivers that I use tell me nothing for percentage of completion, nor time remaining. Newer drivers from Epson do report percentage of completion.)

Mirage is available for both Mac and Windows operating systems, and it controls nearly every professional Epson ink-jet printer. The latest printers and the very latest operating systems are all supported.

I really like this software, and most importantly, it saves me from some daunting problems in the weeks before my big exhibition.

Posted in Color Management, New technology, Panoramic Photography, Photography, Photoshop techniques, Printing and Printing Processes, Software | Tagged , , , , , | 18 Comments