

In my spare time, between teaching and preparing for a photo exhibition opening in February, I have been installing solar panels on my roof. I had decided to do this several years ago, and had found the price of the project too high for my modest salary. I postponed a couple of times.
This summer the price of solar panels dropped by about 25 percent, and I worked summer quarter (earning a little extra money), and my wife and I had earned our way into the high-tier price of electricity in our home/office.
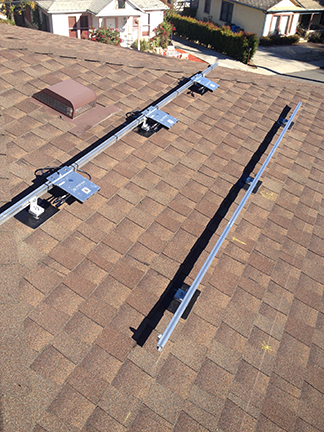
This is my second railing set, which will hold three panels when complete. Along the top rails are the inline inverters, mounted to the aluminum rails. The black plates are the watertight flashing sheets that are inserted under the shingles. A stainless steel stud comes up through those flashings to become the base of the brackets that hold the railings. You can see my chalk lines on the roof indicating where the rails should go, and the yellow marks showing the location of the rafters.
Pacific Gas & Electric Company, our electricity supplier, charges residential customers according to a “baseline” amount, then they add a bit if you go over that baseline. When you go over by a lot, which we do every month, they really pile it on.
Here is a typical month for us:
Our baseline is 291.2 Kwh
Baseline: $0.1323 per Kwh 291.2 Kwh $38.52
101-130% of baseline: $0.1504 per Kwh 87.36 Kwh $13.13
131-200% of baseline: $0.3025 per Kwh 203.84 Kwh $61.66
201-300% of baseline: $0.34.025 per Kwh 247.6 Kwh $84.30
Total $197.62
Most residential electricity consumers don’t get into the 201-300 percent tier. To do that you need a Konica-Minolta digital printer, a NAS server, two Mac Pros running continuously, a Mac Mini running continuously, and a wide-format Epson ink-jet printer which is run several hours on most days. I have all of those things and more. And, we run a regular household on top of (or underneath) all of that.
It’s costly, and it was starting to bother me. So I asked my local solar power company to quote on a system of eight photovoltaic panels for my roof. San Luis Obispo enjoys 300-plus days of sunshine each year; it’s a very sunny place, and my house sits in the sun without any shading from trees or other structures.
And, it’s the right thing to do.
We as a nation and a society use far too much petroleum, coal and uranium to make electricity to run our NAS servers and our Mac Pros. Where there is ample sunshine, we should be generating electricity from the sun.
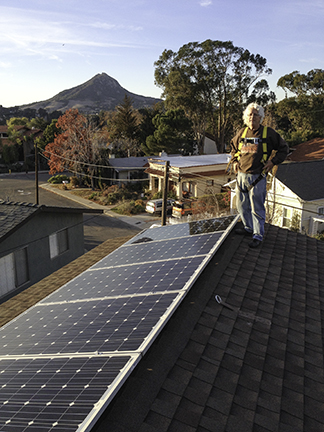
This is me in my handsome body harness (not attached to the anchor in the center) standing on the roof this afternoon after finishing the installation of the first five panels. The roof anchor is permanent, attached with stainless steel screws to a rafter. With that I can visit the panels occasionally to wash them. On the left is a three-foot clearance between the panels and the eave; this is to allow firefighters access to the roof.
I accepted the quote from the local solar company for the panels, the racking and hardware. Then I hired a licensed electrical contractor, and began the work of getting photovoltaic panels on my roof.
I decided to pay the contractor to punch through the back of my electric load center, to install the conduit to the roof, and to install the primary wiring from the panels to the box. Though I have done residential electrical work before, I thought I would rely on a professional when it comes to drilling holes in the roof. I have neither the tools nor the experience to do that myself.
The rest of the job I have done myself. This includes inserting waterproof flashings into the shingles, mounting aluminum brackets to the rafters, and then installing the railings, inverters, wiring and the panels on the roof. It has been fun, and only a little scary. I bought an OSHA-approved body harness and roof anchor system, which is required for safety, and I snapped myself onto the safety line every time I ventured up onto the roof to work. As roofs go, mine is gently sloped. I don’t envy those who have steep roofs, as that would be be much more difficult.
I drew six pages of highly detailed construction drawings and took those to City Hall, where I applied for and received an owner-builder construction permit for my project. The city is concerned that all the terms of the National Electrical Code are met for such projects. They are also concerned about wind and snow load (in a place where it has not snowed for 200 years).
The flashing is reasonably easy, though finding the rafters can be challenging. Fortunately my rafters stick out the ends of the roof. So, I would lie down on the edge of the roof, then feel around under the eave until I found a rafter. Once located, I used a construction square to mark its position on the composition roof with yellow chalk. From those marks I was able to extrapolate the position of each rafter. Then I drilled into the rafters to sink long steel screws holding the stainless steel brackets that hold the solar railing in place.
Once the railings were installed I put up the inline inverters. These are clever watertight DC-to-AC inverters that are connected to each individual solar panel. The inverters are then wired in series to a junction box, delivering 220 VAC power to the line. The line travels down to the load center, where it goes into the breaker panel through a standard 20 Amp 220 VAC circuit breaker. This feeds the electricity into the box, making it available to the home, or, if you make more than you use, it feeds out into the electrical grid, and you get a refund from the electric company.
The power savings potentially generated by my panels looks like this:
My electric bills last year totaled $2,371.39. The high-tier amount of those bills was a total of 2,971 Kwh at $0.34025, for a total of $1,012. Annual Solar power production of my new system is estimated to be 3,279 Kwh, which will allow me to reduce the high-tier power to zero, then dip into the third-tier power. My estimate is that I will save $1,102 annually on my electric bill.
The pay-back of the system, after a federal tax credit of 30 percent, should be five years and eight months. After that time I will be generating about 35 percent of my electricity with the panels fully amortized. And, to me that is a good deal.
In the lifetime of the system, which is guaranteed for 30 years – and made in America – I will generate a total of $33,000 worth of electricity. This will probably not actually happen because the efficiency of the panels drops slightly in their lifetime. But, the price of electricity will most likely go up in the coming years, so this may equalize over the life of the panels.
And, I can feel good about my investment in solar panels, contributing to the power I consume without consuming fossil fuels. I like this plan.
All things considered, it has been an interesting adventure to learn about solar panels and how they are affixed to a residential roof. It has also been an adventure to learn how to make waterproof penetrations to my roof to add the solar system to my home.
Congratulations on your install. I went with professional installation and a system from Solarponics. It has been just over a year since installation and everything has worked perfectly. My entire electricity bill for Oct 2012 to Oct 2013 was $31.27. I too went with US made panels, although the micro-inverters/power optimizers and control system is from SolarEdge and were probably made in Isreal.
Living in SLO means that everyone (well most) should have panels on their roof. Enjoy your steps towards energy independence!