
Acrobat Professional provides extraordinary character recognition

Blognosticator Head

Over the years we have needed to convert scanned images of text into editable text. Companies have invested heavily in the process of extracting text from printed documents, some have lost fortunes in this effort. Some have solved problems, while some have created greater problems. The need to convert images into editable text seems to have waned in recent years, yet simultaneously, the ability to do it has gotten easier, courtesy of the Secret Projects Division of Adobe Systems, Incorporated (I made that up).
Original File

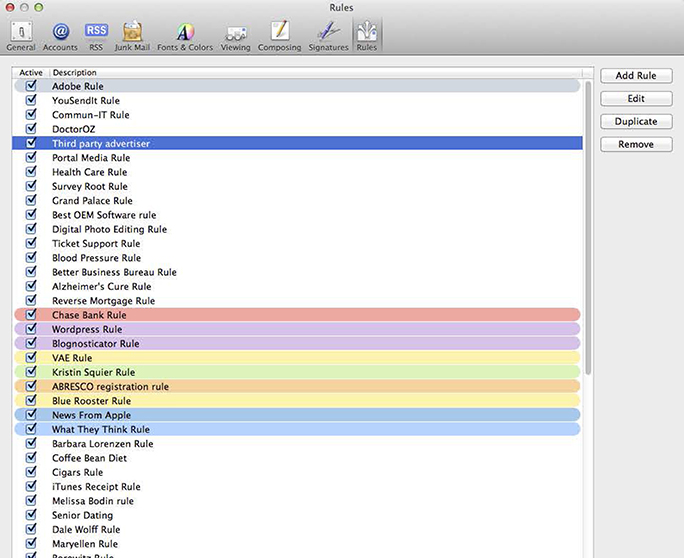
This is a screen capture of the Rules menu in Apple Mail. I wanted to convert the text in it to an editable file for this blog. I couldn’t select the text, so I used Acrobat Professional to convert the screen capture into editable text.

The ability of Adobe Acrobat Professional to convert a scanned document into text is uncanny. I have used it twice in the last week to make text from scans, and I found it to be a life-saving tool. There are two approaches: One assumes you just want the text without the original scan, the second assumes you want the original PDF with searchable text within. Here is technique number one: Scan the document, then save it from Photoshop as a Photoshop PDF. This puts the scan into a PDF container. Open the resulting file in Acrobat Professional.
Recognize Text menu

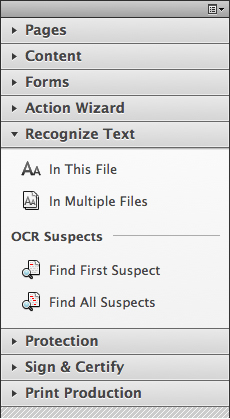
This is the Tools menu for Recognizing Text in Acrobat Professional. I chose the In This File option to extract text from the PDF document I had open at the time.

In Acrobat, choose Tools, then choose Recognize Text, and then In This File. A minute later (depending on the size of the document), without any visible change in the document, any text found will be created, and it under- (or over) lies the visible text in the document. Once created, the text is searchable, and the document can be saved with the text in it. I use this technique to create text, then I copy the text out of the PDF, and paste it into a word processor to do something else with it.
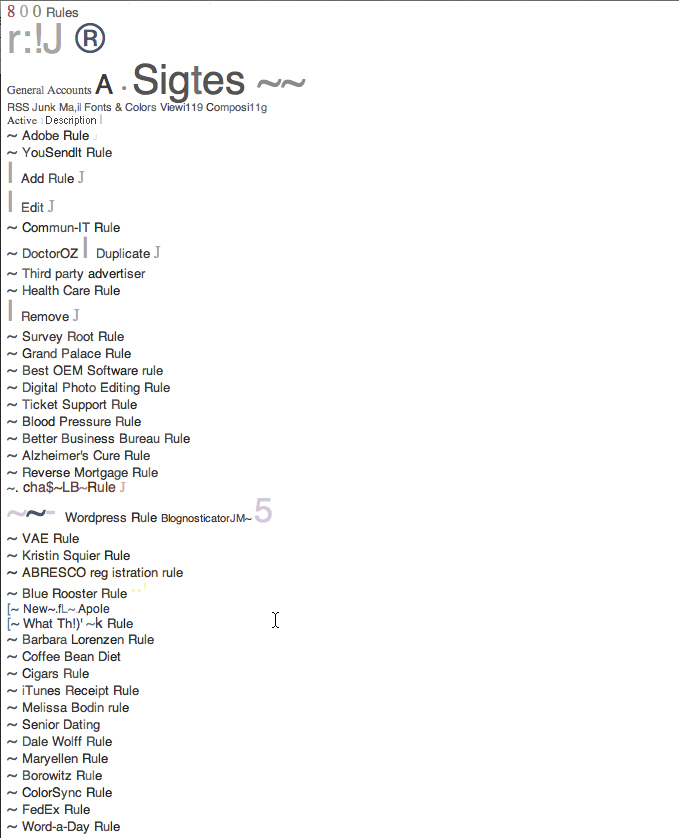
Results of text recognition

This is the text I was able to extract from the image file above. Notice that it intermixes the copy on the left and top of the screen with the copy on the right. It even recognized the text in the icons in the title bar. Some of it is nonsense, but it’s easy to identify and delete. In the end, I had about ten lines out of 124 with errors. The most common cause of errors was the highlighted lines in color (see “Chase Bank Rule”), where Acrobat had difficulty separating the text from the background color, and made quite a few errors.

For the second approach, Save the document after Recognizing Text, and you have an update of the original PDF with searchable text within. The only problem with this technique is that all the text in the scanned document is turned into searchable text, including text in buttons like “OK” and “Edit.”

If you are copying the text out of the PDF and pasting it into a word processor, you will have to excise those erroneous entries, a process that is quite easy because they are easy to identify. And, because no method yet devised can read 100 percent of scanned text correctly, it’s always a good idea to run a spell-check on the resulting text to find errors.

My tests of this process also reveal that the contrast of scanned text also matters. In the example shown here, some of my rules are highlighted in yellow, blue and other colors. It was in those lines where the greatest number of errors occurred. One solution would be to remove the color highlighting, or to edit the document in Photoshop to remove the color, then make a PDF, and Recognize Text.
 

Posted in Scanning, Software, Technology, Typography | Tagged , , , , , | Leave a comment

Godspeed, Scott Carpenter!

Blognosticator Head

If you have followed this blog for more than a couple of years, you know that I am an Eagle Scout. I earned that honor at the age of 15 in Troop 206, Oakland, California. I was one of the first three or four Eagles in our troop, a troop that has spawned many who have reached Scouting’s highest honor.

I was really into Scouting, and was involved well into my 40s as a Scout, a camp counselor, and ultimately as an Assistant Scoutmaster in the county where I now live.

I attended one World Jamboree and one National Jamboree. These are the biggest campouts you will ever see, with tens of thousands of boys in attendance.

In 1967 I was chosen to be part of the World Jamboree Host Corps, a troop of about 50 young men who arrived early at the Jamboree – held that year at Farragut State Park in Idaho, USA – and acted as hosts to the arriving Scouts, leaders and dignitaries who were part of the event. My job was to help produce the Jamboree Journal, a newspaper that was produced by us Scouts with adult help every day of the event. I went out on photo assignments, wrote stories, and helped paste-up the newspaper. It was printed each night in nearby Coeur d’Alene, Idaho.

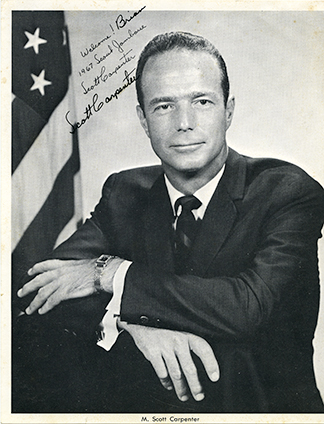
Scott Carpenter

Commander Carpenter added my name and his actual autograph to a pre-printed PR photo that he gave me on our day together in 1967.

One day, when I arrived at the newspaper tent, I was told by my adult supervisor that I would be accompanying Commander Scott Carpenter, the Mercury 7 astronaut, on his tour of the World Jamboree that day. I was thrilled, and jumped at the opportunity.

Mr. Carpenter and I walked from camp to camp, admiring the handiwork of the visiting Scouts, and we enjoyed meeting visitors from around the world. It was one of the most exciting days of my life. On our day together, we talked about his flight into outer space, his service in the Navy, and about my aspirations and plans. He was attentive, kind, and gracious.

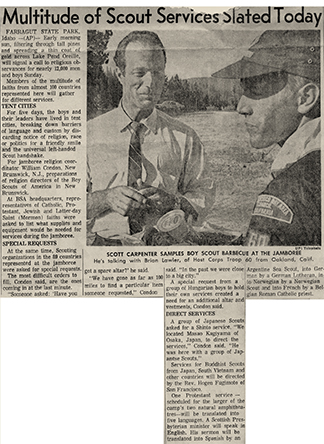
We were trailed by news reporters the whole day, everyone asking for a quote or a photo, and Carpenter, a true gentleman, offered up many opportunities. At one point, a UPI photographer and reporter asked if he could photograph the two of us as we had a bite to eat, and we complied. His photo of me, and an accompanying story penned by one of my youthful colleagues, appeared on the UPI “wire” the next day.

Newspaper article LR

That’s me on the right, a member of Jamboree Host Corps Troop 60. Commander Carpenter and I had spent the day visiting the various camps of the 1967 World Jamboree. The story that accompanied the photo was about the many religious services available at the Jamboree that week.

The photo featured me and Commander Carpenter at lunch. Someone who knew my parents sent a copy of the Boulder, Colorado, newspaper which printed the story the following day. I kept that photo, along with all of my copies of the Jamboree Journal which I helped to prepare, in a box in my house. I took it out this past weekend when I learned of the death of Commander Carpenter on October 10.

It was Carpenter who said to John Glenn on his launch from Cape Canaveral on February 20, 1962, “Godspeed, John Glenn!” We have all heard the recording of that message in movies and in television reenactments of the space program. When I hear those words I remember my day with the man who spoke them.

He was a fine man, a great influence on young men and women, and one of our finest astronauts. It was an honor to have spent the day with him back in 1967, a day I will always remember.


Posted in Adventures, History, People | Tagged , , , , , , | 3 Comments

More textures – from aloft

Blognosticator Head

I have a great hobby – hot air ballooning – and I get to practice it occasionally. This year has been a pretty good year for my ballooning adventures, including this last weekend when I flew with my good friends at an annual event called WHAMOBASS. WHAMOBASS is an acronym for the Whiskey-Hill, Atherton, Menlo Oaks Ballooning and Sporting Society. It was founded by our dear friend Deke Sonnichsen of Menlo Park.

Marguerite over Coalinga 01

This is the balloon Marguerite, in which I flew on Saturday and Sunday mornings. In this photo, the balloon is being piloted by my friend Jim Eckford. After he landed, I climbed in and continued on for another 45 minutes over the pistachio orchards.

WHAMOBASS is the longest-running balloon event in the world, at 49 consecutive years. It is currently held in Coalinga, California, on the west side of California’s vast San Joaquin Valley. The town of Coalinga has about 18,000 citizens, and is home to two large prisons, a trauma hospital (likely a result of being located near California’s major Interstate Highway 5), and a lot of pistachio trees. It used to be the cotton capital of the state, but that industry dried up, literally, with the shortage of water in the region.

Pistachios use just one-fifth the water that cotton required, so the agricultural community has been planting those trees in the former cotton fields, and reaping the rewards of a nut-in-great-demand.

Pistachios 01

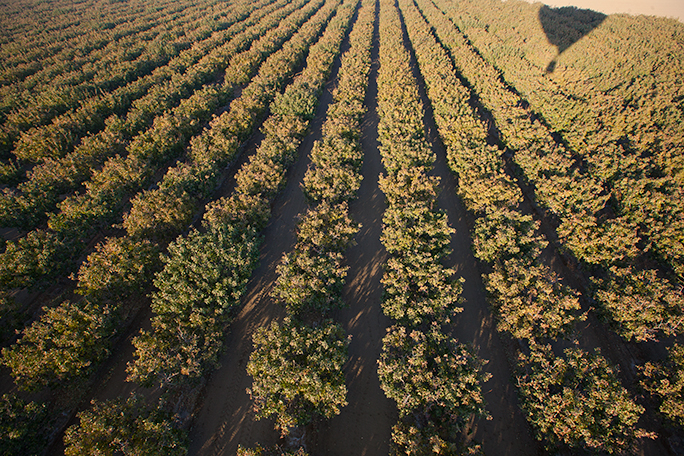
This is my first image of the pistachio orchard, balloon shadow on the upper-right.

We took off on Saturday into a clear sky. Twenty-one balloons floated in the long valley for a couple of hours, then landed and packed up and headed out to breakfast. On Sunday morning we did it again, but there was smoke in the sky, so the morning was not as pretty.

Switchgrass 06

Switchgrass makes interesting patterns in the landscape. I love the undulations of the rows in the distance.

I flew as pilot on both days for one flight, and pilots are generally required to pay constant attention to their surroundings and circumstances. Occasionally I carry a camera around my neck for taking a photo or two in the short moments when I can take my eyes off of the approaching countryside. I did that this weekend, and I got some nice photos on take-off and in mid-flight. I can’t take photos of my landings because I am always too busy getting the balloon gently to the ground and ensuring that my passengers are safe.

Pistachios 09

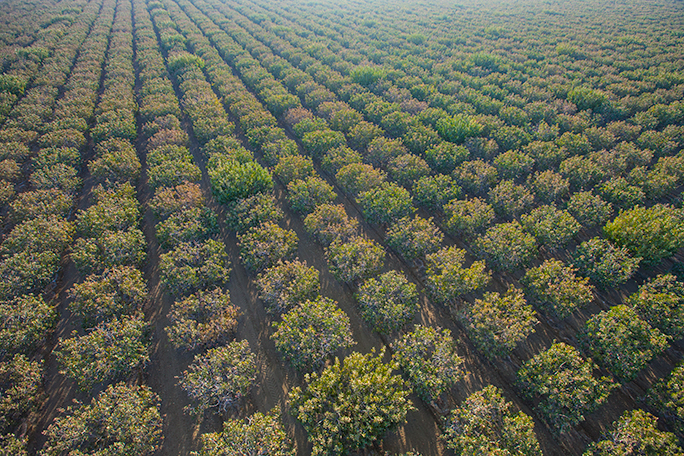
Though subtle, the colors of pistachios are superb. There is a hint of red here and there, a brighter shade of green in only the occasional treetop. It’s beautiful to see from this overhead perch.

While flying on Sunday I was treated to the spectacle of aerial patterns, as always. The first of these was a mysterious grass crop that had delightful undulations and textures. I learned after landing that the crop is Switchgrass, a plant used to make ethanol. The second was the pistachio trees, which from ground level appear to be nearly colorless. They are carefully planted in rows, and they are kept trimmed to almost identical height. But one in every ten or so is a maverick – showing a little more color or sporting a different haircut. I found this attractive, and I shot a handful of photos to record the textures of the nut trees.

I used my position in the balloon basket, flying very low over the orchard to see the world from a slightly different point of view. It’s a great opportunity to appreciate the patterns of the land and record them onto a digital sensor.


Posted in Adventures, Photography | Tagged , , , , , , , | Leave a comment

Out damned spam! Out I say!

Blognosticator Head

I don’t use Gmail. I have nothing against Google or their e-mail offering, but I just don’t use it. I use the Mail application provided as part of the Macintosh operating system. I have done this for years (decades?). Several people, including my son Patrick, have told me “Just use Gmail. It will solve your problems.”

Mail Icon

But I don’t use it. I continue to use the Apple Mail program. And for a mail server, I host my own as a part of my web site and business strategy. I can control the size of attachments, I can issue new e-mail addresses and delete them as I need.

The reason my son and others suggest that I use Gmail is that is has such spectacular spam filters. It kills almost all incoming junk mail, leaving only the mail you intend to receive, and that’s great. There is a service offered by Google for those like me who host their own e-mail servers. This service will filter your e-mail, killing spam on the fly, and then forwarding it to your mail server. This service was once available under the trade name Postini, but that service has now been absorbed into the Google Business services.

I plan to try that soon because my level of frustration has risen to the boiling point. I really must find a way to stop the junk mail, and I will – soon.

In the meantime I use Apple’s Mail software and its very powerful Rules to eliminate gazillions (perhaps quintillions) of unwanted e-mail messages.

These filters work quite well, and they are easy to configure.

Example: you are receiving spams every day, or several times a day, from a bulk e-mailer who does not run an honest business. There are many of these out in the world, one of which is currently making me crazy. The e-mailer is clever. They use a different (usually hijacked) domain as the “sender” of each spam message, and they have an “unsubscribe” button at the bottom, but checking it doesn’t unsubscribe you, it makes matters worse. Many spammers do this; when you click “unsubscribe,” it confirms that your e-mail address is valid, and they then sell your address to other spammers who start sending unwanted mail to you.

For a few days last week I was getting about 25 spams a day from this e-mail spammer. They all sported different sender addresses (one appeared to come from me!), and they all have the same general appearance. At the bottom is a message from the “sender” which is not text, but a GIF image of text. If I examine the HTML code of the e-mail, I discover that my e-mail address is embedded in the HTML code. Clicking it would send my response to the spammer, indicating which e-mail I had clicked on, and confirming that I am here. I don’t want to do that.

When I open the raw source of one of these spam e-mails, it contains a bunch of seeming gibberish, like this:

<!--
<div><span><p><i>
individuals involved, he was taken into custody tonight about 9 p.m. and charged with murder.
"He said Aliahna's body was discovered shortly after the interview.
Fries would not disclose the motive for the killing or the manner of death in Aliahna's murder, only that Aliahna's body was discovered in northern Allen County.
Aliahna was reported missing on December 23 and investigators believe the crime occurred sometime before that time.
Investigators do not believe any other individuals have knowledge as to what happened to Aliahna.
Earlier Monday, The Journal Gazette reported that Aliahna and her sisters were staying with Plumadore because their mother had been sick with the flu and Aliahna's stepfather works at night and sleeps during the day.
Plumadore told the newspaper Sunday that he left the three girls in his mobile home about 6 a.m. Friday and went to a gas station about a mile away to buy a cigar. Authorities have said the store's surveillance video shows him 
</i></p></span><div>
-->

As you can see, the entire block of copy is “commented-out” ( <– and –> ) inside the HTML code. Its purpose is to perplex spam filters. With what appears to be real text, this e-mail might slip through a spam filter, and arrive in your in-box (it landed in mine this morning).

If Subject menu

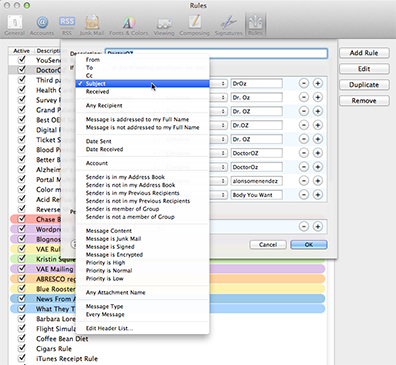
This is Mail’s Rules menu (it’s in Preferences). Notice that you can select from a long list of criteria related to the incoming mail: To, From, Subject, etc.

With Mail’s Rules, I can search for anything in the incoming message: the sender, the addressee, the Title, the content, and more. When there is something common in these spams, like a block of hidden text (like the above) that is the same from spam to spam, I can search for it, and delete the message.

What to do screen

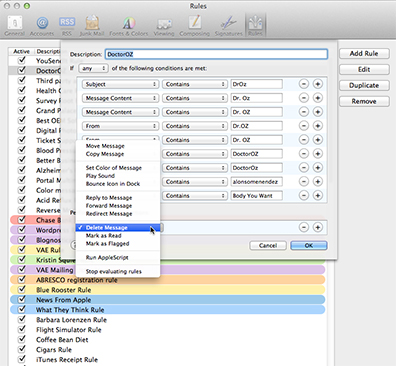
I call this the “what to do” screen that indicates to Mail what you want it to do once it identifies a spam e-mail. In this example I have selected “Delete Message” from the available actions. It’s equally easy to do something positive with incoming mail, for example, highlight every mail from your mom with red, or move every message from the office into a different folder.

There are, though, messages that don’t respond to Mail’s Rules. I cannot figure out why. If I can read the text in the Raw Source of an HTML e-mail, and I can search for it when reading the Raw Source, then I should be able to automate the find, and do it automatically. But, some just won’t be scrutinized by Mail.

Here’s how I handle a typical spam: I look for something that is consistent in all of the incoming spams. I recently discovered that the sender was making a small typographical error in each one. They put a space in front of a comma in one line of all the spams. It was something like this: “To unsubscribe , click here.” It was the space after “unsubscribe” and before the comma that allowed me to delete every incoming e-mail that had that characteristic. It worked for several weeks, then the spammer changed the copy and removed the unintentional typo.

Now I’m getting them again.

At least in the short run I was able to delete the offensive e-mails. Now I have to look for another vulnerability.

I wish I didn’t have to do this.

Posted in Business, Software | Tagged , , , , | Leave a comment

Details on scanning film with the Epson scanner

Blognosticator Head

In two earlier blogs I described how I set up a large tabletop arrangement to scan historic panoramic negatives on my Epson Perfection scanner.

When using the Epson scanner with the Epson Scan software (you can control the Epson scanner with Image Capture, VueScan and Silverfast also), you have some additional controls that are important to getting an excellent scan of film.

You could read this as a criticism, but I would rather think of it as a tech note: The Epson Scan software is too smart for its own good. It always tries to make the best possible image as it scans – one that has nice color, has proper white balance, and which has the right amount of adjustment for shadows and highlights. Epson’s engineers have worked overtime to make their scanners effective for customers. But, in spite of those intentions, sometimes you will want to overrule the automatic settings that are generated by Epson Scan.

When I was scanning the historic film, I needed to overrule the auto settings on every negative. It’s not that Epson Scan did it wrong, it was that their software was jumping to conclusions about the film, the unexposed area around the film (this has surprising effects on exposure), and the tonality of the film, conclusions that were not correct.

I learned how to manage tonality with just a few test scans, and here are some tips for those of you who might be interested in scanning film on these machines.

First, set up the scanner with the Film Area mask in place, or any of the other film holders that came with the scanner (this applies to those Epson scanners that have the ability to scan with backlight). Then position your film on the scanner bed, emulsion-up (though I have discovered that it doesn’t matter which way the emulsion faces).

Once the film is in place, run a Preview scan, set the cropping and the resolution. Epson Scan will do an auto-exposure adjustment to the image as soon as the Preview scan is complete.

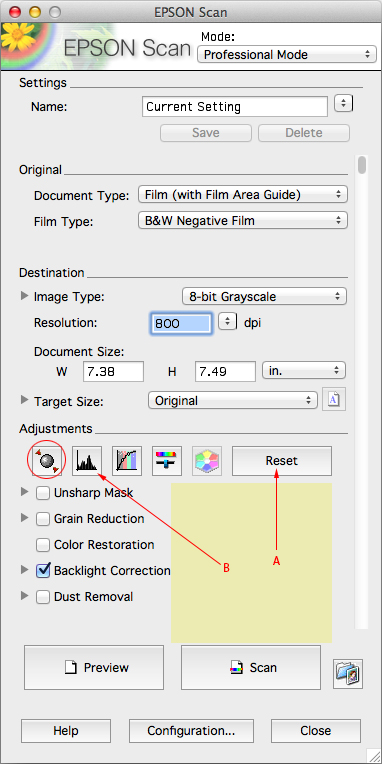
Epson Scan controls

This is the Epson Scan software. Circled in red on the left is the icon that indicates that the software has applied auto-exposure to your scan. When I was scanning my panoramic films, this was not appropriate, so I would turn it off and then adjust exposure manually using: first, Reset, which turns off the auto-exposure, and second, the Histogram control, shown at B, above.

Immediately hit the Reset button in the Epson Scan control palette. This will change the left-most icon in the control icon list, making the little red arrows move away from the circle in the middle, indicating manual exposure (or perhaps more correctly: manual everything).

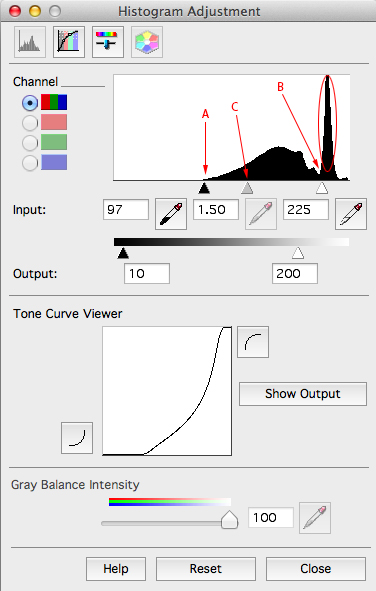
Epson Scan Histogram

A indicates the darkest part of the scanned information. Move the left-most Histogram arrow to the edge of this point on the data. Second, move the right-most arrow, called Highlight, to the left. In this case I had to slide it to the left of the very light data shown in the encircled area. This area represented correctly measured parts of my film that were being valued incorrectly. Parts of the negatives where the emulsion was missing were causing this, a false reading of the highlights. Once the ends are placed to your satisfaction, adjust the center slider to get a reasonable image; the Preview window is interactive.

Once you have turned off the auto-exposure, click on the Histogram icon, which will bring up the Histogram control window. In this window, which behaves very similarly to the Levels control in Photoshop, you can adjust the tonality of the Shadow, Midtone and Highlight. Slide the Shadow slider from the left to the first significant edge of the histogram data. This will darken the shadow areas of the image (the Preview is interactive). Then slide the right-most arrow to adjust the highlights. This will affect the lightest parts of the image – the highlights. In the example here, there is a large body of data to the right of my highlights slider. This represents the clear areas of my film where the emulsion was damaged, and is now missing. The clear areas there are less dense than the highlight that remains in the emulsion (film base plus “fog”).

Once the ends are in position, adjust the middle slider to adjust the midtones to suit your needs. I found when scanning my films that working with the midtones and highlights a little on the dark side allowed me to adjust the tonality later in Photoshop. In contrast, setting the highlight slider to a position that creates a blown-out highlight in the image causes the scan to be useless. In order to adjust tonality, there must be tonal information in every part of a negative. It’s far easier to adjust the resulting scan in Photoshop than to go back and rescan the negative again.

Once these adjustments are in-place, and if you are scanning sections of a single piece of film to be rebuilt later with Photoshop’s Photomerge controls, you cannot click anywhere except the Scan button in the Epson Scan control palette. If you do, the software will revert to auto-exposure, which will spoil your work (unless you had the good sense to write down the Levels values you set in the Histogram control palette).

I accidentally clicked outside the Scan button a few times while working on my panoramic negatives, and had to start a few of my scans over again as a result. This was tedious.

If you’re careful in setting the points on the Histogram, you can make extraordinary scans using the Epson scanner and the Epson Scan software. I am sure that VueScan and Silverfast can both do similar things with tonal controls, but I have not tried those products with the scanner that I own.


Posted in Adventures, Art, Color Management, History, Photography, Photoshop techniques, Scanning, Software | Tagged , , , , | 4 Comments

Taking a nuclear plant tour (and how it relates to scanning historic film)

Blognosticator Head

Last Friday I was privileged to be taken on a tour of San Luis Obispo County’s nuclear power plant. This tour was arranged by the local Chamber of Commerce leadership training group, and I was included by being related to my wife, who is a graduate of that program.

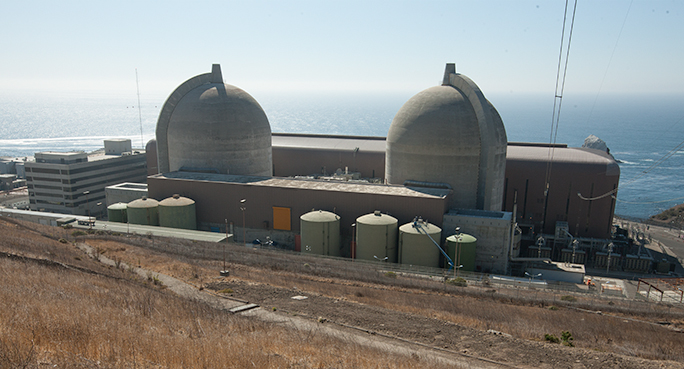
Plant overlook 02

Diablo Canyon nuclear power plant, with its twin reactor buildings in the foreground and its gigantic generator building in the background, followed by the Pacific Ocean. On the right you will see one of the three conductors of the 550KV lines coming out of the plant and heading off to the power grid in California’s central valley. The plant is about eight miles from my home, as the condor flies.

Tours of the plant, now California’s only operating nuclear generation operation, are fairly common. Getting inside with a camera is not. I was granted permission to photograph the group on the tour, and was excited to be able to document our adventure through the huge energy operation.

The tour was led by John Lindsey, Corporate Relations Representative of Pacific Gas & Electric, the public utility that operates Diablo Canyon. Lindsey is something of a local hero because he writes a regular column in our newspaper about weather, and a host of related topics. He really knows his stuff, and he was both entertaining and informative about the plant. Instrumental in arranging for the leadership group to get the special tour was Kristin Inman, a communications specialist at the plant.

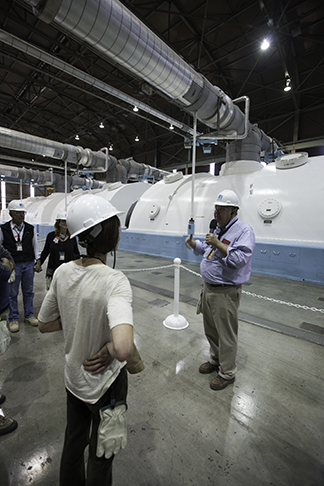
John Lindsey

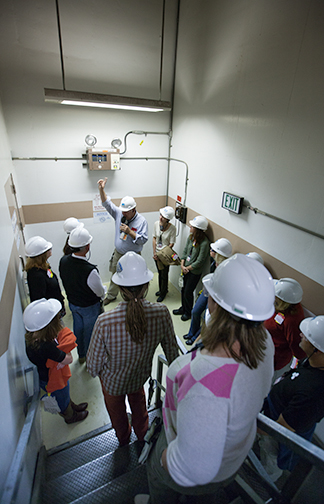
John Lindsey, PG&E Corporate Relations Representative, explains the operation of the low-pressure turbine behind him. Steam from two nuclear reactors behind us power the turbines, which generate about 20 percent of the company’s electricity.

Our group was bussed from the firm’s information center near San Luis Obispo to the plant site near Avila Beach, and accessible only by a private seven-mile road that runs along the gorgeous bluff north of Avila, to Diablo Canyon. The utility is steward to over 12,000 acres of land along the Pacific Ocean; the plant occupies about 1,200 acres of that land.

On arrival, we donned our PG&E hardhats, put on our lexan safety glasses, and clipped a pair of leather gloves to our belts. We had all been vetted a couple of weeks earlier by the company’s security people, so the first part of being allowed inside was already done. We entered the building’s security area and checked in, one by one, and were issued individual proximity cards that identified us as we passed through doorways in the plant (and I presume would have alerted security if we approached the wrong door).

Lindsey in stairwell

Stairwell briefing: Mr. Lindsey explains the system in the plant that removes water from the steam, and re-injects that dry steam into the turbines. The stairwell was a good place to talk because the plant is so noisy. We were all wearing amplified earpieces that delivered his voice while protecting us from ambient noise.

I had my camera gear run through a standard X-ray machine without difficulty. I walked simultaneously through a metal detector. Then I was asked to step into a second security machine. The guard, who was wearing an AR-15 assault rifle across his chest, indicated that I should hold my hands up in the air while the machine puffed air toward me to detect nitrates.

Nitrates? Yikes!

I held my breath.

I had been handling historic panoramic film for the past two weeks, scanning it for a presentation I am making in February (see my two previous blogs). All of this film is cellulose-nitrate film (the dangerous stuff). I wondered, in spite of my having taken a shower and changed into business clothing, if the puffer machine would detect my contact with the nitrate film.

I held my breath longer, composing my explanation in case the red lights went on and the sirens started blaring.

And nothing happened. The green lights went on, and I responded to a recorded voice (quite similar to Siri’s) saying, “Please step out of the machine.”

I exhaled.

The tour was fascinating. We walked through the huge turbine generator building, which is the source of about 20 percent of PG&E’s electricity. The turbines are fed by steam from two reactors (after a heat-transfer process) in adjacent buildings that we saw only from the outside of the plant. We walked down stairs, and went up elevators from level to level, learning about high-pressure steam, and dried steam that is reinserted into the low-pressure end of the turbine. And, we took a group picture next to the Exciter, which was exciting!

Outside the plant we got an overview of the cooling water intake area (photography forbidden), and the cooling water outflow area (photography allowed). And, we got to see the dry-cask storage of the spent fuel assemblies on the hillside above the plant. At the end of our visit, we were treated to an overlook of the plant, and another group photo opportunity (photography allowed).

PG&E’s Lindsey and Inman were extraordinary tour guides. They gave us all of the information they thought we would want, and they answered all the questions our group asked – including the uncomfortable ones about the plant’s proximity to the ocean, and the likelihood of a tsunami damaging the structure, its pumps or related equipment (à la Fukushima Daichi). All of their answers were candid and given with only a hint of nuclear energy industry spin. Bravo!

I left impressed by the plant, by the extraordinary work done by PG&E to increase security, and to triple the cooling water back-up systems to insure against events like the one that hit Japan. They make a lot of electricity there, and I am using a tiny amount of it right now to write and publish this blog.

And I’m glad that their puffer machine didn’t stop me from going on the tour. Perhaps it makes exemptions for historic film.


Posted in Adventures, Business, People, Technology | Tagged , , , , , | Leave a comment

More on scanning film
with the Epson scanner

Blognosticator Head

Last week I wrote about my immersion into scanning 19th century panoramic film. These negatives kept me up nights for about ten days. My total output of scans was 26. I carefully sorted through over 150 pieces of film, selected those that interested me, then scanned the best of those to make high-res scans.

I wanted to scan essentially as much information as could possibly be gotten from each piece of film. I experimented with different resolutions of scans, coming to the conclusion that 800 ppi is excellent for this work. Most of the negatives are over four feet in length, and either seven or 11 inches in height. I scanned each one on the Epson Perfection scanner at full size, and slid the film across the bed of the scanner with about 20 percent overlap so that Photoshop’s Photomerge function could reassemble the images successfully. This worked well, and most of the images turned out acceptably.

Detail photo

This is a close-up of one of the negatives, enlarged approximately 20X. In this image you can see the amount of detail in the original film, and you can see slight gear chatter from the Cirkut camera’s wind-up spring motor and drive mechanism. Some of these films exhibit more of this flaw than others.

At 800 ppi the scan contains visible sharp grain, and at the point where you are scanning grain you have gone about as far as you can go. Any higher resolution seems to be unnecessary, as I reached the maximum amount of practical information in each image at that resolution.

The resulting files are from about 500 MB to over 1 GB, depending on the size of the original. Each one required a lot of retouching, and I feel that there is much more retouching to do, but time will not allow for this, so I have declared victory, and I am moving on with the next part of the project, making modern day replicas of photos in the same locations.

4x5 Film Guide

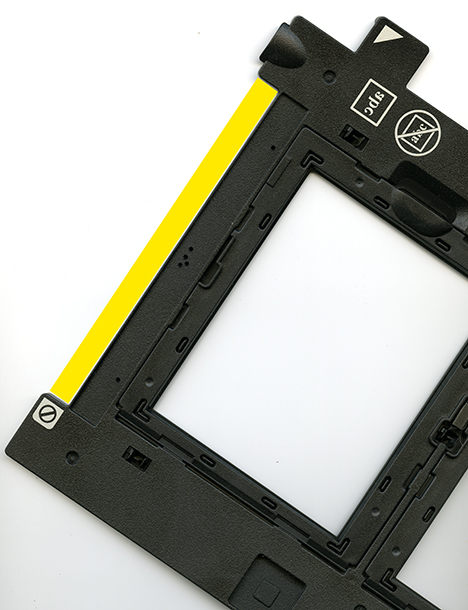
This is Epson’s 4×5 film scanning bracket. The area marked in yellow, above, tells the scanner that it’s working with film, and allows the machine to get a baseline exposure and white balance. Without one of these film area holders or a similar indicator, the scanner will not work correctly.

Scanning film on the Epson scanners requires the presence of one of its Film Area modules. There are several that came with the scanner, one for 4×5 film, one for 35mm film, and one piece of plastic with a large open area in the middle, but with the requisite window at the top to allow the scanner to adjust exposure for the baseline of any scan of film. Without this small space at the top, the scanner will refuse to scan film correctly.

I experimented with this, and I found that even a strip of black gaffer’s tape carefully placed on the top of the scanner window will do the trick. This leaves the majority of the bed available for the film – which I used to the fullest with my huge panoramic negatives.

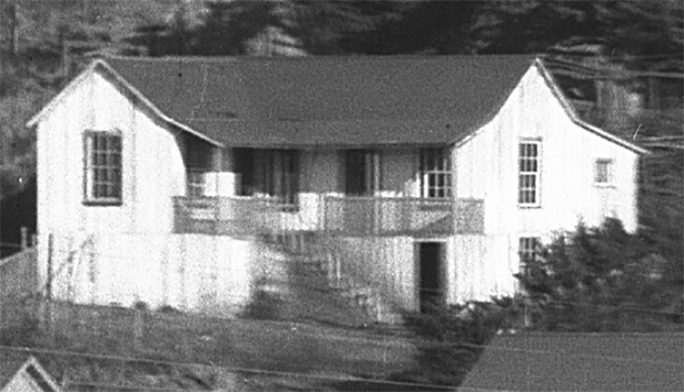
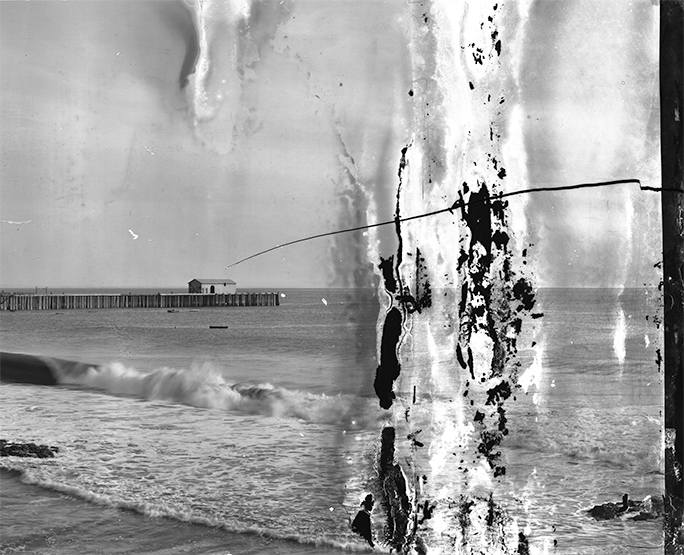
Avila before

This is an example of the damage that was typical in the film I scanned. These films, you may remember from the last blog, had been under water back in 1973, and were severely damaged by water and silt. In 1983 I carefully soaked and separated the film, but many of the works suffered from this kind of damage. When I completed that task, the film was not able to be printed photographically, so I stored it for 30 years until technology caught up with my needs.

I also used a sheet of regular glass to weigh-down the wrinkled edges of my subject material, and to hold the film against its natural tendency to curl back into a roll. I thought that I might need to purchase a sheet of anti-Newton Ring glass for this, but the regular glass did the trick; I don’t think it was ever in adequate contact with the film to cause Newton Rings. And, the depth-of-field of the Epson scanner is extraordinary. It did not seem to matter that some of the film surface was nearly 0.1 in. away from the surface of the bed. It all came out in focus.

Avila after

This is approximately the same area in the retouched version of the image. On the right I just cropped the damaged part of the ocean out of the image – that’s a lot easier than trying to retouch it (call me lazy!). The resulting image is quite acceptable.

The scans have an amazing amount of detail, and as a result of the age and prior handling of this film, an amazing amount of tears and scratches and spots. I spent countless hours zooming in and retouching the obvious, then repairing damage to the emulsion as best I could. The resulting images are amazing, and I will be presenting them to the public this coming February in a show at the San Luis Obispo Museum of Art. More on that as the show date approaches!


Posted in Adventures, Panoramic Photography, Photography, Photoshop techniques, Scanning, Software | Tagged , , , , , , , , | Leave a comment

Scanning Kodak Cirkut film

Blognosticator Head

A dear friend of mine, now deceased, handed me a box of film about 30 years ago. The film had been in a flood in the garage of his friend who obtained the film from the original photographer who died in 1966. The film had been partly or fully submerged in the garage for a period of days, and then damp for many weeks thereafter. It looked ruined.

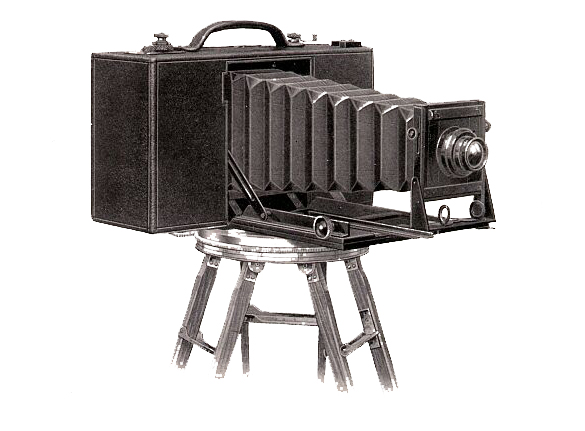
Cirkut camera

This is an image of a latter-day Cirkut camera. At the bottom of the camera is a geared wheel. A wind-up spring motor powered these cameras, allowing them to rotate and to move film inside the camera simultaneously to make a true panoramic image. 

The film rolls, each between three and six feet long, and seven to 12 inches tall, was originally exposed in a Kodak Cirkut camera, a panoramic camera made by a division of Eastman Kodak Company called Folmer & Schwing, then later by Folmer-Graflex.

Rolls of pano film

These are the rolls of panoramic film on my dining room table last weekend.

The original plan was that I would take these films to the photo lab at my business, Tintype Graphic Arts (1973-2003), and restore them to printable condition. Many were ruined because the water-soaked emulsion glued the layers together, and those could not be separated. Others were loosened up by soaking in water and preservative chemicals for several days. Those that I could separate were thoroughly washed to remove the mold and crud of the floodwaters, and then carefully dried.

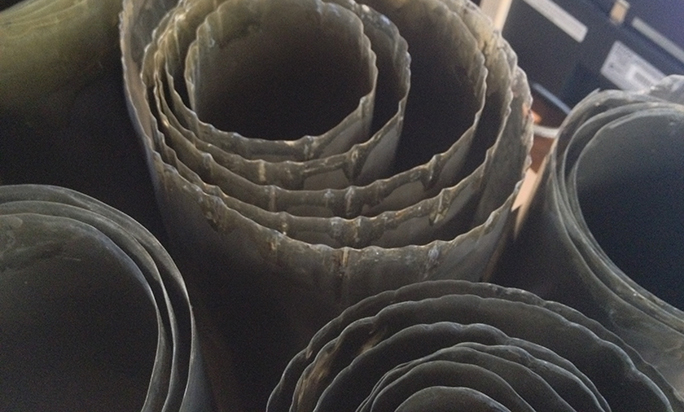
wrinkly film

This is the edge of several of the panoramic films. These wrinkles pose no problem for the Epson scanner, which does a great job of capturing all the detail in these historic photographs.

There are more than 100 rolls of panoramic film in the box. Some are exquisite, while others are badly wrinkled along one edge. Some have severe damage to the emulsion, and others are very clean. At the time, my plan was to attempt to print them they way these photos were printed in the early 20th century – by contact printing. But the wrinkled films wouldn’t cooperate, and my attempts to print the negatives were fruitless. I put the box aside, hoping to figure something out later that would make them printable.

All of the images are of local subjects. There are scenic panoramas, community events, military parades – everything a commercial photographer would have been involved with in the early part of the 20th century.

I have a passion for panoramic photography (which is well documented in other blog entries on this site). I have been taking panoramic photos for decades. And, I have a show coming up at the San Luis Obispo Museum of Art, a show of panoramic photographs that will run from February 14 through March 30, 2014.

Last Sunday I went out to my garage and dug out the big box labeled “Photography.” It is like many other boxes of photos in my personal collection except a bit taller and deeper. When I opened the box I remembered the flood-damaged negatives and was about as excited as I ever get. Wow! Original, local panoramic photos!

And, in the 30 years that have passed since I had last opened that box, technology has advanced significantly. Today I have a digital scanner that can make images even from wrinkly flood-damaged film.

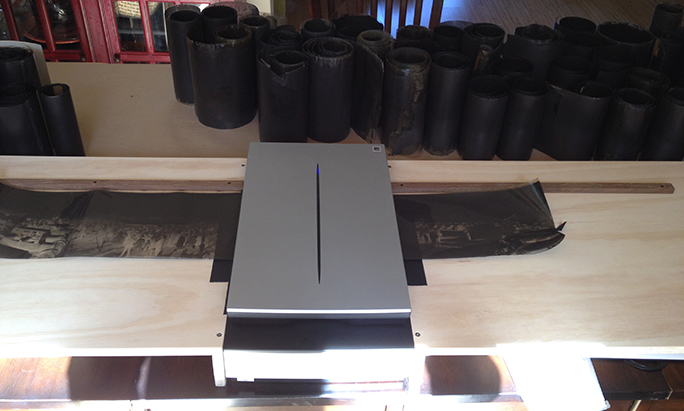
Last Sunday evening I built some extension tables for my Epson Perfection 700 scanner to support the long-roll panoramas, and on Monday afternoon I made my first scan of a four-foot long film negative. I am doing this in sections of about eight inches, with an overlap. I built into the extension tables a guide edge to bank the film against, and when scanning, I slide the film (carefully with cotton gloves!) across the table, into the scanner, and I scan a segment, then I repeat the process until I am done.

Epson scanner extensions

This is the Epson Perfection 700 scanner with the two extension tables I built to support and to register the panoramic films as I scan them.

Once I have the scanned sections complete, I pass them to my desktop computer and I run them through Photoshop’s Photomerge function, which can put them back together in minutes, almost perfectly every time.

Once the merged image is done, I flatten it, then spend an hour or two retouching, correcting scratches and other marks, and making the photo as nice as I possibly can. I scan at 800 ppi, which makes a composite image in the 500-600 MB size range. This size is needed because I plan to enlarge these photos to about six feet in width, then hang them in my show above or below a recent photo I have taken from the same location.

Finding the exact location to take these photos is not as easy as it seems. San Luis Obispo has been on a tree-growing crusade for the past thirty years, and most of the downtown is now lined with (admittedly lovely but…) troublesome trees. My modern replicas are in color, and are or will be taken with the GigaPan robotic camera mount. The result is ultra-high-resolution images that can be enlarged manyfold larger than my film-based historic images can be.

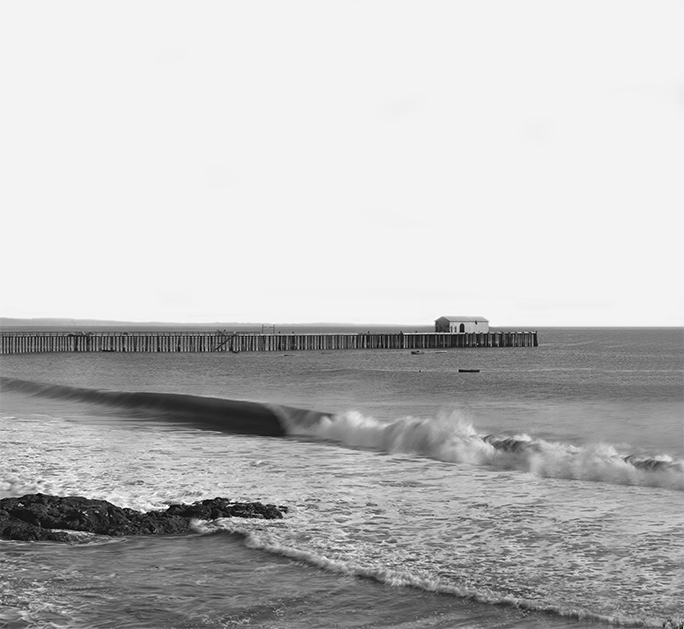
San Luis Obispo from Terrace Hill

This is one of the panoramic images taken from a hill called Terrace Hill. At the time this photo was taken, that hill was about 100 feet taller than it is now (thus the name “Terrace Hill”). A much smaller San Luis Obispo is visible in this image. Click to see the image at twice this size.

Terrace Hill Gigapan

This is one of my GigaPan images, taken January, 2013 from a location about 150 feet to the left of the image above. It’s possible to see how much the community has grown in the years since the upper image was made. Click to see the image at twice this size.

My method for scanning is to use Epson Scan software, which controls the Perfection scanner, and allows me to set the resolution and to adjust exposure, color balance, and more. These images are monochromatic, so I am scanning them as grayscale images, then turning them into RGB color and adding a color overlay to tint the resulting prints the way an original photo from the era looks. As a model for that color, I have one original print made by the photographer from a negative that I – curiously – do not have in this collection.

I have six completed so far. So, at this pace, I can get them all scanned in about half a year. Meanwhile my wife and I can’t use the dining room table because it’s covered with panoramic film, the scanner and the extension tables and computer. I will figure something out to solve that problem.

And, as I finish scanning the images, I am putting each negative, rolled gently into a cardboard tube with plastic caps, with a label describing the subject of the film, the quality of the image, and a warning that the film is of the nitrocellulose variety, and therefore very flammable and not very stable. Once this project is complete, I will return the negatives to the family of my late friend who allowed me to clean them up, then hide them in my garage for three decades.

And, come February, some of these wonderful images will be hung in my show at the Museum of Art where everyone in the community can enjoy them.


Posted in Adventures, History, Panoramic Photography, People, Photography, Scanning, Technology | Tagged , , , , , , | 3 Comments

A textural photo assignment

Blognosticator Head

I occasionally find myself walking down a street of booths at a farmer’s market or a community fair. I attended one a week ago in Clovis, California. There were all the usual vendors – kettle corn, corn dogs, frozen lemonade, churros, and more. There were also a few strange ones – a group of people asking for signatures on a petition to impeach President Obama (their grounds for impeachment fell far short of those proscribed by the Constitution). Bottom line: they don’t like him.

Birds 01

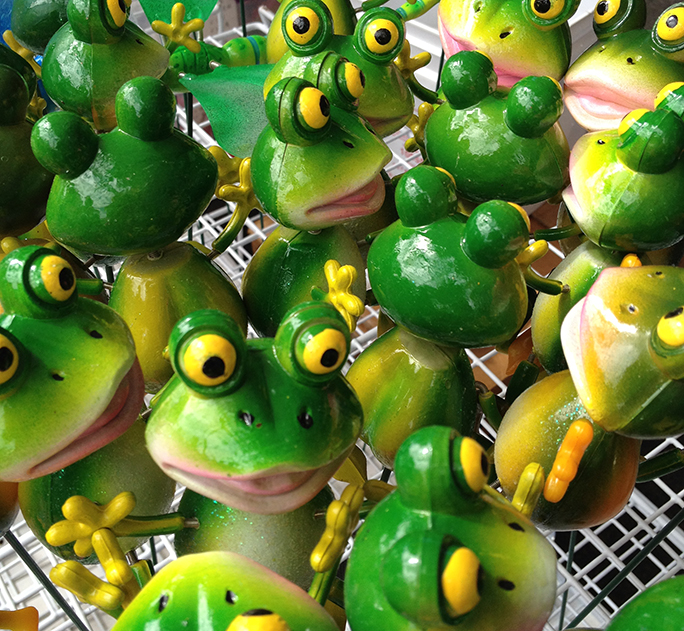
At the fair there were vendors of tacky wall art, calendars, wood-burning, etc., et cetera. And various vendors (I think they were all selling for the same company, though in separate booths) with plastic oddities one could vaguely call “décor.” These included pretty plastic birds, frogs, butterflies and pinwheels. My wife bought one of the birds to give to a bird-lover friend. I bought some frozen lemonade for a lemonade-lover (me).

As we walked with friends along this chorus line of mostly useless stuff, I thought about a photo assignment. I decided to entitle it “textures” and to take photos that captured the textures of the community fair. The colors and variety were resplendent, the sheer number of booths was exhausting. The photo opportunities were many.

Frogs 03

What’s fun about textures is that individual objects disappear, replaced by the textural qualities of a mass of objects. Birds become a sea of color and iridescence, plastic frogs are not just frogs, they are a jungle of colors. To me it’s like the effect of halftone dots – up close they are dots, but when viewed from a distance they become an image. It’s one of the most masterful illusions!

Umbrella handles 01

At one booth I was about to take a photo of stacks of hats when the vendor shouted at me, “No photos!” I asked him why – they were stacks of hats for goodness’ sake – he responded that he doesn’t allow photos of his hats. Perhaps these hats were foreign-made rip-offs of hats by famous-label designers and he didn’t want me to gather evidence of his theft of intellectual property. Perhaps his hats contained terrorist messages in the patterns of the herringbone fabric that he didn’t want me to capture (I watched an episode of Homeland last night). I walked away hat-photo-less. I moved on to the umbrella vendor who didn’t seem to care if I photographed her umbrellae.

Bows 05

I got some nice images, and it made the festival even more interesting for me. On Thursday evening I plan to go to the local farmer’s market to photograph beets and carrots and avocados. Those textures will make interesting photos for another blog on another day.

Posted in Adventures, Photography | Tagged , , , , | Leave a comment

The last offset press at PRINT?

Blognosticator Head

I was trying to figure out how many times I have visited Chicago to attend the GraphExpo and PRINT shows. I think it’s nearly 40. I wasn’t able to attend for a few years because of travel conflicts, and I didn’t go a couple of times because I couldn’t afford to take the time away from work. But I have been making the pilgrimage since my first visit in 1970.

Komori press

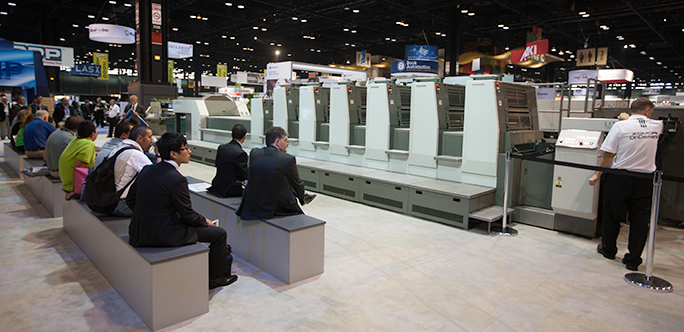
This was the Komori Lithrone six-color press on display at PRINT13. The company was, as always, demonstrating the features of the press. The most impressive of those is the fast change-over that makes automatic plate changes in about a minute.

I remember the first time I attended the show. It was huge, much bigger than it is now. Press manufacturers like Goss had full size newspaper presses running at the show. Heidelberg had not one, but a half-dozen presses running on the show floor. These machines were captivating, and I remember many times having difficulty bringing press sheet samples home on the airplane.

At the height of the GraphExpo/PRINT experience I remember a bell that the managers of Heidelberg would ring every time a press sold. You would hear the bell ringing throughout the day, and people in the vicinity would applaud and cheer.

Then there was 9/11.

GraphExpo was in full-force on September 11, 2001. The show came to a complete stop that morning, and people attempted to get home from Chicago. There were stories about airplanes being diverted from their destinations to odd places like Lincoln, Nebraska and Plano, Texas, instead of Los Angeles or San Diego. Many people rented cars and drove cross-country to get home. And, I heard one story about a man who took a taxi to a used car dealership in Chicago, bought a barely passable car, then drove back to McCormick Place and announced that he was driving to Seattle. Did anyone want to join him? Minutes later, the car was filled with travelers and they drove all the way back to Washington in the car. He sold the car after the trip.

The 2002 show was a muted affair, with both exhibitors and visitors reluctant to participate. I remember it was like a trade show in a ghost town.

In the years since then, the show has grown back to full size again, with tens of thousands of visitors, and a tremendous number of exhibitors. But the presses started to disappear. Last year Heidelberg did not have a booth, and the word was that they would return to PRINT13 with presses, as it’s the show for printing. They were not there this year. Mitsubishi was not there this year. KBA was in attendance, but had no presses in their booth.

Komori had a large booth, and displayed the only multicolor press on the floor. The press was a six-unit Lithrone with a separate coating unit. It was encouraging to see the Japanese company still believes in printing presses. There were plenty of digital and ink-jet presses on display, including one I wrote about a couple of days ago from Komori (and INX and Startanics) that prints pressure-sensitive labels with ink-jet technology.

The printing industry is changing, certainly, and we are watching that change at the GraphExpo and PRINT shows. Thirty years from now I will be blogging about the newest anti-gravity printing machines from Komori, and the transparent aluminum printers being exhibited by Epson.


Posted in Printing and Printing Processes | Tagged , , , , , , | Leave a comment