Pushing preflight upstream

The responsibility for preflighting a job prior to printing has been for a long time the aegis of the prepress professional. It is logical that preflight should be carried out in the prepress department as a job makes its way into production.

But, preflight is an expensive task in terms of job cost centers. Typical charges for prepress work are $2 to $5 per minute, and this work runs-up a significant charge against the job as it makes its way through production. For some preflight tasks, the work really should be done in the printing plant. I’m referring here to the need to monitor trapping, overprint, bleed, checking that the correct color profiles have been used.

But the lighter side of preflight can easily be done by the designer or page layout artist, and it should be done there. The tasks I am referring to here include checking spelling, checking for missing fonts, repairing missing links, and making sure that all the parts are in all the right places.

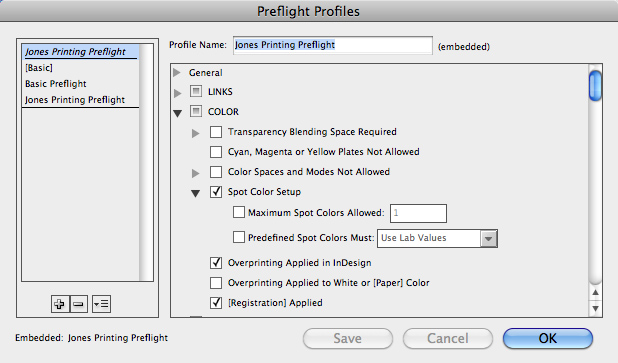
The prepress pros can contribute to the preflight process by making InDesign Preflight Profiles (one is shown above) that are customized for their production requirements, and providing these templates to their designer clients. These preflight profiles can (should) be posted on the printing company’s web site along with color profiles and PDF presets to aid the customer in preparing artwork for production that is perfectly ready for production.

InDesign’s Preflight tools are surprisingly effective at alerting design specialists to potential problems before they occur in production (and become very expensive corrections).

I made a profile this morning to demonstrate the process to my students. I set a few basic characteristics that are practical for sheet-fed production:

• Warn if bleeds are not present 0.125 in. all the way around the job
• Warn if artwork is too close to the edge of the sheet (less than 0.125 in.)
• Warn if the resolution of any color or grayscale image is less than 225 ppi or greater than 750 ppi
• Warn if the resolution of any bitmap (line art) file is less than 800 ppi or greater than 2500 ppi
• Warn if there are missing fonts
• Warn if there is any overset type
• Warn if a CMYK image will possible be processed a second time to a different CMYK
• Warn if any line is thinner than 0.1 pt. in thickness
• Warn if there is any type 4 pt. or smaller, and especially if it is made of more than one color

I saved my profile in the name of a fictitious printing company in Morro Bay, California (12 miles from here).

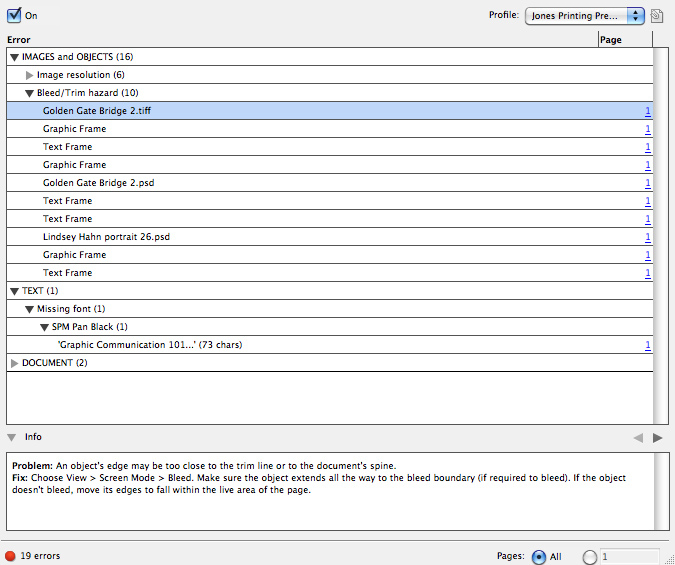
Then I ran the profile on a test sheet my students and I have been building. InDesign’s Preflight tool warned me that I had 19 errors. Some of these errors could be attributed to the fact that I was testing high-resolution line art scans to see where the best results could be found (2400 ppi), and a couple of the errors I wrote-off to photos that were too high in resolution (never can be too rich or have too much resolution!).

This preflight error tells me that the photo identified is too close to the edge of the sheet without bleeding.

Curiously, a few of the preflight errors were legitimate, and it made me realize that I had made a few errors in creating the test sheet. I adjusted the position of a couple of images, stretching the bleeds off the page where they had only kissed the edge in our original design, and I changed the file type of one of my images before replacing it in the layout (I had put a GIF file into the layout, which was certainly going to cause trouble later).

I am an advocate of PDF for all printing production, and I encourage all printing practitioners to provide the tools and instructional materials to their design clients to make press-ready PDFs as the only file that comes into the printing plant. I realize that some printers prefer to receive InDesign files, links and fonts (in a Package, I hope), but accepting the “native” files from customers is inviting trouble in my opinion.

So, providing a preflight profile, instructions on how to use it, and providing the best possible ICC color profiles (and instructions on their use) make it possible for the printing firm to pass the majority of responsibility for preflight upstream to the client, and thus reducing the cost and trouble of doing that work in the printing plant.

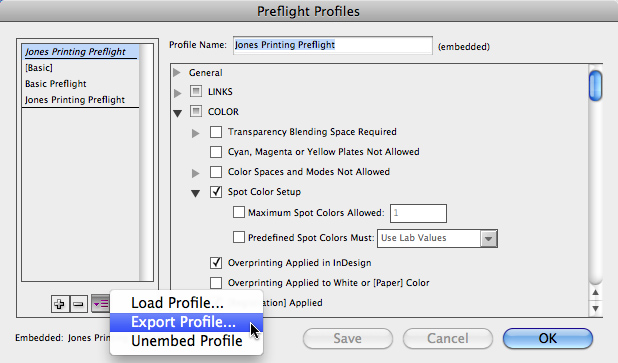
To export a Preflight Profile from InDesign, find this nearly perfectly hidden menu and save the file. Then, post the profile on your company’s web site and make an instruction sheet to tell your customers how to load it and use it.

And, printing companies can (should) provide a PDF preset for their design clients (with instructions) to assist in making a PDF that is truly press-ready.

Posted in Color Management, Printing and Printing Processes, Software | 3 Comments

An Ode of Hatred for the Pocket Wizard FlexTT5

An update on this post: Phil Bradon, a product marketing manager for Pocket Wizard, contacted me and has arranged for me to try the new Pocket Wizard Plus III transceivers to see if they will solve my problems with triggering my Canon strobe flash units. I have accepted his offer, and will report on my success here after they arrive, and I have given them a try.

I appreciate his gentle response to my ode, and want to acknowledge his kindness.

—Brian

There are, occasionally, things that make me go raving mad.

My Pocket Wizard FlexTT5 transceivers are an example. I have been a customer of Pocket Wizard for years, and I own three of their earlier devices, each of which has worked nicely. To say I was a delighted customer would be too strong, but to say “satisfied” would be fair.

The Pocket Wizard FlexTT5 transceiver, designed to work with Canon strobe flash units.

When they announced the FlexTT5 series, which work with either Nikon or Canon strobes, I jumped, and bought three of them. These devices work (or are advertised to work) with my Canon 580EXII strobe flash units, and provide a host of TTL features-over-radio. Pocket Wizard said that they would transmit 1,000 feet or more – nice – and that they were the answer to my TTL strobe flash dreams.

Sorry. Those dreams have turned into nightmares.

The TT1 transceivers don’t work. And, my goodness I have tried, and tried to make them work.

The problem started immediately after I got them, which is a couple of years ago. I tried to get them to do “normal” things, like fire my strobes from moderate distances like 25 feet from the camera. No luck. I moved them closer, and sometimes they worked. Other times nothing happened. It was very frustrating.

So, I went to the Pocket Wizard web site, and I learned that there was a problem with Canon strobes emitting radio-frequency interference that made these units fail to work optimally some of the time. What could be done? Buy these plastic shields to put around your strobes, and the problem would go away.
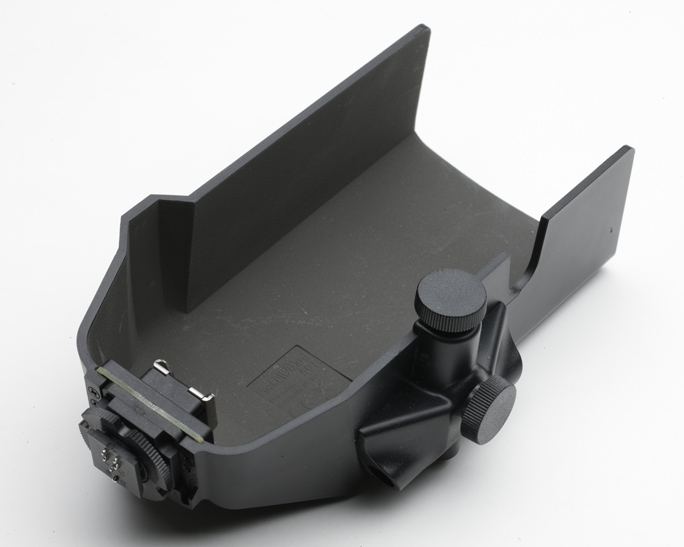
The dumb plastic RF shield made for the Canon 580 EX II strobe. The indent on the right allows one to push the button on the side of the strobe unit, but the shield prevents it from folding at the middle – so why did they put the indent there?

So, I bought two of the plastic shields (I spent a small boatload of money on them), and I installed them, and very quickly discovered that they rendered my strobe flash units essentially useless. The shields prevent the strobe units from folding forward to direct light out the front. I could only use them in a fully straight position, which is really dumb.
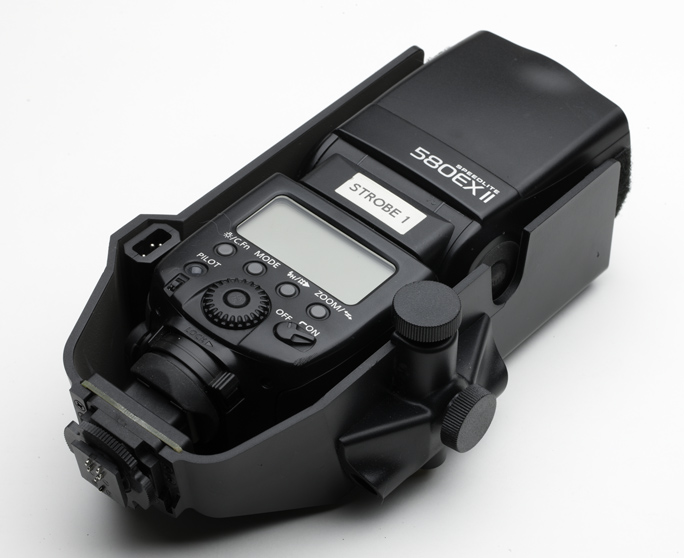
One of my Canon strobes in the dumb plastic shield. You can see the dumb isolation framis at the bottom.

And, I use an external battery pack for my 580 EX strobes. Pocket Wizard provided a little 90-degree connector to make the connection of my cable possible, which I appreciated.

In this configuration I attempted to use them for news photography. It was a disaster, so I gave up on the plastic shields.

Then, Pocket Wizard suggested that I get the little conductive cloth bags which would eliminate the radio-frequency interference. I bought two of them, spending about $50 more to solve my (their) problem.
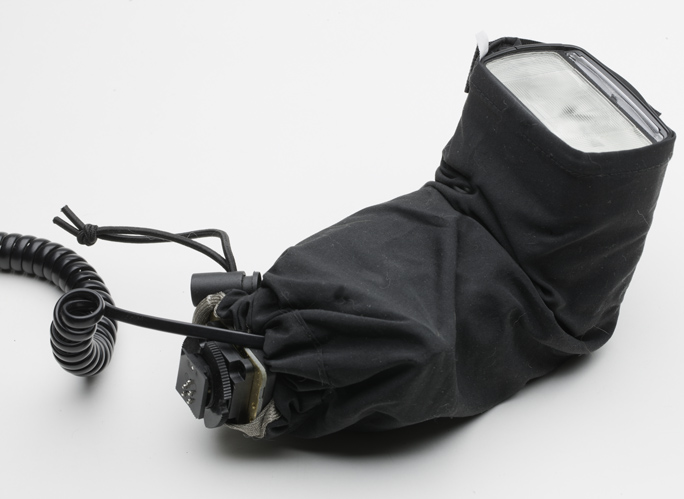
My Canon 580 EX II mummified in the dumb conductive RF shield bag, and the dumb isolator framis on the bottom.

These bags come with what I call the “dumb isolation framis” which is a hot-shoe adapter that isolates the strobe from the camera, the Pocket Wizard, and ostensibly the source of RF interference. These framises are about an inch thick, which makes it difficult for me to use my strobes in a soft box or other modifier bracket because the center of the strobe is then one inch higher than it is supposed to be. I overlooked that and forged ahead.

When using the (dumb) isolation cloth bag, you can’t get to the controls on the back of the Canon strobe. You have to loosen the drawstring, and then wiggle the bag upward (getting it over the external power cord is very difficult) to get to the LCD screen. Often, while attempting to get this to work, I gave up in frustration; news does not wait for the Pocket Wizard conductive bag. Another bad idea.

Note: These RF problems do not affect the Nikon versions of the TT5 units; those apparently work wonderfully.

As for range, I have seen the online video where some nice guy uses his Canon 580 EX II strobe with a PW TT5 transceiver for a distance of over 500 feet. It’s very impressive. Three weeks ago I needed to shoot across a city street and through a window at a man siting in a restaurant. It was about 60 feet. The stupid things would not transmit that far, even when mummified in the (dumb) RF bag. I was so frustrated that I gave up.

I’m sure some of you are thinking “Oh, you probably had bad batteries.” Don’t get me started on batteries! I have bought several hundreds of dollars’ worth of batteries, rechargeable, non-rechargeable, and nothing makes them work correctly. It’s not the batteries.

I dropped one my my strobes one day. It fell about 10 inches from my hand to a concrete floor, and it landed on the metal foot that was connected to the bottom hot-shoe of the TT5. The (dumb) isolator framis was above that, followed by the strobe itself. The bottom hot-shoe cracked and broke off.

So, I sent it back to Pocket Wizard with a charge to my credit card of something like $125, and they kindly sent me a new one (I guess fixing the foot was more difficult than replacing the entire unit).

I put the new one into the old one’s place, and tightened the hot-shoe. It broke off as I watched, and I hadn’t even tightened it very much. So, the new one broke immediately on installation, and remains broken to this day.
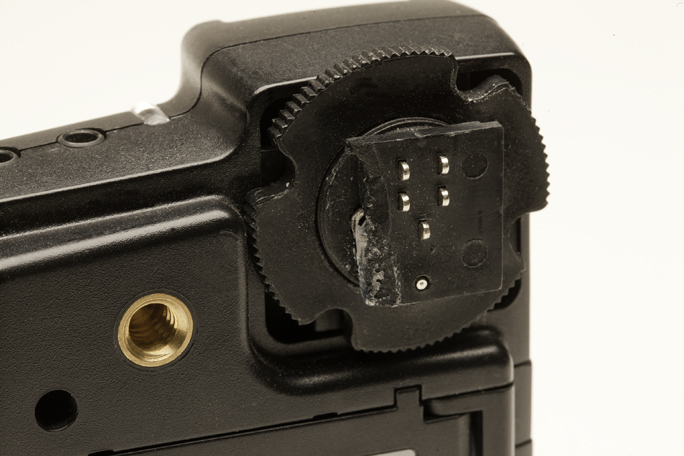
The broken foot of the hot-shoe. I live with this because it’s too much trouble to send it back and get another one. I think I might try using this unit as a skeet-shooting target this weekend.

I have spent several thousand dollars on the strobes, the Pocket Wizards, and the various “fixes” that Pocket Wizard has recommended. I feel like all of it has been a bad investment. I hate them all; I hate the strobes, I hate the Pocket Wizards, and I wish I had just stuck with the original Pocket Wizards which still work just fine).

What am I going to do next?

I might try the next edition Pocket Wizards, and abandon the TTL versions. The new ones look good. But, unlike the TT1 models, they don’t allow me to connect them to my strobe units with the hot-shoe, instead requiring a short cable adapter, which I also hate. I’ll almost certainly end up with the Pocket Wizards stuck to the back of my strobes with Velcro and a cable. And, they will probably work fine, and I will grumble and get some work done.

But, I won’t be happy.

I wish that Pocket Wizard would just admit that the TT5 product for the Canon strobes is a complete disaster, and give me my money back.

For them, I have written this little ode:

 

How do I despise mine Pocket Wizard FlexTT5?

Let me count the ways!

Whilst the hot-shoe broke within an hour of its replacement, I spat and cursed (this due to the fact that it is made of a villainous plastic material, not strong enough for its own screw-keeper)

Whenst the device faileth to shoot images in a burst, sometimes faileth to respond to any signal at all (for reasons unknown to mine eyes and brain)

Whilst the device has never worked as advertised

(Lo, they claim it sendeth its waves over the ground up to 1,500 cubits!)

Mine own experience is more in the realm of 15 cubits! (which is sorely shy of the prediction)

A device so poorly engineered that it won’t work with the Canon Speedlights to which it ist paired, (Electromagnetic radiations, they protest!)

… and then they asketh me to buy a pribbling plastic shield that was so lame that it faileth to allow me to sorely use mine own Speedlights, except in a straight-up position.

(But, I want mine light to travel outward, as the jackal sneaks upon its prey, upon the Earth and not whilst pointed at the stars or the ceiling!)

And, then, for additional lucre, I acquired the slightly less-mumblejack black shield bags, which wrap around mine Speedlights as would a mummy’s cloths.

But, lo! These electromagnetic shield bags prevent me from accessing mine own controls, so making the lights go from TTL to MAN is essentially impossible (and they don’t easily allow for mine own power cable to plugeth-into the Speedlights, so I fight and scrape to get the silky bags off the bottom)

But then the “Wizards” forced me to add churlish, boil-brained Electromagnetic Isolator Blocks to the bottom of mine strobes, adding a finger of depth to them,

…and making them not fitteth in mine soft-boxes, and then to affix the clapper-clawed silken shield bags to these blocks, further isolating me from mine controls.

This is craven clay-brained canker-blossom torture!

I have given many shekels in exchange for these accursed devices, and wish that I had not done so, a sum of many hundreds!

And, I am no better off than I was before I was familiar with the FlexTT5.

I should have stuck with the original Pocket Wizards (which have always worked fine except for their awkwardness in requiring a sync cable to the strobe and no heated shoe)

Whosoever created the FlexxTT5 (that works perfectly well on the strobes-by-Nikon) is as a cur! Didst thou not ever test these maggoty devices on the Canon Speedlights?

What goatish fly-bitten fustilarian devices are these!
 

Posted in Curmudgeon, Photography | 56 Comments

An adventure in Lego photo mosaics

I am the father of a 25 year old young man who, when he was in his pre-teen years, was a championship Lego brick builder. Several times he won local Lego competitions, and his life seemed for several years to be constructed around the latest Multicore Magnetizer set, or the newest Lego pirate ship. He was obsessed, and we were proud and indulgent parents. The money we spent on Lego kits and bricks probably could have paid for a year of college tuition. Or perhaps it saved us a year of college tuition because he didn’t have to enroll in 3D Design classes or Strength of Materials.

As a result of our son’s passion for Lego constructions, I became interested in Legos and I helped a lot when he was building things. We visited Legoland in southern California, and we invested more of our after-tax pre-tuition dollars in brightly colored plastic bricks. We bought the books, and we enjoyed the joys of seeing our son build ever-more imaginative constructions of his Legos.

This is a low-res JPEG photo of The Blognosticator that was used for these Lego-mosaic images.

A long while back, on the Lego web site there was a product where you could upload a photo, and Lego would send you a kit of grayscale bricks and a pattern to build your photo in bricks. That product, alas, is no longer available on Lego’s web site.

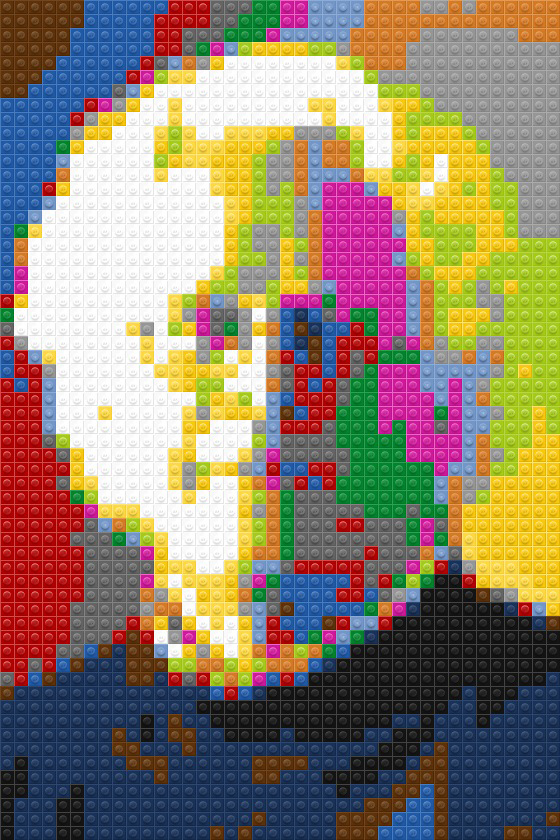
…and this is the image created by the LegoPhoto app on the iPhone. It’s pretty nice, and very realistic because it includes the little round connector buttons on the top of each brick.

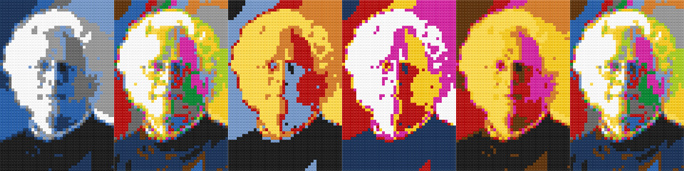
But today, while doing nothing particularly important, I found two interesting applications. One is the (free) Lego iPhone app, called LegoPhoto, which converts any image into a Lego mosaic image. It makes wonderful images, complete with the details of the little round bumps on the tops of the Lego bricks. It also has an enchanting ability to change the color composition of each image, making a number of variations-on-a-theme from the mosaic you create. I uploaded my portrait and ran it through the app, then created six variations of the image and made those into a panel, shown here (Andy Worholesque imagery!).

These are the variations-on-a-theme created by the LegoPhoto app on the iPhone. I find the collection charming – even if it is made-up of images of my own countenance.

Then my mind started wandering and I found myself searching for a more sophisticated image program that can convert images into Lego mosaics, perhaps even into actual Lego constructions. I found one in an instant. It’s called Pic-to-Brick, and it comes from a pair of German software developers named Tobias Reichling and Adrian Schätz. The software is available for Mac and Windows, and it’s delightful despite a few small interface weaknesses.

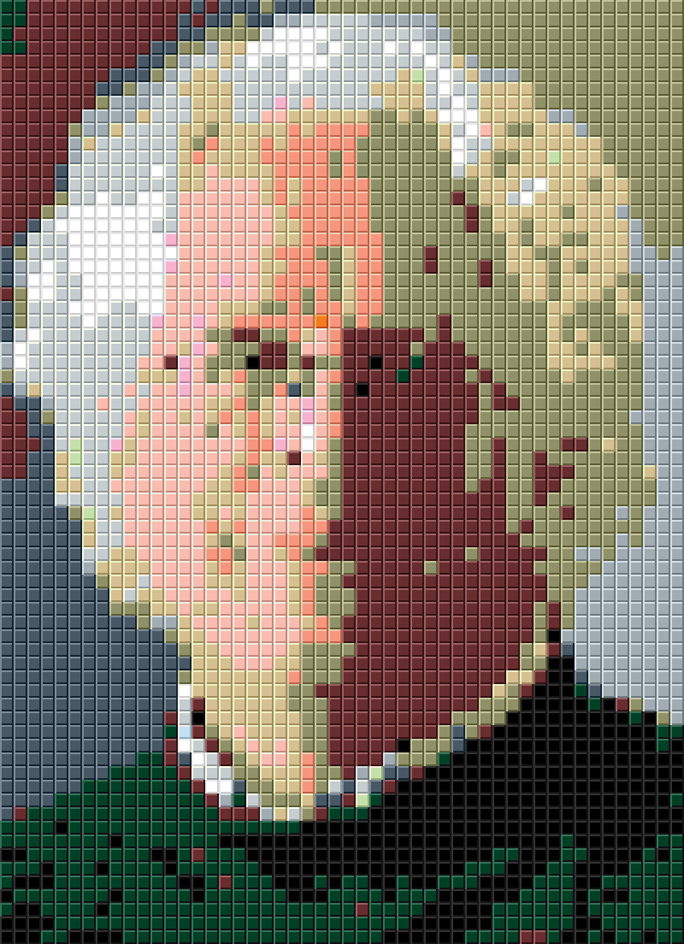
This is more sophisticated mosaic created by Pic-to-Brick software on the Macintosh. It is comprised of 3,450 individual “Lego” brick images in a variety of colors selected from the original image.

With a little experimentation (God forbid I should read the tutorial!) I was making some pretty cool images with the program, generating various color schemes and making screen captures. When you are finished, you can export a construction instruction list, and a bill of materials (in addition to a JPEG of the finished mosaic).

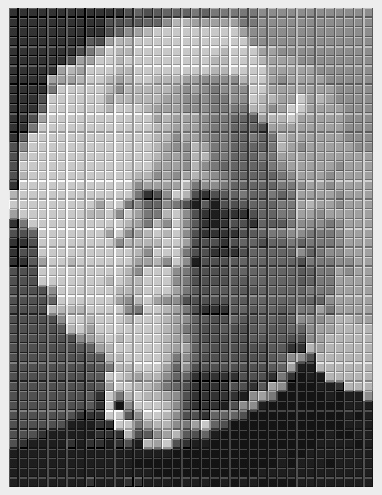
One of the options available in Pic-to-Brick is a grayscale version of the mosaic. It’s also very nice, and would make a lovely work of plastic art.

I like mine, and I thought it would be really fun to build it out of real Lego bricks. I went to the Lego web site, where you can order masses of Legos if you need them in a whole bunch of colors (14 stock colors are the easiest to order). And, though not every color in my mosaic is readily available from the Lego factory, most are, and I totalled it all up to make my 50 x 69 brick art piece. At the online price, this plastum opus would cost me (only) $345.00.

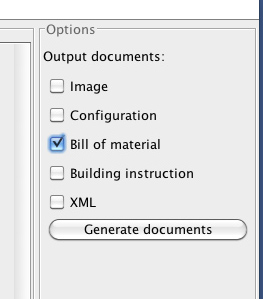
Pic-to-Brick exports a number of documents, all in HTML format, that can help you to order and build a construction of Legos if you can afford them in such quantity.

So, I stopped working on that angle and decided instead to write a blog about how delightful the software is, and how impressed I am with the output documents, the mosaics and the bill of materials. This is very cool stuff indeed; I just can’t afford to buy 3,450 Lego bricks to make my Lego self-portrait.

Posted in Art, Photography, Software | 3 Comments

Stargazing with the San Luis Obispo Astronomical Society

I was standing on a hilltop called Star Hill late last night, advancing my panoramic camera mount and pushing the remote shutter button. My camera was aimed into the night sky, with the foreground in each shot. Every frame was 25 seconds long, a pretty long time for a single exposure. A few feet away, my other camera was clicking on a similar interval, 28-second exposures every 30 seconds. That camera was making a time-lapse movie of the same scene I was shooting as a panorama.

This was my first attempt at “astronomical photography” which is to say I have never taken photos like this before. And, unlike everyone around me, I was not shooting through a telescope. I was shooting with two normal cameras, both of which were fitted with very wide angle lenses – the opposite of telescopes, really.

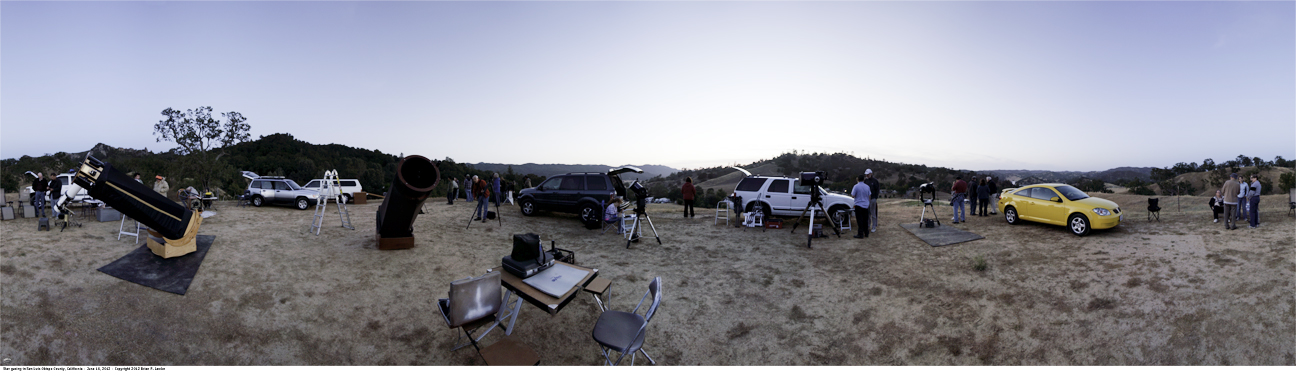
This is a 360-degree panorama of the set-up on Star Hill. Telescopes up to 22 inches were trained on the night sky, and many people made the trek up the hill to look through the viewfinders at distant stars and galaxies. Click on the image to see it twice this size.

What I wanted to get was a time-lapse movie of the night sky with movement in the stars. I also wanted the astronomers of the group to be in my photos, adding a sense of their mission to the photo. I could go out any night and take photos of the night sky, but this night was special because it involved the people who bring life to this late-night activity.

I shared this adventure with my pal Dave Garth, who is a formidable photographer. He was armed with cameras and tripods. We both felt out of place showing up for the first time on Star Hill, unannounced, but invited by the astronomers who make their monthly event open to everyyone. But we had not even made it to the top of the hill when a nice man named Joseph Carro walked up and greeted us, then introduced us to the small number of astronomers who were setting up their instruments. To say we were welcomed is an understatement. We were friends with several of these scientist/hobbyists within minutes.

And, the talk ranged from “how big is that telescope?” to “How many people come to this event every month?”

The answer to that question we learned, as the night got darker, was about 50 people – maybe more. It is an amazingly popular event. Small clusters of people would gather around one of the telescopes, as its owner/astronomer would explain the sky. Blue-green lasers would occasionally point into the heavens as one of the experts named a constellation, identified a star, or pointed to the tip of Sagittarius. “Anyone want to see M50?” I heard several times during the evening.

I set-up my time-lapse camera first, setting it for the circumstances, which included an ample amount of daylight (we arrived an hour before sunset). It was clicking away as I prepared my other camera for the nighttime panorama – a photo I have never attempted before.

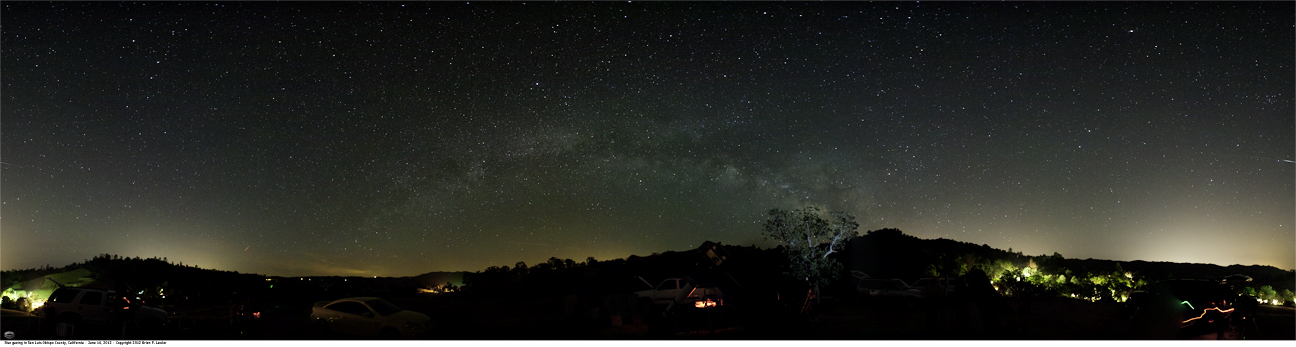
This is my most successful night sky panoramic image. It is a full 360 degrees, and it features at least a couple of galaxies including our own. The lights in the foreground are various activities with the telescopes and nearby campground lights. Click on the image to see it twice as large.

In the days and weeks before this event, I scoured the Interwebs looking for data about star photography, hoping to learn as much as I could about exposures, apertures, lenses, positions, strategies, and more. And, I learned a lot. There are many generous astrophotographers out there who share their knowledge about the night sky, and more specifically about how to take photos of it.

I had little crib-sheets tucked into my pockets. One was a list of things to take with me (jacket, red flashlight, tripods, lenses, interval timers, extra batteries for the cameras, etc.). The other contained cryptic notes: “Polaris, something in foreground, ISO 6400? Oak tree?”

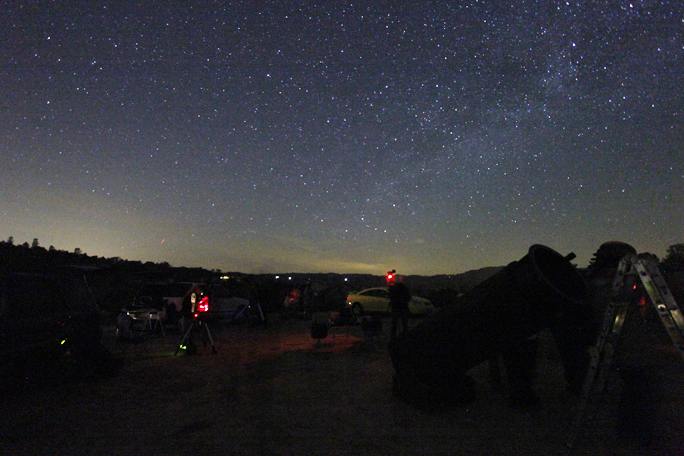
This is a still photo from the time-lapse movie. The movie can be viewed online. This video is dedicated to my father-in-law, Bud Fenter for Father’s Day 2012.

I pointed the time-lapse camera into the north sky, guessing where Polaris would eventually be visible. This camera could not be moved once it started taking photos, so I wanted to be sure to get it positioned correctly. And, it’s impossible to focus once it’s dark, so I was exceptionally careful to focus the camera on infinity – I suspected that the stars are about that far away. Click, click… or more correctly click… (wait 28 seconds)… click.

I listened to the astronomers telling stories about the stars, about white dwarfs and black holes and about star clusters and spiral nebulae. It was both fascinating and amazing. People came and people left. Families gathered to look through the eyepieces of various telescopes. Joseph Carro, retired from the pharmaceutical industry, was explaining the night sky in Spanish to a family who didn’t speak English (I had learned earlier that Mr. Carro teaches Spanish at Cuesta College in San Luis Obispo). I found this explanation very impressive, as I couldn’t do it in any language.

Three hours passed in an instant, and Dave and I eventually packed our gear and headed home, arriving just before midnight back in town. It had been a fascinating evening of stargazing and photography. I had no idea if my efforts at night photography had been successful. I made a hot cup of tea and transferred my images into the computer. I was anxious to see if I had been successful at either the time-lapse or the panoramic.

And, I am very pleased to say yes, I was successful at both. Now I wish I had stayed out there longer, recording the Earth’s rotation around the stars for another hour or maybe two (it would be nice to have more of the time-lapse material).

This was a spectacular evening for me! I took several night-sky panoramic images, a few finished minutes of time-lapse photography, and I came away feeling like this would be fun to do again next month when the Astronomical Society gathers again on Star Hill for their monthly event on Star Hill. Perhaps I will see you there.
 

Posted in New technology, Panoramic Photography, People, Photography | Leave a comment

It’s amazing what a fake mustache will do for an old guy!


I attended a party last night called The Great Catsby, a fund-raiser for the local animal shelter. The theme was, obviously, 1920s.

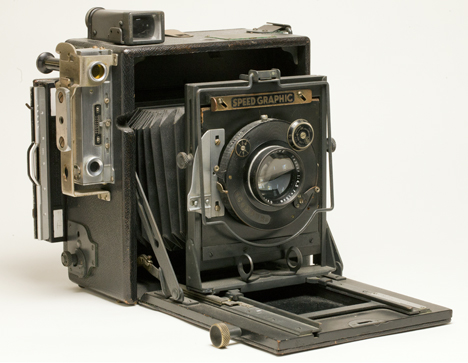
I had decided a few weeks earlier to go as a press photographer, armed with my trusty 1939 Speed Graphic 4×5 press camera. It’s a gem of a camera, leather and wood and brass, with a focal-plane shutter that can still expose a sheet of film for just 1/1000 of a second.

This is my Speed Graphic camera. It converted me into a minor celebrity last night at a costume party for the local animal shelter.

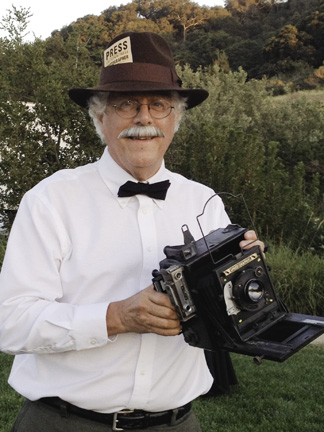
I bought a fedora (Indiana Jones brand), added a PRESS card to the hat band (in era-appropriate type fonts), and hoped that the anachronism of a camera ten years too new would not cause me embarrassment.

I dressed in working class duds, a pair of dark green-gray soft slacks, businessman’s shoes, and a plain white shirt buttoned at the collar with a black bow tie.

This is the older me with my Speed Graphic camera. I’m glad no one noticed that the camera is a decade too new to be in perfect period style for the party; I would have been humiliated!

I added two authentic fountain pens to my shirt pocket, and then glued a fake mustache on my upper lip.

At the party I walked around stalking people with my camera. I was seeking scandal! And, I took some very good photos, though it’s a shame I hadn’t loaded any actual film in the camera. I also do not own an era-appropriate flash of any kind. In the 1930s that would have meant either using flash powder or flash bulbs. Alas, I own neither of those technologies.

I found it fascinating that people I have known for decades glanced at me, and walked on, completely unaware of my identity. Is it possible that the fake moustache was so powerful a disguise that I became invisible? I think it’s true, because it happened about a dozen times yesterday evening. I was a total stranger to these people.

My camera was the darling of the evening, though. Lots of people wanted to see it, and wanted to know how it works, and is it real?

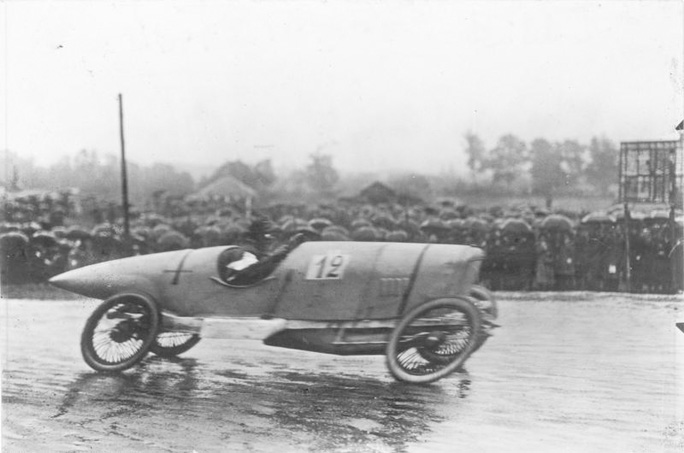
I had a lot of short conversations about the camera’s famous focal-plane shutter and its amazing action-stopping abilities. It really is an impressive bit of technology. The shutter is a bottom-to-top cloth curtain mechanism with a variable-slit opening that slides very quickly across the short dimension of the film. It is powered by a hand-wound spring motor.

This is an image from 1922 which shows the strange effect of using a vertical focal-plane shutter on a fast-moving object. As the shutter moves from bottom to top, the image is gradually recorded onto the film – as the car keeps moving. The result is the “italicized” image of a car speeding by. This image is from Wikipedia, provided by the German National Archive, Berlin. – Photographer unknown.

Mine was made in 1939 by the Folmer Graflex Corp., of Rochester, New York. It’s called a “pre-anniversary” model. Though the camera can be used with what are called “barrel” lenses (lenses with an adjustable aperture but no shutter mechanism), mine has both the focal-plane shutter and a mechanical shutter in its beautiful Carl Zeiss 150mm f4.5 Tessar lens. To shoot with the focal-plane shutter, I need to lock the shutter in the lens open, set the aperture, then use the rear shutter to make the exposure.

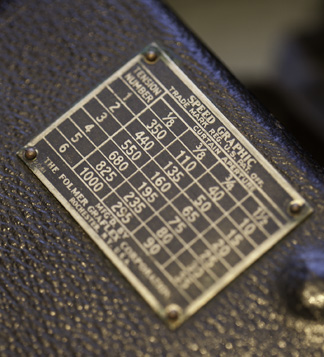
This is the focal-plane shutter speed chart on the top of my Speed Graphic. It has four curtain apertures, and 6 shutter speeds. There are 24 total variations of speed available, topping-out at 1/1000 sec.

The bellows is made of leather, and it’s still light-tight, and mine features a rangefinder viewfinder for focusing (it’s quite difficult to use). The whole thing folds up into a nice leather-covered cube, and it has a sturdy leather handle on the left side.

I used to own dozens of them, but today I only own two 4×5 film holders. I can shoot up to four photos with the camera before retreating to a darkroom to reload the film holders. But, I don’t shoot with film very often, so this shortage of film holders is not much of a burden on me.

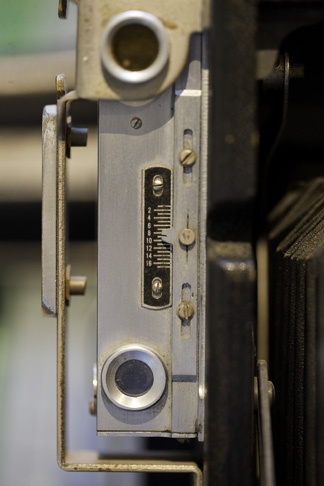
This is a close-up of the rangefinder viewfinder. You look through a tiny tube to line-up two images of the subject. When they overlap, you’re in focus!

The mustache makes me look like a much older version of me, perhaps ten years my senior. I am amazed by the transformative effect of some gray hair on my upper lip. Both my father and my uncle sported gray/white mustaches for a while; I think these photos make me look like them.

It was fun to get out the Speed Graphic and fire its shutter a few dozen times last night. It was also fun to tease my friends with an older version of me. Some may never have known that they were talking to me during the evening. But, for those who were intrigued by the old camera, I was happy to provide a glimpse of photographic history.

Several people told me that their “grandfather had one like that,” and that made me feel really old because I have one like that (though I am not the original owner).


Posted in History, Photography | Leave a comment

VueScan and the CoolScan make a great friendship!

A few weeks ago I put on my Curmudgeon hat and griped about the fact that Nikon no longer supports the software on its wonderful CoolScan scanners.

And, I lamented the fact that I would have to purchase new software to use my CoolScan 9000 scanner. Which I did.

And, here I am to proclaim that I really like that software and find it to be a refreshing tool for acquiring digital images from film.

I bought the Professional version of VueScan from Hamrick Software ($79), installed it, and was right back in the game with my scans. The learning curve is short and not too steep; I am running at full speed with just a few scans to my credit.

VueScan provides complete control of the scanner, adds some new features that were never in the Nikon software (a calibration scan, for example), and it behaves well in all of the conditions I have tried.

I used the scanner and the new software for the first time while scanning my dad’s 75-year old negatives of the Golden Gate Bridge under construction. I was very pleased with the results and the performance of the software.

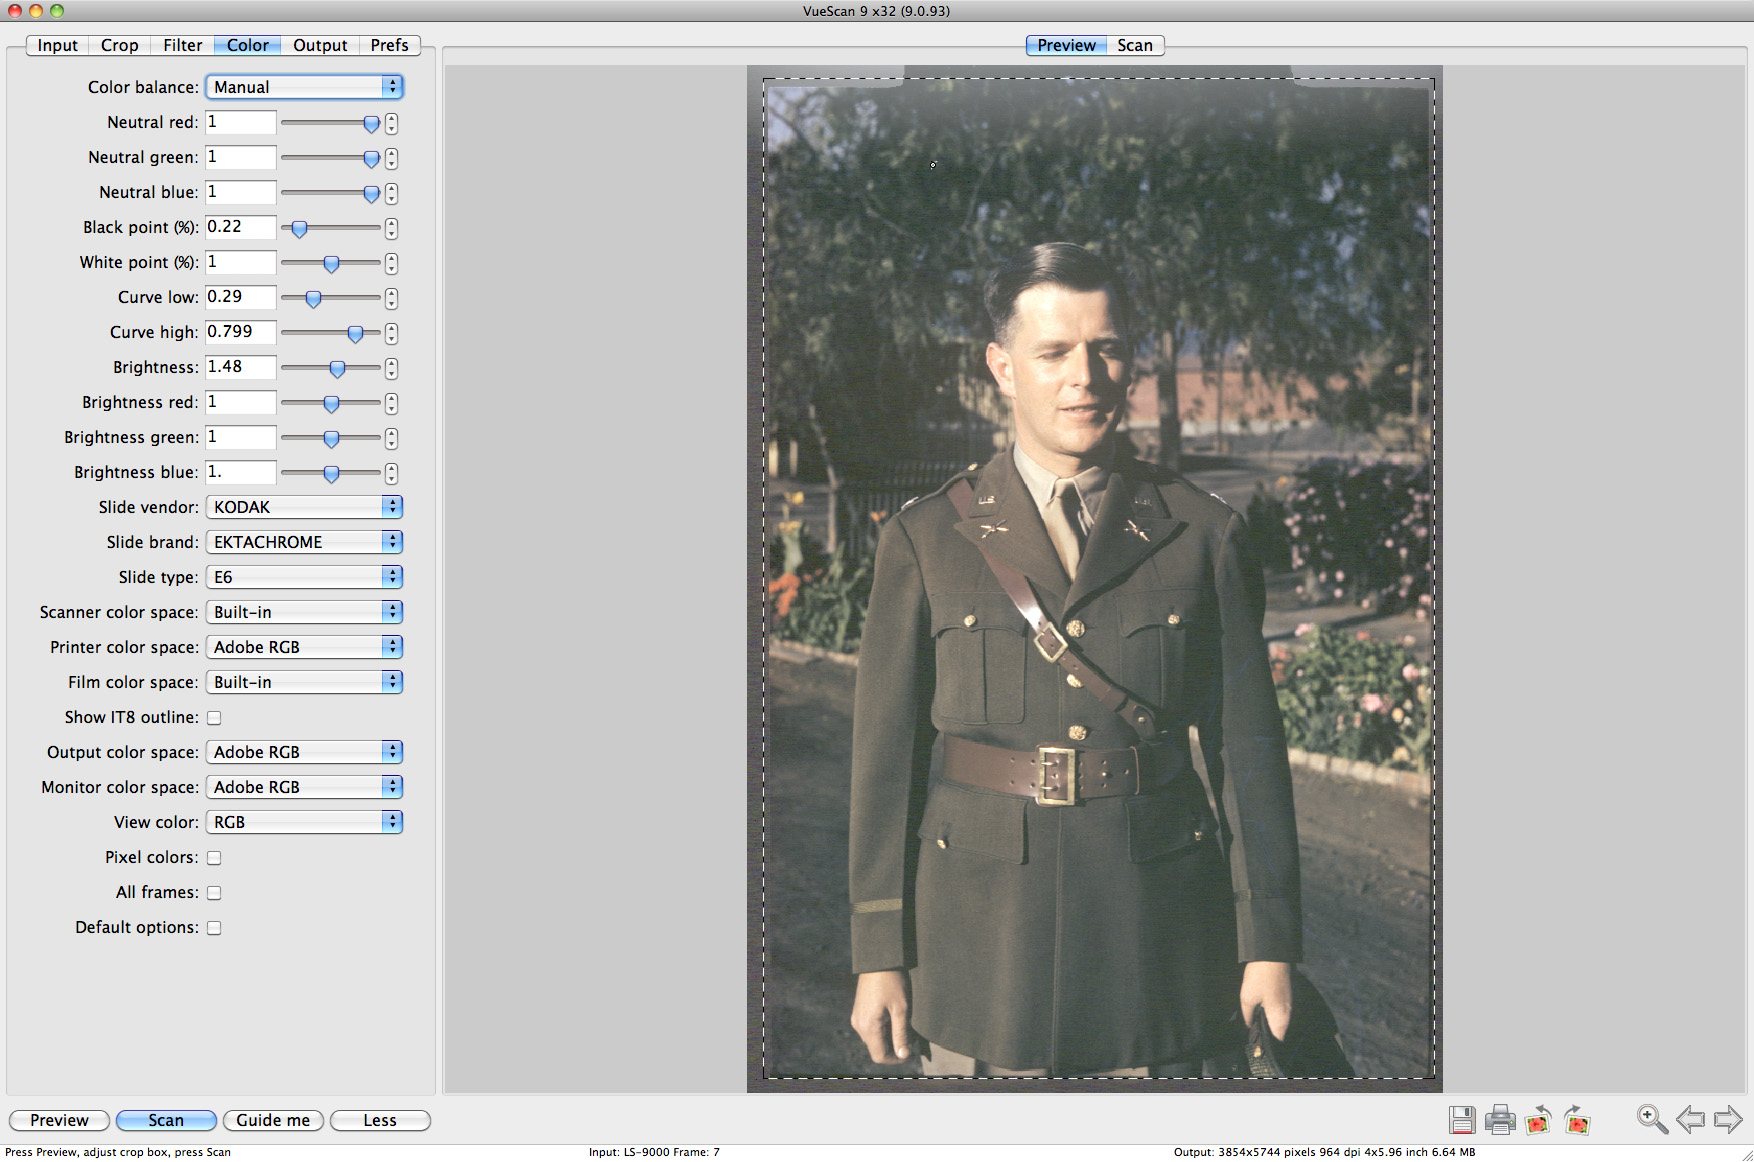
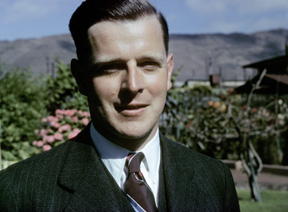
This is the VueScan interface window for Color. In this example I am scanning a photo of my father in his military uniform in the 1940s. The original is a Kodachrome transparency, which has a very different emulsion type than the various Ektachrome films that came after it. VueScan understands the difference, and once it is set to Kodachrome (notice that I have not yet done that in the controls), the color is quickly corrected.

Today I am scanning a number of 35mm black and white negatives, and using the scanner in batch mode for the first time. It seems to be working nicely, and it’s producing these batch previews in short order.

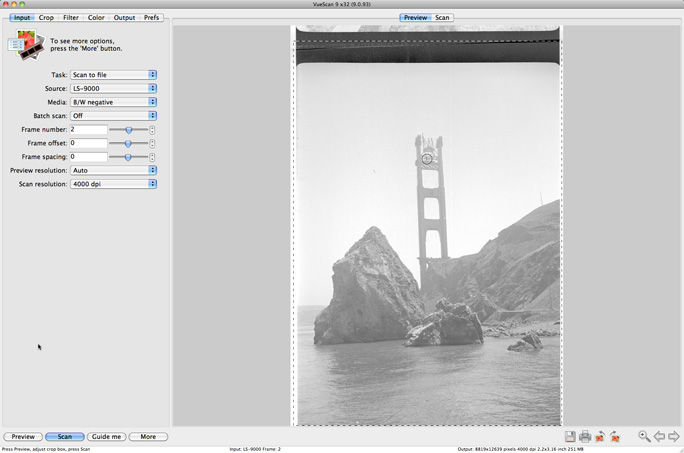
This is a preview of one of my dad’s medium-format negatives of the Golden Gate Bridge under construction. The Frame Offset value in the controls allows me to move the scan area relative to the image on the film. This was always problematic on the Nikon software; it’s slightly less troublesome in VueScan. The correction is relative to the current image, which requires a new preview when the value is changed.

I understand of course that the scanner being driven by VueScan is the same scanner I used to run with Nikon’s scanning software, but I’d like to think that Hamrick has learned a lot about the performance of the CoolScan devices, and has optimized the performance of its software to make them do the best possible work in the shortest amount of time.

This is a short-and-sweet blog. Thank you to Hamrick Software for making the transition to your software painless and effective. I think this is the beginning of a beautiful friendship!

Posted in Curmudgeon, Photography, Software | 2 Comments

Sitting for a Ken Christiansen portrait

Los Osos, California artist Ken Christiansen is a wonderful impressionist landscape painter. His works are prized by locals, and praised by art collectors worldwide.

I have always wanted one, but have not yet made the decision to purchase a painting for my small house with not enough wall space (we rent a storage unit that is packed with framed artwork).

But a few weeks ago Ken sent a postcard inviting some of his friends and clients to sit for a portrait in his home, so my wife and I decided to do it.

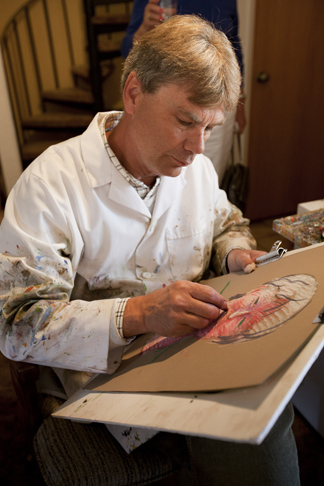
Ken Christensen at work on my wife’s portrait. His quick hand and deft [brush]strokes make short work of the pastel portrait.

You can probably bring up an image of the artists at Montmartré in Paris, sketching tourists with pastels as quickly as they can, and your impression is correct. Our friend Ken has spent a considerable amount of time at Montmartré studying the technique of these sidewalk painters. This, while he is spending time in France making large oils of scenery and picturesque towns.

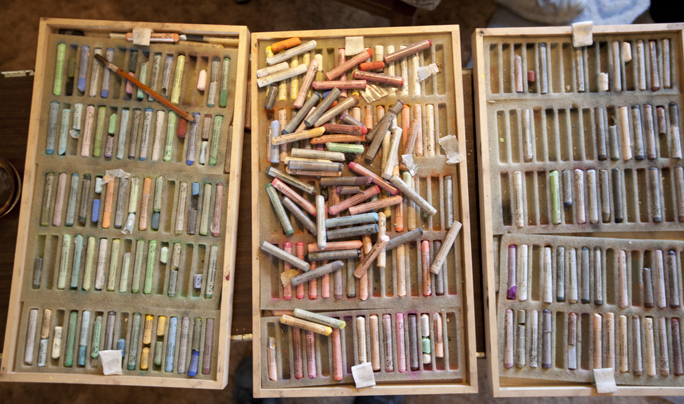
Some of Ken’s pastels sit beside his chair in the room. His hands would flash in an out of the pastel box, choosing a new, more subtle color as he worked.

Ken works in oils, mostly, so I was curious to see how he handled pastels, and I came away from the experience impressed. His impressionist style translates nicely into colorful portraits that are both well drawn and playful. I love what Ken does with colors. Like his many predecessors in the impressionist style, he will occasionally make a field of green grass into purple, or a cloudy sky into a deep gray-green color. Unlike his Dutch predecessor, though, Ken still has both of his ears.

And, also unlike his Dutch predecessor, Ken actually makes his living by painting, an impressive, impressionist feat in today’s digital world.

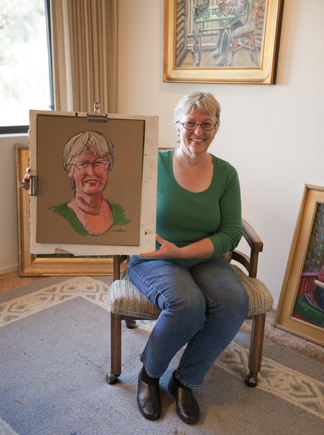
My wife holds her Christensen portrait after it was completed.

My wife and I arrived on the scene while Ken was finishing another portrait, and we were enjoying Ken’s other work on display when the time came for me to sit for my portrait. He had me sit in a comfortable chair and he sketched the drawing out on a sheet of gray-brown paper. I have never sat for a portrait before, so found the experience a bit intimidating. I was careful not to move as I sat.

The process was fun to experience because I had no idea what was happening on the paper across from me. He would lean to the side, and grab a slightly different color pastel crayon, sketch for a minute or two, then go back for another color. My wife and others in the room had the benefit of seeing what was being created while I did not.

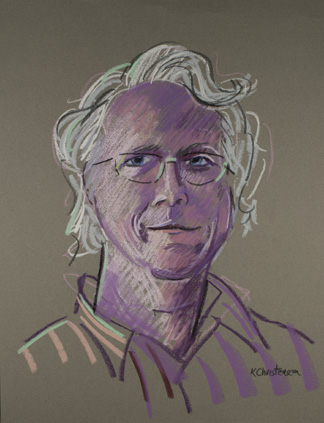
…and this is my portrait. I’m probably not really this color, but I do like the work, and am proud to have been painted by Ken. Images used by permission of the artist.

When he was finished, he turned his drawing around to me, and declared victory! I was very pleased. His illustration is not comical, as many streetside portraits are, but it does take liberties with color and form, characteristics that I appreciate in Ken’s work.

I am now the proud owner of a Ken Christensen portrait, and I enjoyed the experience of seeing it in the making.

Posted in Art, People | Leave a comment

The brave and short life of Daniel Coudray

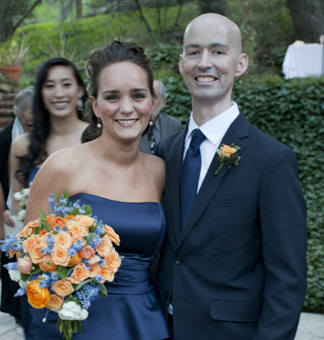
Daniel Coudray and his sister Celine at their sister Patrice’s wedding in January.

Like his father Mark, Daniel Coudray was an Eagle Scout, and like his father, Daniel was a high-achiever. Young Daniel graduated from Mission College Prep in San Luis Obispo, and, like his father Mark, he went on to get a degree from Cal Poly.

Over the years Daniel worked in his father’s screen printing plants, loading and unloading shirts, making screens, washing-out and washing-up. He did whatever it took to help his father and his family to succeed. Sometimes he was up all night, working side by side with his dad to meet a particularly difficult deadline, or to test a new printing procedure that would yield better quality or better productivity.

Sometimes I had the privilege of coming in to check on the progress of these all-night missions. Sometimes I was their customer. Usually I was just a friend of the family.

Daniel was athletic, intelligent, and he sought great things. I remember that he wanted to be a military aviator after college, and I remember him dancing at his sister’s wedding last January. He loved the Boy Scouts, he loved motorcycles, and he loved a good political debate. Our last was last Christmas, when Daniel and his sister were in our home. We talked about everything under the sun, and we ended our conversation on the topic of health care, a topic that was very important to Daniel.

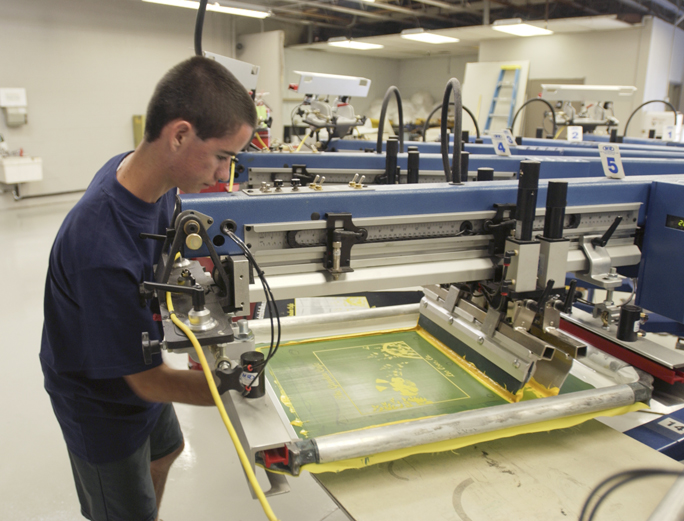
Here Daniel is cleaning the underside of a screen on his father’s M&R Gauntlet screen printing press. This photo is from August, 2002.

What stopped Daniel from his many dreams was leukemia, a particularly rare form of the disease which struck him suddenly two years ago. He was taken that night by ambulance 200 miles north from our city to Stanford Hospital in Palo Alto.

Anyone other than Daniel would not have survived the night with the astronomically high white blood cell count he had when he arrived there. But he was lean and strong, and his emergency room doctor suspected that his affliction might be leukemia; that’s why he made it to Stanford, and that’s why Stanford paid so much attention to Daniel over the following two years.

There were high points and low points, and there were several times when Daniel’s family gathered around perhaps to wish him their final words. But Daniel bounced back, sometimes stronger than ever, and he went home to live a “normal” life again. But his life was never really normal again. He continued to get blood transfusions, bone marrow transplants, and various forms of chemotherapy.

During his illness, Daniel’s mom Joan stayed nearby, living in an apartment adjacent to Stanford Hospital, then at home when he made his way back, then at UCLA Medical Center, and then home again. Joan suspended her life to support her only son while he was going through this ordeal.

A few weeks ago, Daniel’s oncologist told the family that there was nothing else that the medical profession could do for Daniel. Various therapies were ineffective or unavailable, and that he would have to cease the chemo treatments. It was a rare house call, and that he did not bring good news.

So Daniel and his family decided to make it last as long as possible. They had visitors, and the whole family got together to support Daniel. He got stronger, his hair started to grow back, and he looked good. His sisters returned to their homes and families, and life was OK for a few weeks. Daniel made a presentation at his high school, telling the students about his ordeal, and his hopes for the future.

Then, last week, Daniel was taken by ambulance to our local hospital. His white blood count had returned to the levels he had reached two years ago. He responded to one antibiotic, but his body was wracked by infection.

And, last Thursday at eleven in the morning, the hospital sent Daniel home. They were unable to do anymore. Daniel was, according to his father Mark, “80 percent with us.” He was having coherent conversations about his family, while parts of their conversation were peppered with his visions of another dimension.

He remained in that state Friday, talking with his sisters and his parents until after midnight. And on Saturday morning he died.

It was a heartbreaking end to Daniel’s short and brave life.

It was my honor to have counted Daniel as a friend.

Oh Daniel, we will miss you.


Posted in Uncategorized | 2 Comments

My father’s Golden Gate Bridge photos – 75 years later


My father, Russell Lawler, was born in San Francisco on November 18, 1905. It’s easy for me to remember this because it was six months to the day before the devastating earthquake and fire that struck the city.

Russell Lawler

This is my father, photographed in Antofogasta, Chile, in 1942.

He graduated from San Francisco’s Lowell High School, and then from the University of California, Berkeley, with a degree in civil engineering. Though I never knew him as a civil engineer, he practiced the trade for a while, then moved into the insurance business.

My dad was also an amateur photographer. That I remember well. He always had a camera in his hands, a tripod in the back of the car. I suppose it had an influence on me and my interests, as I almost always have a camera with me, and a tripod in the back of the car.

In the mid-1930s my father worked for the Pacific National Fire Insurance Company, located at 376 Pine Street, San Francisco. He went into the field occasionally to evaluate property, to investigate insurance claims, and to visit the company’s clients. And, during that time he had several opportunities to visit the Golden Gate Bridge, under construction at the mouth of the San Francisco Bay. I don’t know if his several tours of the Golden Gate Bridge were in an official capacity, or if he was just lucky enough to be included in a mid-construction tour.

Fortunately he took a camera along.

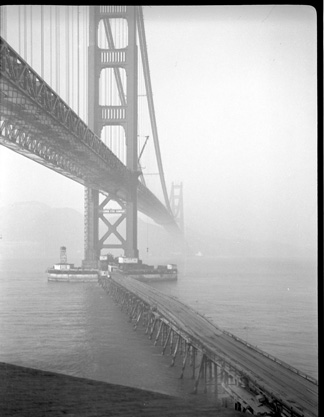
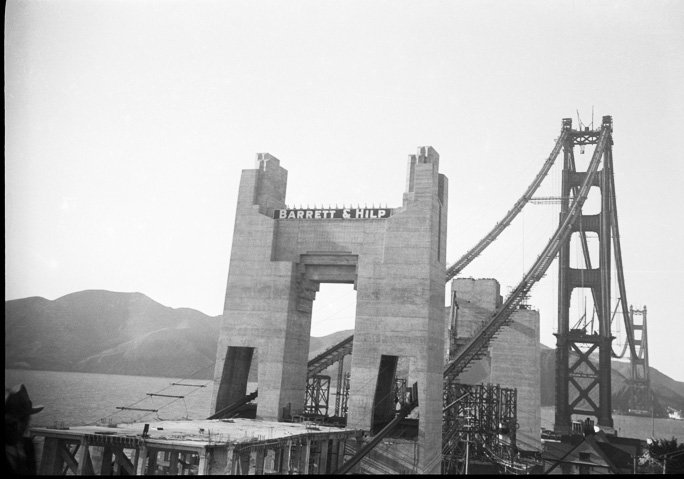
This photo was taken from the south (San Francisco) end of the bridge. The roadway is nearly complete, and the suspension cables are under construction. The cradles that supported the suspension cables are visible in this shot, as are some of the vertical cables that support the roadway. Notice that the vertical cables are absent north of the close tower.

Though my father died in 1988, his photos live on. I found some of them recently while going through a box of family memorabilia. They are 6 x 8 cm. black and white negatives taken by my father’s camera. Big negatives are always nice to find, because they have so much information in them. These photos are properly exposed, mostly in focus, and reasonably composed. If nothing else, they are very interesting because of the subject matter: the construction of the Golden Gate Bridge, which took place 75 years ago, opening this day in 1937.

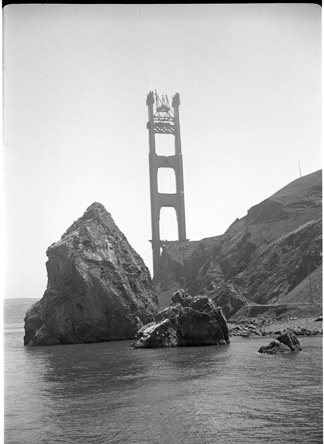
This photo, taken probably two years earlier, is at the Marin County end of the bridge. It shows the tower without cables, roadway or approach highway.

The photos show the bridge towers, some with the suspension cable cradles in place, others protruding starkly into the sky with nothing attached. On at least one of his photographic journeys (I think these photos represent three different trips to the bridge), he traveled by boat from the San Francisco side to the Marin County side of the construction site.

This photo, taken from the east side of the anchor point of the suspension cables, shows the cradles into which the suspension cables would later be laid. Notice that there is no roadway under construction in this image. This is the San Francisco end of the bridge.

My father had an odd penchant for taking photos with no people in them, and that is true for these photos also. People appear in only two of the 40 frames of film in our family’s collection. Two men are seen walking on a wooden causeway in the distance. in another image, the others on the tour are walking away from the camera, and up the hill to the buttress at the Marin County side of the bridge. There are no workers, no smiling faces, no people in the cranes or on the bridge structure.

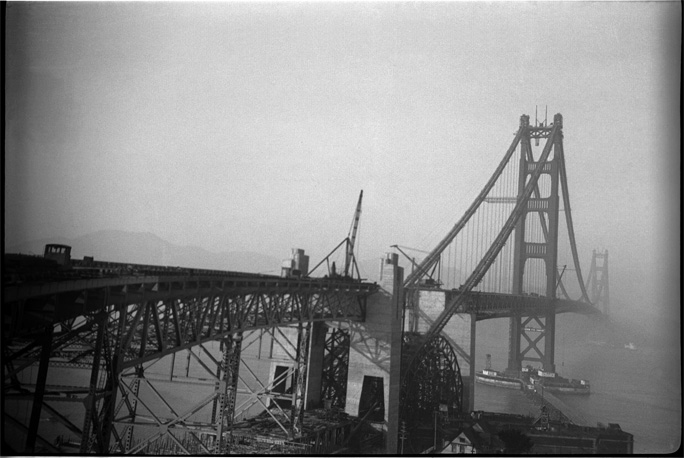
Another image from about the same location shows the approaching cantilever roadway on the San Francisco end, the suspension cables are in place (and the cradles are still there, indicating that they had not been wrapped yet), and the bridge roadway is nearly complete. This would have been months later.

My sisters and brothers and I have always wondered how Russell managed to take so many photos with so few people in them (On a month-long trip to Mexico in 1959, my father took 8mm movies, hours and hours and hours of them. When we returned, he edited them into a delightful movie with animated title sequences. When we watched it a few years ago we all noticed that he never photographed our mother, and we children only appear in the movie by accident. It’s as if we were not on the trip with him).

Though badly scratched, this image shows the Golden Gate Bridge with its incomplete roadway on both the San Francisco side and at mid-section. This was taken from a boat while west of Alcatraz Island looking west.

That quirk aside, these photos represent some interesting documentary work of the construction of the Golden Gate Bridge. I hope you enjoy them.

Posted in History, People, Photography | 2 Comments

I’m SLO at some things (another GigaPan story)

It took me five days to squeeze the last GigaPan image into my schedule. I had classes to teach, meetings to attend, a midterm exam to write, a rehearsal with my choral group, and a meeting of the San Luis Obispo Mac User Group – SLOMUG. I couldn’t find the hours to put the big Mission San Luis Obispo image together until last night.

The abbreviation of San Luis Obispo can often be the source of humorous acronyms and abbreviations. We have a local Internet supplier called SLONET, for example. I have been thinking about calling my exhibition of panoramic images SLOpano, or Take it SLO, or SLOmo Pano, or something trite that includes the SLO moniker.

And I did finally get the Mission SLO pano into the GigaPan Stitch software and on its way to being a very high resolution panoramic image. It is comprised of 798 separate 60 MB images, which according to my calculator is nearly 800 images, which translates into the monstrous file of over 17.74 GB. There is a significant overlap of images when using the GigaPan rig. Though it is adjustable, the default is 30 percent.

This is the finished Mission San Luis Obispo GigaPan photo. Click on the image to go to the GigaPan site to see the ultra-high-resolution version.

When I have taken my other “normal” panoramic images, I usually shoot 12 frames, and the resulting files are a tasty 350 MB finished size. These images have about 25 percent overlap so that my other stitching software (PT GUI Professional) can make them whole without difficulty.

The hard drive companies are going to love me! Oh, yes! Since I (perhaps stubbornly) shoot everything in Camera Raw, I end up not with just one set of 798 images, but two, because I first convert all of the images to full-resolution uncompressed TIFF images for the GigaPan Stitch software to ingest. Camera Raw files from my Canon 1ds Mark III camera are typically 15-25 MB each, and the TIFFs I make from them are really large at over 60 MB each (no compression!). I will probably end up supporting an entire community of workers who will be slaving overtime to make multi-terabyte drives to support my GigaPan obsession.

Oh, yes, it has become an obsession.

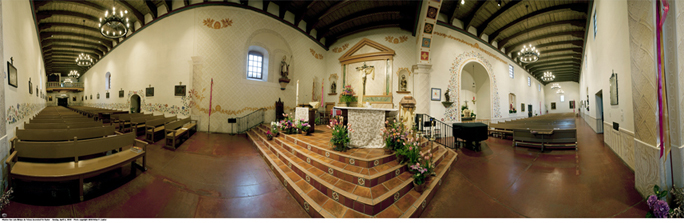
The altar, main sanctuary, and side sanctuary of Mission San Luis Obispo. This is a lovely environment, and especially nice for musical performances. This image is a conventional 12-frame panoramic image taken with my own panoramic “backpacker” mount.

As I rode my bicycle to school yesterday morning, I was eyeing the mountains above Cal Poly, a beautiful vista exists up above the Poly “P” on the hill. From there I could get another sweeping view of our beautiful volcanic peaks. And, if I get up there in the next few days there may still be a trace of the lovely springtime green. Spring is short here for color. We get about three weeks of Irish green grass, then it dries quickly to the California gold we enjoy for the rest of the year.

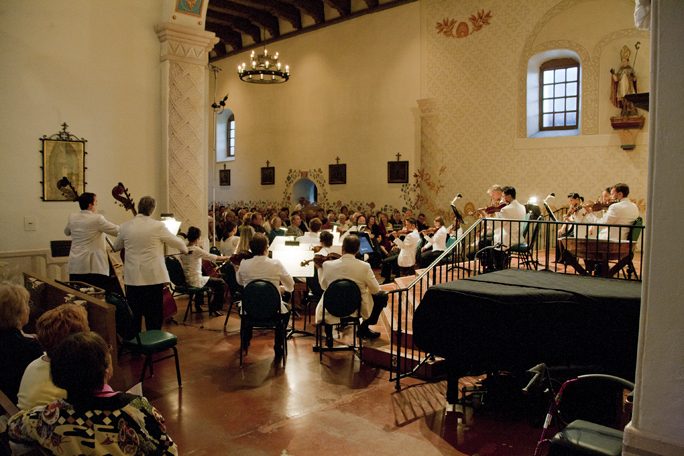
I took this photo during a performance of the Festival Mozaic orchestra performing Bach in Mission San Luis Obispo in 2010. I am the photographer for Festival Mozaic.

I have been thinking about adding some kind of bracket to the back of my old Kelty backpack to attach my horrible and heavy video tripod, making these mountain hikes a little easier on the back and shoulders. And, I have been thinking about other uses to put GigaPan’s software to work. How about flat art? Ultra-high-resolution reproduction of antique images, charts, maps? (I found some on the GigaPan site that were done by others.)

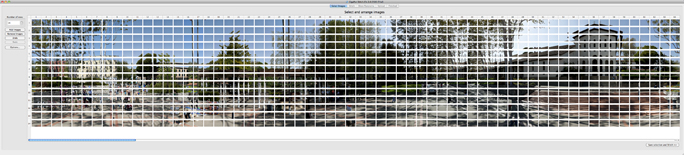
This is the mozaic of 798 images in GigaPan Stitch software. It takes a long time to load, and a long time to stitch, but the resulting images are amazing.

Then I started thinking about a wooden jig with a pin register system for indexing historic Cirkut panoramic photo prints in front of a copy camera or into a scanner. Oh, the possibilities are endless! I am literally losing sleep on this project (it’s 2:53 a.m.), and I am not sure it’s officially a project yet.

This is the finished panorama shown in GigaPan Stitch. I exported it to a Photoshop Raw file 194,256 pixels X 30,452 pixels in size. You can also see the color correction panel at the right. This is a nicely-implemented addition to Stitch. It makes simple and effective color, tint, tonality, saturation and similar corrections to these massive files.

In the online version of the photo, you can zoom in and read the inscriptions on the Mission bells, learn what year they were made (they were recently replaced), and you can see the legless waif walking (floating?) up the stairs of the Mission, the disembodied (or mis-embodied) people all around the Mission Plaza. I’m even in there! Where’s Waldo? I’m sure you can find something interesting in this photo.

There is a rather strange stitching “error” (not sure what to call it) on the steps of the Mission, which marks the beginning and the end of the panorama. Over an hour passed from start to finish, and there was a significant lighting change during that time. The camera continued to shoot at the same exposure, so the variation is understandable, but there also seems to be a positional error that crept into this image. Maybe I bumped the tripod at some point?

A GigaPan Lesson learned here: Don’t split the main subject of a panorama. I will be careful to plan better in the future to pick a start-stop point somewhere in the trees so it doesn’t show if there is a minor exposure difference in the time it takes to make the panoramic image.

A second GigaPan Lesson learned here: A much longer shutter speed would not record as many mis-embodied people. I think that a speed of 1/4 or 1/2 second would do the trick. Then, only people who stand still longer than 1/4 second would be recorded at all. The photo would look as though there was no one around. I used this technique to make people disappear from the plaza in front of Notre Dame de Paris, and it worked well. The only people in the photo are those sitting on benches; everyone else disappeared.

Overall, it’s a fantastic image, delightful to view, and it’s especially interesting to see the effect of time and motion in a busy public place while the camera turned and pitched and clicked. Please enjoy the view!

Posted in Panoramic Photography, Photography | Leave a comment