

In several previous articles I have written about the process of repositioned panoramic photography. It works best when there is no perspective – strictly two-dimensional subject matter.
With my experiences with street art (see the most recent article here), this works perfectly. Photographing flat art – and painted walls are pretty flat – is what works best with this technique.
Photographing three-dimensional subjects causes this technique to fail with near-certainty. I think the first time I tried this seriously was when I attempted to photograph a huge Heidelberg printing press by taking an image, then taking three steps to the right, then taking a photo, etc. The resulting image, after assembly, was a catastrophe.
This is easily explained: perspective does not exist on flat subjects, and real things like printing presses have dimensionality. They have depth, and at every point on the camera plane that perspective is different. There is simply no way for software to reason-away differences in perspective.

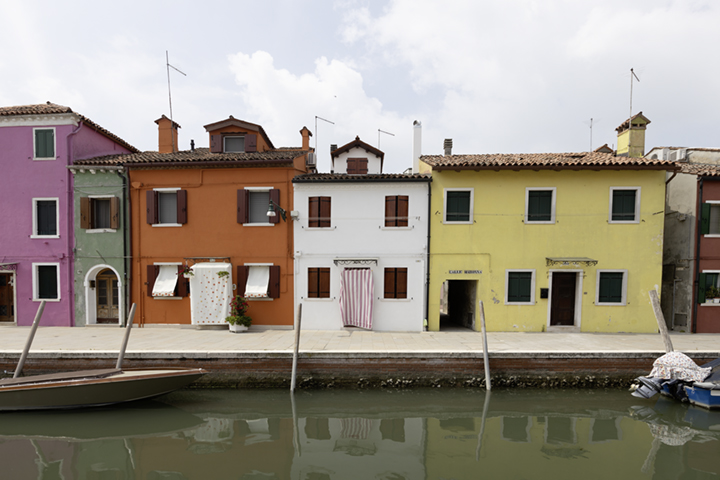
Tempting fate, on a recent visit to Burano, Italy, I did it again. This time, instead of a 20-meter long printing press, I took a series of repositioned photos of an entire city block along a canal in that charming town, and attempted to put them together into a single repositioned panoramic photo.
I worked, kinda sorta. Well, not very well really.
But, enough of it worked that I persisted, and I was eventually successful in making a single image of the entire block, and it is charming. In the process, I took some liberties with the sides of buildings, the bows of small boats, and the waterway that separated me from the subject matter.
I took a total of 27 photos, each about 10 careful paces apart (I was not carrying my ball of string or my tape measure). The overlap between them was significant, but so was the perspective variance and the distortion of the wide angle lens (Canon 16-35 f2.8 at 21mm).
To stitch them in Adobe Photoshop – which does a spectacular job on repositioned photos taken of two-dimensional subjects – I first had to take some of the distortion out using Photoshop’s Perspective controls. I put a baseline guide in, then two vertical guides, and I used an Action to perform the same perspective change on each image, straightening its vertical lines – mostly.
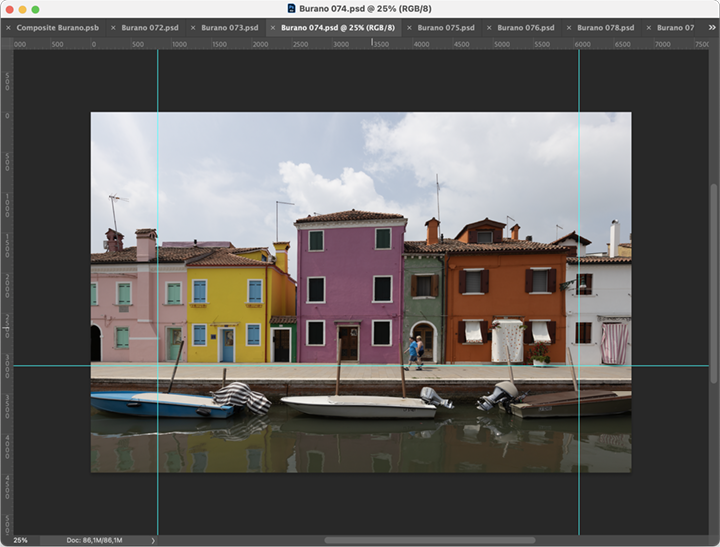
After that I used Photoshop’s Automate>Photomerge function, with its Reposition option to put these images together. It didn’t do very well at all. I tried several times with subsets of the images, and was eventually able to create two big chunks of the repositioned photo that I then assembled into one using drag-and-drop. This final image was OK as a starting place, but there were fractional boats in the canal, and mooring posts that disappeared half-way to their pinnacles.
It looked pretty good, but it would take too much work to make it into a convincing photo.
So I gave up on Photomerge and decided to build this image by hand, assembling each image adjacent to the next by putting each onto its own layer, then creating a master mask to cut out the perspective parts that don’t work. This was complicated by slight differences in size and camera angle, so on each image I did some scaling and a bit of distortion to get the image to fit its neighbor to the left. Then I put the next image in, and did the same until I had completed the block-long photo.
Most of the buildings on the block are conjoined with their neighbors on both sides. There are only four alleys on the block where you can see into the distance to another building in back. So, with the exception of the rooftops, which have considerable depth, the façades of the buildings are two-dimensional.
I began my work by using the Magic Wand tool and selecting the sky, then making a drop-out mask with that selection on each image. After I had positioned all the images together I built a master sky mask by assembling all of the separate masks into a new channel mask. I replaced the original cloudy blue sky with a similar cloudy blue sky image.

The most difficult part of my master sky mask was television antennas. On top of almost every building there are skinny poles with various antennas attached. These didn’t select well with the Magic Wand, so I enhanced them with the paint brush on the sky mask, allowing them to be seen better against the sky.
I also had to remove parts of buildings in the background and visible from the street where I took my photos. This was done in the Master Sky Mask; I replaced these architectural artifacts with sky, and it is very convincing.
When the buildings and the sky finally made sense, I had to work on the boats in the canal. There is usually one boat per building in the photo – sometimes two – and each had reflections on the water of the canal toward the camera. Because of my intervals, the perspective of those boats, which are much closer to the camera than the buildings in the back, changed considerably from photo to photo. To remedy this, I took the best boat photo from each of the two overlapping images, and pasted it on top of the composite photo. This worked well, but I had to invent some of the reflections in the foreground.
When all was complete, I had my repositioned panoramic photo. At final resolution I can print this at about 5 meters long (about 15 feet) by 38 cm. tall (about 15 inches) at 300 ppi resolution. I don’t have any plans for the photo at present, but perhaps the city of Burano would like it for their City Hall. Or they could just walk outside and look at the real thing.
Addendum 3 September 2022
I’m in Norway this week, and will soon be returning to the United States after a year in Germany, teaching and experiencing the European lifestyle (excellent).
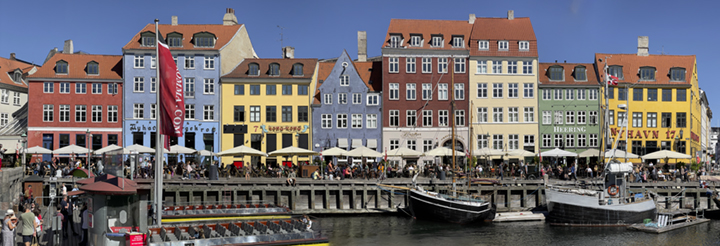
In Copenhagen there is a famous canal-waterway called Nyhavn, which features lovely old buildings, all painted different colors, and all built together along the waterfront. It is a mecca for tourists (me too!) because of its beauty.
I decided to try my repositioned panoramic photography there, using the same technique as described above. This time I used my iPhone 12 camera – normal lens (which is actually a moderately wide angle lens) – and I shot 17 photos along the opposite side of the canal. I did it with much more overlap this time, about 50 percent, and I took photos until I ran into a kiosk that prevented me from going any further (I would have liked to do the next block of buildings but there would have been a gap in the middle).
I opened all 17 images in Adobe Photoshop and used its Photomerge function to assemble the images into a repositioned panorama. This time it worked beautifully!
Except for the distortion of the left-hand sailboat, it is nearly perfect, and I have done no retouching on this image. I’m very happy with this one.
Addendum to the addendum 14 September 2022
I liked the result of the photo above so much that I bought a Metro ticket and went back to Nyhavn another day (Copenhagen’s Metro is fabulous!).
This time I took my Canon EOS R camera and my only practical lens for this kind of work (16-35 zoom). Where I stepped three big steps between the shots on the photo above, using my iPhone 12 with the “normal” lens, this time I shot at 35mm, and I took only one big step between photos. I started at the left where the tourists board the sightseeing boats, and I took over 270 photos to reach the end of the canal where it meets the channel.
It took me about an hour. I didn’t use a tripod because I had shipped my tripods back to California. My only difficulties in getting a complete set of source photos were the obstacles on my side of the canal: tourists taking selfies and portraits of their friends and a few kiosks and signs that blocked my view. I shot until I bumped into a medium size ship moored on the south side of the canal. I had to stop then. I started again on the other side of the bridge there and shot images all the way to the end.
Just as I stopped at the bridge, the Queen of Norway went by in her limousine, with her motorcycle escorts and entourage! It was exciting. I had never seen a queen before.
The next morning I boarded a United Airlines airliner for my return flight to California, arriving the same day, but 11 hours en route. Now I am back in my home, putting the pieces back together after a year abroad. Among those pieces is my desktop computer, which sat idle during my absence. I put the hard drives back on the desk and plugged them in, and started it up. It works! (My RAID software tells me that I have one failing disk drive; I will replace that later today with a new one.)
This morning I made another attempt at Nyhavn, using 127 of the photos I took last week along the canal. I used Photohop, again, and its Photomerge function to stitch them together. And it worked admirably. I had to paste one of the boats into the canal on the left, and a part of one of the buildings was oddly distorted, so I pasted that part in from one of the source images.
It turned out nicely. This one can be printed about 8 feet in length at 300 ppi, and it has about 500 MB of size. I might try printing one very large to see how it fares.
Here is a reduced size image from my attempt today:

Addendum to the addendum to the addendum:
Back in the USA after a year in Germany
We returned from our year-long adventure in early September. We immediately went to our storage locker, where all of our personal stuff was sequestered, and brought it all back home. It was kind of like moving. It was exactly like moving.
Then we reset our phones and changed our calendar preferences and tried doggedly to remember the passwords for the computers and bank accounts and other software and hardware that had been idle for 12 months.
And, after a few weeks resetting and cleaning and getting everything back in the closets, I decided to print the Copenhagen photo on my Epson wide-format printer. I had postponed this as long as I could because I knew it would be difficult to rouse the machine from its deep sleep. In 2017, after only five months in Germany, it took me most of a day to get all the ink-jet heads working again. I ran the test page and the nozzle diagnostic about two dozen times, and eventually it was working. I expected no less this time (I expected total failure this time).
I started up the Mac that runs my Epson, and I couldn’t remember the password for the machine. Nothing. Nada. Rien. Kein Passwort! I tried everything under the sun and failed. Then I tried screen sharing, and it also expected a password, but in this case it presented a hint: “Printer” so I typed “Epson” and the machine woke up. What a relief!
(I would never have guessed “Epson” as a password, and I never bothered to enter that password into my 1Password application to keep track for me. I was lucky to have had the hint.)
After a version update to Adobe Photoshop, I launched the program and opened the Nyhavn pano, chose my Mirage RIP software to print it, and amazingly, it printed flawlessly. No missing nozzles, no clogs, no problems! Hurrah!
I am very happy with the print. It’s glorious. The colors are gorgeous, the detail is amazing, and the method I used for repositioned panoramic photos was a success. I am sure I’ll do this again.
I am also very happy with my Epson printer and its uncanny ability to sit idle for a year and then start up with no clogged nozzles and not a moment of hesitation. Bravo, Epson!