

It’s been about a month since I wrote my last blog. It was about variable-frequency-drive high voltage motor controllers and a 1935 book sewing machine. The relevance of that is cloudy, but suffice it to say that I have been deeply involved in bookbinding for the past two months.
The motor controller works perfectly, thank you. The machine also works now, but it still needs some work. I made a new drive belt and added that to the machine, and it works nicely. The problem now is the clutch, which needs to be disassembled, cleaned and reassembled. I am eager to do that, but I cannot, because I am now in isolation at home. I am not allowed on campus, so my machine is standing idle, waiting for some more effort to get it into perfect working order.
In the month since I wrote last I have been teaching a delightful class called Book Design Technology. It’s a course that is required of some of our students. It’s senior-level, and most of the students are graduating this week or in June. I had 34 students in the class.
We start the quarter as advanced typographers practicing what I call long-form typography. The students are required to find a book manuscript, edit the manuscript, and prepare a book from that manuscript. This involves cleansing the manuscript, editing, composing it into pages in Adobe InDesign, and preparing it for print. It is in this part that the students learn about GREP searches, and learn about the importance of tagging everything in the book manuscript with Paragraph and Character Styles.
Once the book is readied for print, we learn how to fold, collate, sew and bind books by hand. We start with a blank book to prepare the students for their much larger and more complex finished books. On several mornings this quarter I was in our book bindery with 16 young people, each armed with needle-and-thread, glue, brushes and book cloth. We stitched our signatures together using a traditional butterfly stitch (a hook-stitch).
The students begin by poking holes in 16-page signatures using an awl, then sewing with bookbinder’s thread in and out of the centers of those signatures. Each successive signature is sewn to the previous signature using the butterfly, where the thread exits the signature, is passed under the same stitch in the previous signature, then back into the signature to pass to the next set of holes.

It’s a relaxing and fun activity, and it requires manual dexterity, attention to detail and confidence. This was the first book-sewing experience for these students. They all did well.
Once the signatures are sewn, the spine is glued, the book block (the collected signatures) is trimmed square on three sides, and a cover is made. We used common buckram fabrics for the first books, but the students graduated to more refined materials for their final books. Some chose satins, others made their own cover materials (one young woman laser-cut her cover boards on thin sheets of wood). One adventurous student used velvet, a material that I have never seen as a bookbinding cloth before.
The covers, when complete, are laid out on the work tables, and the sewn book blocks are glued-in, using linen fabric for the spine, and decorative end-papers for the bookends. The results were spectacular. I have taught this class numerous times in my career at Cal Poly, and the work is always extraordinary.
I was working in parallel while my students were making their books. I chose a manuscript written by the late father of a dear friend. That manuscript, accompanied by about 100 family photos, I turned into a handsome hand-bound volume. I was working side-by-side with my students so that I could answer their questions about the process with fresh experience. I had not bound a book since last summer, so I needed to brush-up on my skills.
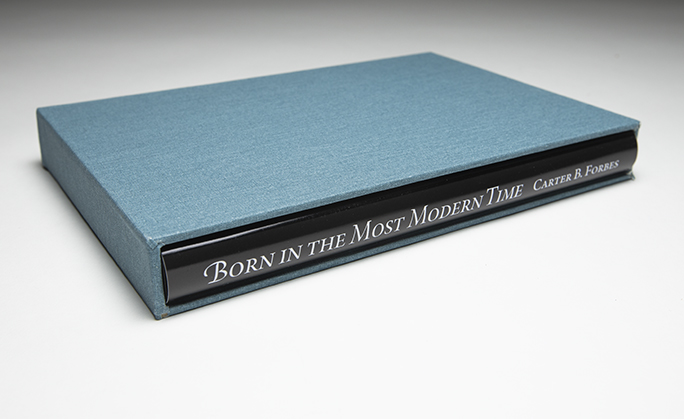
When I was finished with the book manuscript for my book, I decided to foil-stamp the cover, and to build a slip-case for the book. Slip-cases are not part of the assignment for my students, but then can make one if they wish. I had not done this before.
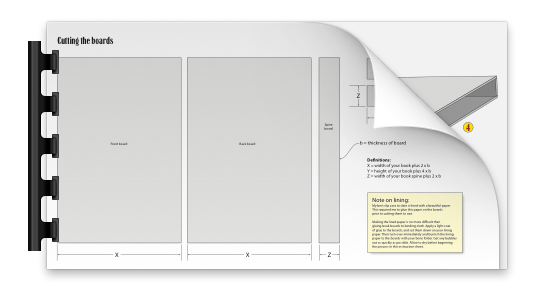
I took it on like a packaging project. I drew a detailed die-line for the slip-case, including scoring and cutting lines. I drew a detailed cutting diagram for the wrapper. Then I built mine and it was a disaster. I had chosen board too thin for the task, and I failed to line my box. On the second try I did better. I lined the boards, built the box, wrapped the box with book cloth, and the book didn’t fit inside! The addition of lining paper had made the fit so tight that I could not get the book inside.
I threw out both drafts and redesigned my case. This time I approached it differently. I made separate side boards, abandoned scoring and folding, and simply glued-up a box to fit the book (plus extra for the cloth and lining). I used the same board I use for book cases, so it was much thicker and thus much stronger.
The third time I succeeded. My slip-case is a nice addition to the project.
The experience came in handy when on the last lab day I accidentally ruined one of my student’s books while foil-stamping the cover.
She was crushed. I was crushed. The cover was melted (she had used a book cloth whose washable surface was made of plastic). I offered to make a new slip-case to replace the one I ruined.
The recent experience making my third, successful, slip-case proved valuable. I made the replacement slip-case for her, and it went together easily and quickly.
As a result of this I made a complete instruction manual for slip-case making.
In any event, the book design class was a tremendous success, marred only by the end-of-the-quarter arrival of the COVID-19 virus. I was forced to cancel the final exam, which was to be a book show, and I never got to see most of the finished books. Instead, I had the students photograph their books and submit the photos. From those photos I have made a slide show that I will share with them as a final exam.
The books are amazing!