

Last summer I built a nice Adirondack chair. It was based on an existing chair that had rotted-out, a victim of years of being out in the weather. I decided for the clone that I would make it entirely of oak lumber, and wherever there was a connector, I would use stainless steel.
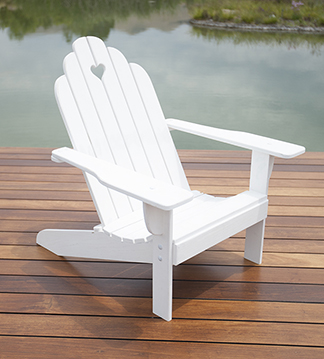
This is my assembled Adirondack chair on the dock of a friend’s pond. The chair is painted with white exterior primer prior to being assembled, then later painted with the final color – purple.
I took the old chair apart, mostly by sawing the rusted fasteners apart, then tracing the wood pieces onto kraft paper. I took the tracings home and spent a bit of time reconsidering the design of the chair. I made some technical changes to make the chair stronger, then I made some changes that I thought would make the chair look better.
I made full-size drawings in Adobe Illustrator, then printed those out on my Epson ink-jet printer on a smooth, uncoated paper at 720 ppi resolution. I didn’t need photo quality; I wanted speed. Then I took a trek to the local lumber yard to purchase some oak boards, and several hundred dollars later, I had all the wood I needed.
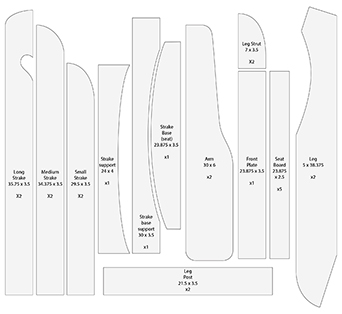
This is my cutting diagram, which I printed on my Epson wide-format ink-jet printer at full size. I then glued the curved patterns directly to the boards, and cut them on the bandsaw. Later, I sanded the pattern paper off.
I ordered stainless machine screws, carriage bolts, washers and nuts from McMaster-Carr, a Los Angeles based purveyor of everything mechanical. Several scores of dollars and a couple of days for shipping later, and I had all the hardware.
I glued the ink-jet printer output to the oak boards (I cut them to approximate size first) with water-soluble glue. Then, using a combination of tools including a table saw, a bandsaw, a chop saw, a router table, a hand-held router and other hand tools, I had all the parts cut and ready for assembly.
For those boards with ink-jet paper glued on top, I used the printed lines as cutting guides on the bandsaw. Where two parts had to be identical, or mirrored (the arms are a good example), I screwed two boards together then cut them at the same time on the bandsaw. Whatever irregularities occurred, occurred to both boards. I completed all the cutting, then moved on to surface sanding and smoothing curves. For those operations I used a hand sander, two stationary belt sanders and a stationary spindle sander.
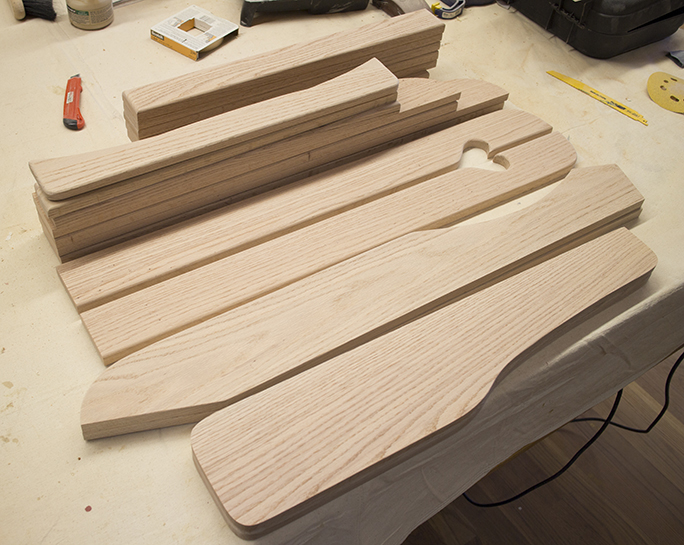
This is the entire chair as cut and sanded boards. Some of the board edges are routed with a half-round cutter – I did this only where the boards touch the person sitting in the chair. All other edges are left square. Assembly began at this point, following a primer coat of white exterior paint.
When all the boards were smooth and finished, I cleaned each one, then applied two coats of latex exterior white primer on the boards. It’s better to paint the raw material then assemble it into a chair than to build the chair and paint it. Unpainted parts, especially those hidden by joints and corners, tend to be an invitation to dry rot.
When the chair was assembled, a couple of days later, I sanded the tops of wood plugs I used to cover the screws, and then I sprayed several coats of exterior latex paint on the finished chair. You may wonder why I started with beautiful oak boards, only to paint the chair with purple paint. Remember that my objective was to make a weatherproof chair. The color was chosen to work with the other colors in our garden.
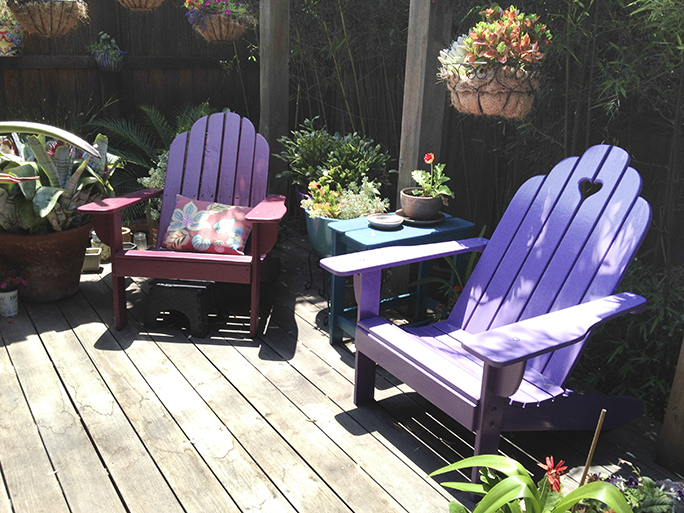
…and here is the finished chair on the right, its beautiful purple color fitting in nicely with the plants and the sister chair on the left in aubergine. I plan to replace that chair soon, as it’s showing signs of decay from the elements.
Using Illustrator as a design tool for real objects is interesting. For me it’s easier and less expensive that getting a CAD program, and I already know how to use it. Working entirely in 2D is easy for me, and Illustrator is delightful for this. As mentioned, I draw at full size, requiring that the canvas be set to the size of the full size lumber.
The finished chair is very nice on our back deck garden (we have a very small yard), and the colors of that chair and its counterpart work nicely with the greens of my wife’s wonderful flora.
A combination of software – Illustrator, hardware – the wide format Epson printer, and harder-ware – the various tools in my wood shop, make nice finished products. It’s nice to be able to design, then build real objects from the computer screen.
I would like to order plan and tamplates for my husband.
He wants to build by himself.
How can I get in touch with you?
Thank you
Zorica Petmil
Hi Zorica,
I have complete plans for the Adirondack chair available for US$15.00. If you write to me at brian@thelawlers.com.
I can print a set for your husband.
Best wishes,
Brian P. Lawler
Hi Brian,
I live in Quebec, Canada,
and like very much the chair you made.
You think it is possible to order you a copy of your drawings.
Best regards
Martin
Hi Martin,
Yes. I have plans for sale. Please send an e-mail to brian@thelawlers.com and I will send you information.
Brian
I would like to purchase the plans to the Adirondack chair
thank you
Hi Mitzi,
Send me an e-mail at brian@thelawlers.com and we can discuss this.
Brian
Hi, Are the templates reusable? Are they ridged enough to trace?
Thx, Lance
Hi Lance,
I print the templates on thin uncoated paper. I glue them to the wood, and cut along the printed lines. In the end I sand the paper off. It’s easier for me to use them this way.
I suppose I could print the templates on heavier stock and trace them, but that’s not as easy for me.
Best wishes,
Brian P. Lawler