I get involved in some pretty big stuff:
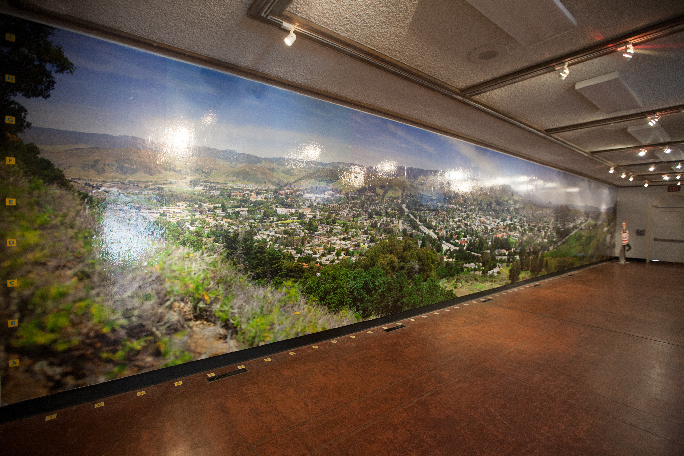
This was my 58-foot GigaPan photo of San Luis Obispo as it appeared in the San Luis Obispo Museum of Art in March. That photo was printed in 17 sections on glossy paper, then mounted on the wall with wallpaper paste. The same image is now being printed on aluminum sheets for a permanent installation at Cal Poly, San Luis Obispo.
In January and February I wrote about the panoramic photo exhibition I had at the San Luis Obispo Museum of Art. That involved 20 photos. One photo, which I call Daniel’s Point, I printed to 58 feet, 7 inches in width. The original of that image, which was taken with a GigaPan device, is over 44 GB in size. I reduced the size of the file to make the print nearly 60 feet long for that display. For that image, I printed 17 vertical strips, each 44 inches wide, with a one-inch overlap for the wallpaper man to use for register.
When the show ended, my friends and I gathered at the museum and pulled the photo off the wall, and threw it away.
But, someone took notice! A group of students from the Associated Students, Inc. at Cal Poly saw the exhibition and decided that they wanted to have me make a version of that photo for permanent display in the University Union. I was thrilled.
This time, rather than print the photo on Epson Photo Glossy Paper, the ASI wanted it printed on sheets of aluminum. This exhibition is permanent. The supplier of the aluminum prints is a company near Santa Barbara, California. They can print on sheets up to 48 x 96 inches in size.
The process is dye-sublimation, where the image is made onto a paper carrier on an Epson 9600 ink-jet printer. That carrier is printed with dye-sublimation inks on the paper carrier, and the image is reversed as it is printed. The dye-sub paper is then positioned on an aluminum panel that is coated with a polyester emulsion. The sandwich is then put into a heat/pressure press where the photo is transferred to the emulsion on the aluminum.
My image will appear 33 feet long, and about five feet tall. So my challenge was to cut the image into sections that would fit onto the aluminum sheets, with an overlap of one inch to trim before the photos are mounted on the wall.
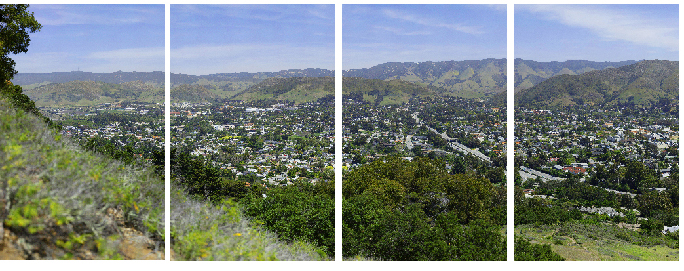
Four panels of my panoramic image. There is a small overlap on each panel on both sides (except the two on the ends, which only overlap on the inside). To get the panels cropped to the pixel from the original image required the precision of an AppleScript working in Adobe Photoshop.
I needed accuracy to the pixel, as these panels are very expensive to make, and the image must be perfect. When I made my paper version at 58 feet, I did the cropping by dragging guidelines into the Photoshop document, and then cropping to those guidelines. But the paper print had the advantage of being able to be registered on the wall while the wallpaper paste was wet, adjusting it until it fit.
The aluminum panels must fit perfectly without any adjustment possible as they are mounted. I tried doing it by hand, entering pixel values into the Crop tool in Photoshop, which worked fine, but there were times when the software and I didn’t see eye-to-pixel. Photoshop wanted to shift one pixel right or left of my desired size, snapping to the wrong side of a measurement, and this was not acceptable.
So I got out the extensive Photoshop CC 2014 Scripting Guide, the most recent of a series of similar publications from Adobe that document how to use various scripting languages to control their popular software. I have used AppleScripts on many occasions to script Illustrator and InDesign, and I find the process both interesting and efficient. I had never tried scripting Photoshop.
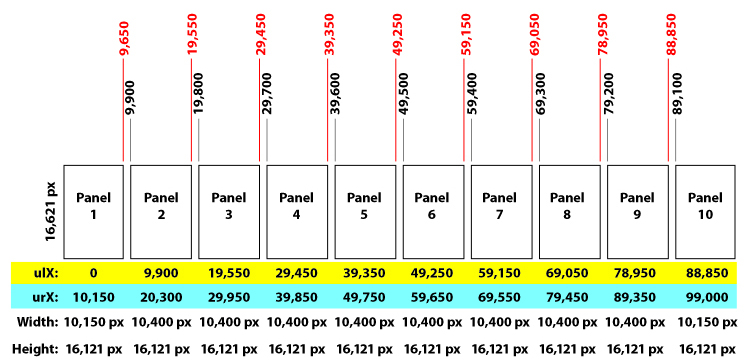
I found the references in the Guide on cropping, and I also taught myself how to draw register marks using a script (that’s for another blog). My immediate challenge was to cut a 99,000 x 16,121 pixel photo into ten pieces, each 10,400 pixels in width and 16,121 pixels tall (except the two on the end which are narrower). Incorporating a one-inch overlap was also part of the process, as I must trim the aluminum sheets to size in a huge metal-cutting shear after they are imaged, and the overlap ensures that the final trim is correct.
The Adobe scripting guide has examples of how to script Photoshop using Visual Basic, Javascript and AppleScript. I prefer AppleScript because I have the most experience in that language, and many years of basic practice. It’s pretty simple, as programming languages go. I built a test photo comprised of four quadrants of solid colors, and I experimented with my scripts until I understood the syntax of the cropping command.
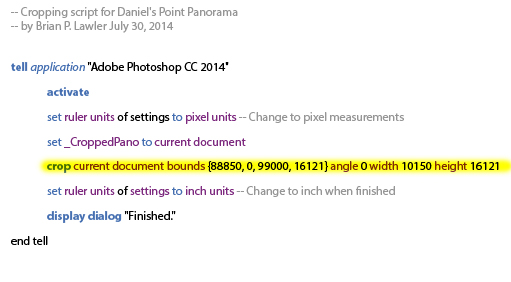
In the end, it’s perfectly logical. It just took me a while to get an understanding of the coding so that I could do my project. The AppleScript code below will crop the right-most of the panels from the whole:
In English, the line highlighted in yellow says: moving over 88,850 pixels from the left corner, and 0 down, crop to 99,000 pixels wide and 16,121 down. The width and height of the cropped image are 10,150 x 16,121 pixels.
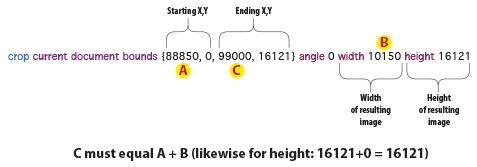
The best part of this is that Photoshop follows the instructions of the script to the pixel without any argument. Here is the detail of how the one line of cropping instructions works:
The structure of an AppleScript must include the target application, in this case Adobe Photoshop CC 2014 in a tell statement. At the very end must be an end tell statement. This encapsulates the instructions intended for Photoshop. AppleScripts are adept at getting information from one application, then switching to another application to do something with that information.
Each message to a specific application is enclosed in a pair of tell statements. Interestingly, the script also acts very quickly on the photo. To crop the 4.4 GB image (a reduced-resolution version of the original) with this script takes only a few seconds. Each resulting section measures almost 500 MB.
This is a legend of how the photo would be cropped into individual panels from one very large original. I needed this to ensure precision in the final images.
As with any adventure into potentially harmful events with photos, it is smart to work on a copy of your master image rather than risk damaging the original. The process of generating ten panels, each precisely cropped to the correct pixel dimensions, took me less than one hour. This was after I had spent at least that much time teaching myself how to write and execute the AppleScript in Photoshop.
The time spent was well worth the effort, as now that I know how to script Photoshop, I am sure that I will do it again – soon. When each panel was properly cropped, I ran another script that added a one-inch white bar at the top and bottom of each section, then added one-pixel-wide crop marks on the top and bottom to guide the metal shearing operation.
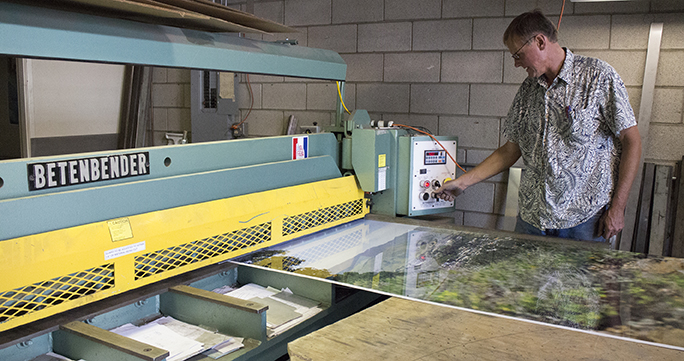
This is my friend Steve Rinell with one panel from the huge panorama in his Betenbender shear.
The panels are now printed, and the metal shearing is partly complete. I will write more about the project as it comes closer to completion. The huge photo is scheduled to be mounted in the coming weeks at the University Union at Cal Poly, where it will be on display for a long, long time.


Another feather in your cap, Brian! These dye-transfer prints on aluminum are awesome. I have used Magna Chrome, a company in Concord. They do really nice work, affordably.