

In the summer of 2014 I built a couple of Adirondack chairs for our back deck. I wrote about it here.
These were made of oak, painted with primer, then assembled and painted again to make them as weatherproof as possible. All of the hardware is stainless steel, making them less likely to rust. They are still doing well, and they have withstood the test of time and the elements.
My wife and I decided that we need two more for our upstairs balcony, a space that is smaller, and will require me to modify the chair design to scale it down so that the finished chairs are appropriate to the space. The new chairs will be narrower, not quite as tall, and will be made of thinner boards. Instead of 3/4 in. oak boards, I am planning to use Monterey Cypress in 5/8 in. thickness; the structural members (legs mostly) will be made of 3/4 inch boards of the same wood.

I have purchased the lumber from Pacific Coast Lumber in Paso Robles, California (about 35 miles north of my city). They have sawn the boards from trees that were taken from storm damage at Morro Bay State Park (about 12 miles from our home). I have never worked with Cypress before, but I am told that it is “semi-hardwood” and that it is especially resistant to weather damage.
The boards are currently being dried in the kiln at the lumber company, and in a couple of weeks I will be able to pick them up and take them to my shop. If they are pretty enough, I plan to make the chairs and then finish them with polyurethane varnish so as to show off the natural qualities of the lumber. If not, I will paint the chairs with two coats of exterior paint. As before, all of the hardware will be stainless steel, which I have already procured from McFeely’s in Harrison, Ohio (best supplier of screws and hardware in the U.S.).
I plan to cut all the parts on the CNC router, machining all of the shapes, and drilling all the holes, then I need only sand and assemble to make the final chairs. I have also simplified the construction a bit, allowing screw heads in the seat boards and vertical slats to show (I plugged and sanded the previous chairs so that the screw heads are invisible).
And, as I did with the first edition, I am machining a heart shape into the vertical slats. It’s a nice design. Unlike the previous models, though, I am not making a plywood prototype. I’m going straight to finished chairs and hoping that my design is effective, and that the finished chairs are comfortable. We’ll see!

I will also make a pair of companion “Adirondack tables” to sit next to the chairs to hold our drinks when we sit out on the balcony in the evenings.
I have seen a lot of similar chairs in stores, and I have tested some of them to see if I like the comfort and construction. So far I like mine the best. Cost – my chairs are not going to be cheap. The stainless steel hardware alone cost more than $100, so I’m off to a good start in the expense column. The lumber, being custom milled and kiln-dried, is also expensive. I am paying for exotic wood that is both handsome and functional.
My job will be to plane the boards to their rough thickness first, then drum-sand them to finished thickness before I begin the machining. I’ll make both thicknesses of finished boards from the lumber I am buying from the mill, all of which will be the same original thickness. Once the boards are ready, I will clamp them into a jig on the CNC machine and get to work cutting the finished parts. Some of the edges will also be round-over routed for comfort. Anywhere arms or legs touch the chair will be smoothed with the round-over; all of the other edges will remain sharp.
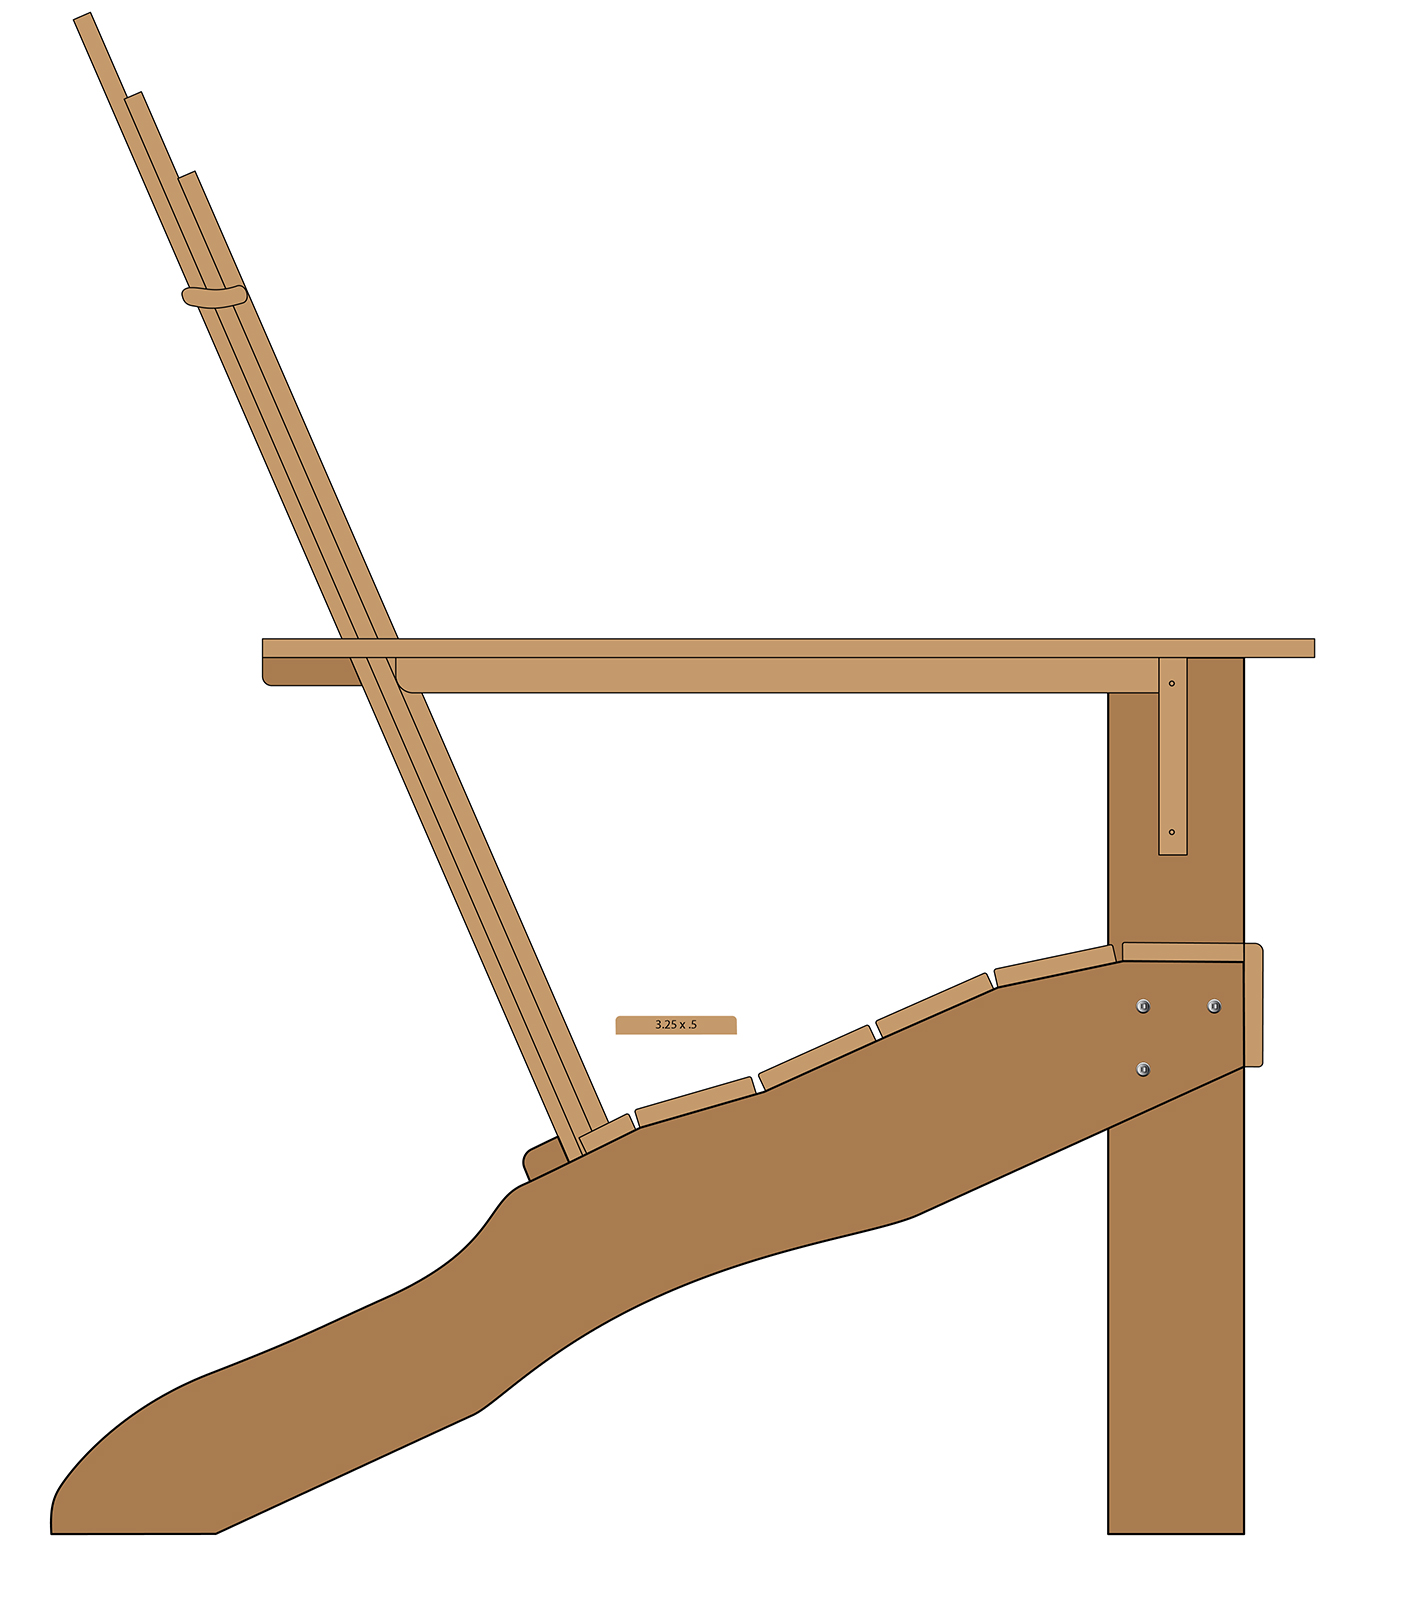
As always, I started in Adobe Illustrator. I revised the original chair design by scaling it down a bit, then changed the angles slightly to make the chairs less-inclined (to fit in the limited space). The new chair design has many things in common with the earlier models. I planned it to cut easily out of eight-inch boards with a bit extra for clamping the boards. Machining will be relatively easy as all of the cuts can be made with a standard 1/4 inch end mill cutter. This makes it possible to cut the pieces quickly and with very smooth finished surfaces. I’m looking forward to this part of the project, and have made some clamping jigs to hold the boards as they are cut.
I’ll document the steps taken in construction and will write about it here. Keep an eye on this space in the coming weeks as I jump into this project.
To read the next part of this story, click here.