

Part II [Part I]
In the fall, my Master’s degree students and I worked on a project to write and publish a book about street art and street artists in Munich. We chose to photograph the work of these artists in one neighborhood called Tumblingerstraße. There, the city of Munich has declared that graffiti is legal.

The block-long palette is a workplace for those who practice fine art with a spray can. The locals call it the Wall of Fame. The turnover of street art along this block is sometimes so rapid that a work will be covered up by a new work within days. I have seen the artwork change twice in one week – once in the rain!
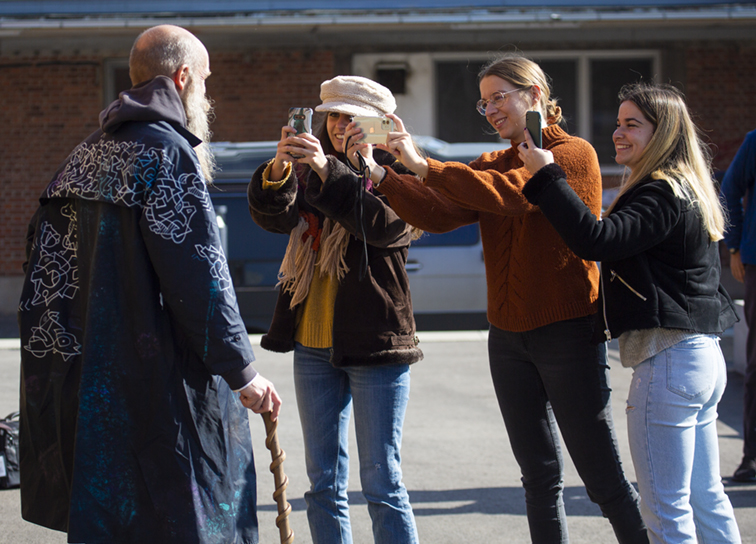
My students split up into teams, some working on finding the sometimes-elusive artists, and others working on the photography of the artwork. We interviewed local experts, painters, and the man who runs an artists’ collective adjacent to Tumblingerstraße called Bahnwärter Thiel (Railroad Man Thiel). Trains run alongside this neighborhood too, whizzing overhead as you walk down the highly-decorated block.
For the street art photography we practiced something I call repositioned panoramic photography. This is a technique I have used on several occasions in the past, and I have perfected it through practice. I bought a roll of string, and we tied a knot in the string every meter. Then my students taped that string to the sidewalk three meters away from the wall.
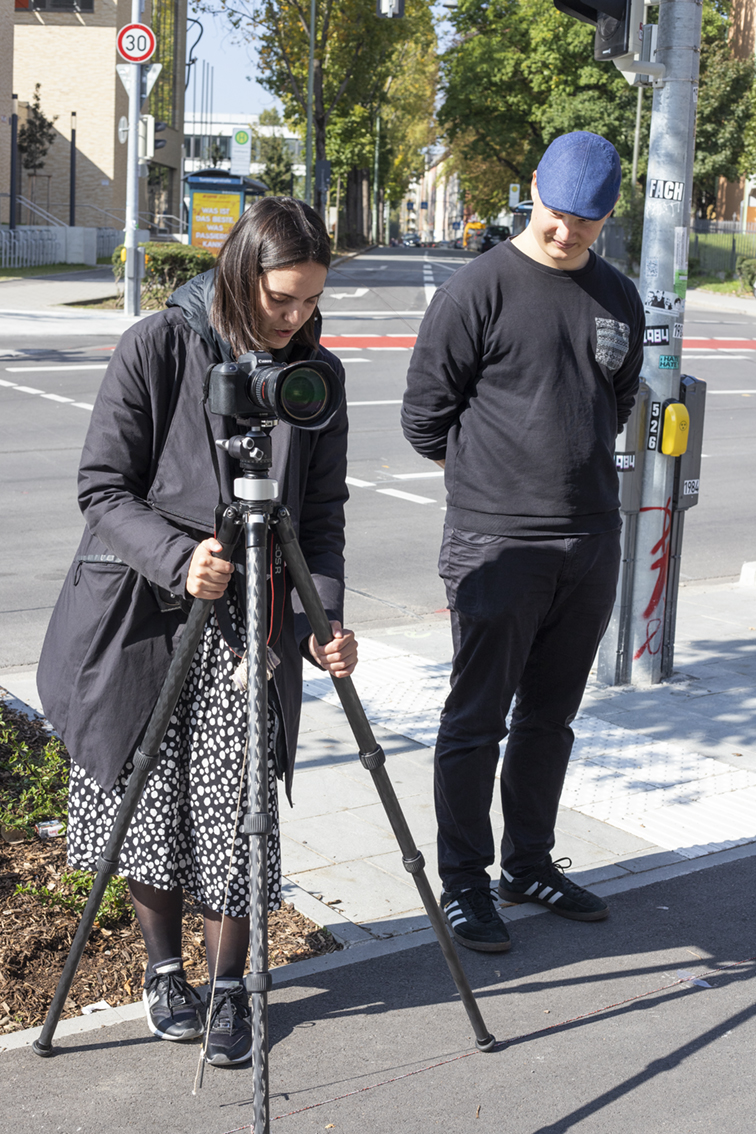
With a plumb-bob on the tripod, we moved the camera along that string, stopping to take a photo at every one-meter interval. We were shooting with a medium wide lens with careful (manual) exposures to ensure consistency. What we ended up with are overlapping photos of the artwork with about 85 MB of data per shot.
Another team of photographers, using still cameras, photographed every nook and cranny of the street, gathering detail photos of the paint and the empty cans (the street artists are reasonably careful not to litter; they dispose of their paint cans properly – most of the time).
A third team of photographers took portraits of some of the artists working on their art.
When we were finished gathering photos and stories, another team of students transcribed the interviews and edited them into what the Germans call a “porträt” of each artist. These are stories that describe the people and their work. They are intimate descriptions of these men (we couldn’t find any of the women in the street arts community) and their philosophies about art and expression.
A smaller team of senior editors then fashioned these written portraits of the artists into a cohesive story about Tumblingerstraße and its contributors. They worked to define the “voice” of our book so that the stories were consistent in style and language.
Meanwhile the students and I worked on stitching the stepped panoramas together into ultra-high-resolution panoramic images for our book. Adobe Photoshop is an excellent platform for this kind of work, as its Automate:Photomerge function is very good a piecing together stepped images into flawless horizontal panoramas of hundreds of megabytes.
I have written about this technique before.
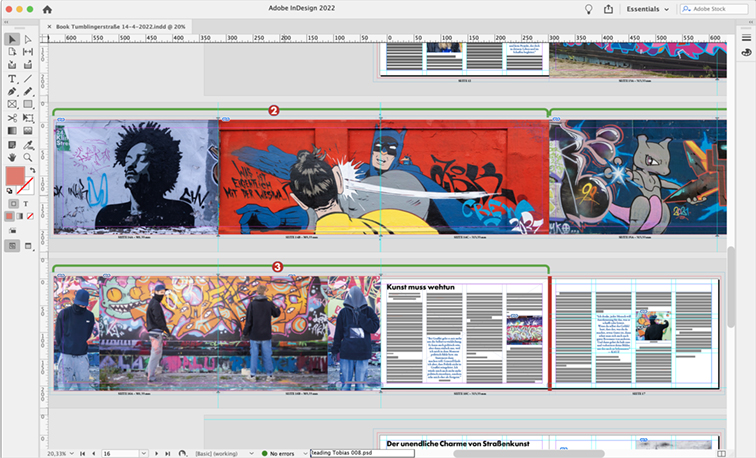
Yet another team began to build the pages for our book-to-be.
And, that is where the Landa Nanopress comes into this story.
I had seen the press running (read about it in this blog), and had asked the company president if they would print our book. With his affirmative answer, I began to work on getting press specifications, creating and printing a test sheet, and making the basic mechanical requirements for my students to follow in designing the book.
I also needed money to print the book, so I applied for, and received an innovation grant from our university to get this book, and several smaller projects printed.
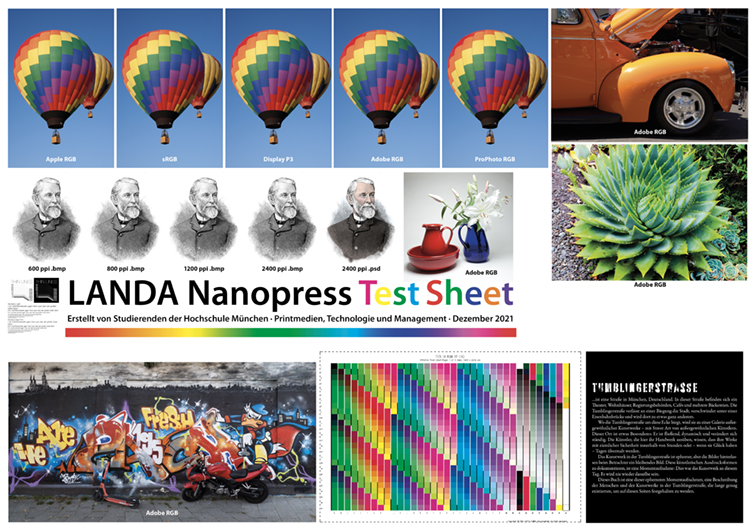
My test sheet revealed that the seven-color Nanopress would make an excellent printing platform for a book about street art. The vibrant colors of the artwork – including brilliant oranges and greens – would reproduce well on this machine. This was going to be a perfect pairing of technology and art.
I am an advocate of big-gamut RGB images for print. I have long believed that saving my photos with Adobe RGB, or ProPhoto RGB profiles gives them an opportunity to shine on the printed page. In this case I was working with the students to create ProPhoto RGB files for the book.
My test sheet proved me wrong, though. Those images I printed from the ProPhoto space did not reproduce well at all, instead turning them muddy and unattractive. But, that is why I made a press test sheet!
After consulting with a representative of EFI here in Germany (they make the RIP that runs the Nanopress), I decided that my best path would be to use Adobe RGB (though after researching it a bit, perhaps ECIRGB might be better – this is yet to be determined).
We reprocessed the photos with Adobe RGB source profiles.
After two months’ work, we completed the book in Adobe InDesign. It was ready to print. The grant would not come through until March, so we waited.
When the grant money became available, I made arrangements for the books to be printed. Our press run would only be 125, but that is what the Nanopress does best. Limited editions are not only possible, they are routine on this machine. And, comparing the cost of printing on the Landa Nanopress with offset printing shows that when you don’t have to make plates and do even nominal make-ready, the Nanopress wins. You get gorgeous printing and you don’t have to spend a lot of money and time getting ready to print.
My summer semester Bachelor’s degree students and I used the Nanopress demonstration as a teaching opportunity. I took 14 students to see the book being printed, and to give them an opportunity to see this amazing machine at work. Representatives of Landa were on-hand to give the students an all-around tour. The machine was running beautifully, and the students had a rare view inside the machine.
The press run didn’t take very long: the book was comprised of three full B1 press sheets for the book body, and one additional press sheet for the covers. They ran about 150 sheets of each, and the entire run was completed in less than an hour.
The students eagerly accepted samples from the Nanopress, rolled them up and left the plant excited to have seen this new technology at work.
After printing, the press sheets were shipped to a bindery in Frankfurt where they were trimmed, folded and perfect-bound into beautiful examples of the work created by my Master’s students. Their work paid off in a form previously not seen – seven-color production printing on the Landa Nanopress that is beyond what we normally see from commercial presses.

Hi Brian,
Great read, as always.
Is it possible to buy a copy of the book?
Yours is pretty much the only blog I follow, because you describe techniques of which I know little so beautifully. I’d love to have a physical copy of the book – looks wonderful.
Best wishes
Nick
Your comments on wide gamut RGB digitalimages are interesting. Some Wide Gamut RGB profiles have ‘colour’ that are outside our eyes perception in believe. Certainly even the best wide gamut, profiled monitor cannot display this images and profiles correctly. Adobe RGB or the P3 digital cinema colour space seem to be the best they can manage.
So converting form Wide Gamut RGB to a CMYK profile results in a huge amount of gamut clipping. So in automated colour management workflows the many variables that can effect this conversion cannot be changed on an image by image basis.
So best to convert in Photoshop to the Landa CMYK device profile in order to preview the results?
Hi Paul,
I agree that some RGB source profiles go outside the human-visible spectrum (ProPhoto RGB does this). My current favorite is the ECIRGB color profile which is slightly better mapped to the colors possible in CMYK than Adobe RGB is (based on FOGRA39).
I do not recommend attempting to convert from RGB to anything prior to sending your job to the Landa 7-color press. That would be fruitless, and would inevitably cause trouble because you cannot convert to the 7-color space correctly (there is no profile commonly available for that). It is always better to leave your photos in their original color space and let the RIP convert to the press color space.
The Fiery on the Landa does an excellent job of converting to CMYKOGV. But, as I mentioned in my blog a few days back, the ProPhoto RGB source color space does not work correctly on the Landa. It’s better to use either Adobe RGB or ECIRGB, both of which are big enough to accommodate an ample color gamut in RGB, and are both converted successfully by the RIP on the Landa Nanopress.
I tested five source color spaces on my test sheet, and they all worked well, with Adobe RGB producing the largest gamut of colors. ProPhoto RGB did not work well at all. (I don’t know why ProPhoto RGB failed, and I have been in communication with EFI reps here in Germany to try to determine the reason, but so far, we don’t know.)
If you choose the ECIRGB source color gamut when opening Camera Raw files, the gamut of colors there is about the same as a FOGRA 39 CMYK gamut. When you convert to seven colors for the Landa, the Fiery extracts the additional colors in the image and uses orange, blue and green inks on the press to greater benefit. The colors in some our images have beautiful greens and oranges on the press – colors that would not be possible with only CMYK inks.
Best wishes,
Brian P. Lawler
The Blognosticator