

In my last blog about the failure of my Cinema Display, I included a detailed illustration of a Coleman lantern. This was dredged entirely from memory, and included as an after-note in an illustration of a heliograph that I built in junior high school.
After I posted that blog I realized that there was some instructional value to the lantern illustration because I did it with Illustrator’s odd but effective 3D tools. They are found under Effect>3D>Revolve, etc. I like these tools, but they leave a lot to be desired (more on that later).
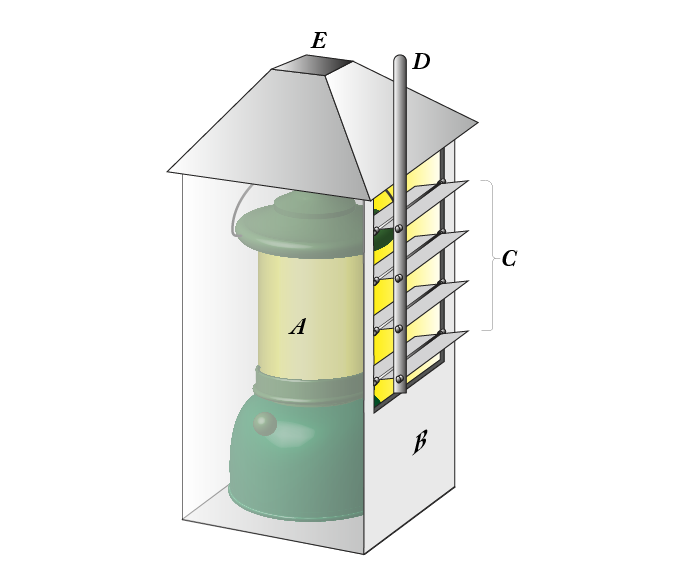
The lantern is relatively easy to draw if you have a sense of the construction of such a device. It is made up of several simple parts, a canister of fuel at the bottom, a regulator valve in the middle of a cylinder above that, then a base for the lantern glass, the glass lens, and two tiers of steel caps on the top, one provides a vent for the hot gasses escaping from the lantern.
Then, on the very top there is a machine screw and a wing-nut to hold the glass and the top caps on, and a wire handle that hinges from the lower top cap.
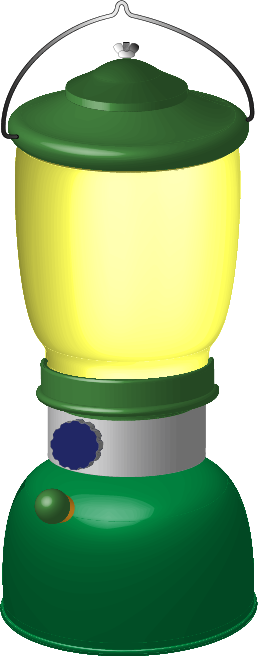
This is my finished Coleman lantern illustration – it’s a little fancier than the one I used in the heliograph illustration. It’s made up of some relatively simple parts stacked atop one another.
In Fundamental Drawing in college I learned how to dissect objects into their primitive shapes: rectangles, cubes, spheres, cones, etc. That’s all it takes to draw the lantern, or any other object. Divide the object into its primitives, and begin. In Illustrator that’s easy because the primary drawing tools are primitives: lines, polygons, rectangles, circles, ellipses. Everything else we draw is either a combination of primitive shapes or a modification of primitive shapes.
To draw my lantern, I considered the lantern parts from bottom to top, then drew them in unwrapped form. Unwrapping a 3D object means to think of its profile only, revolved around a center pivot point, which is what Illustrator does in its Revolve controls. The program will do a nice job of creating realistic objects, complete with shading. It helps to have a fast processor and a fast display card, otherwise you may have to wait while the computer catches up with your drawing’s complexity.
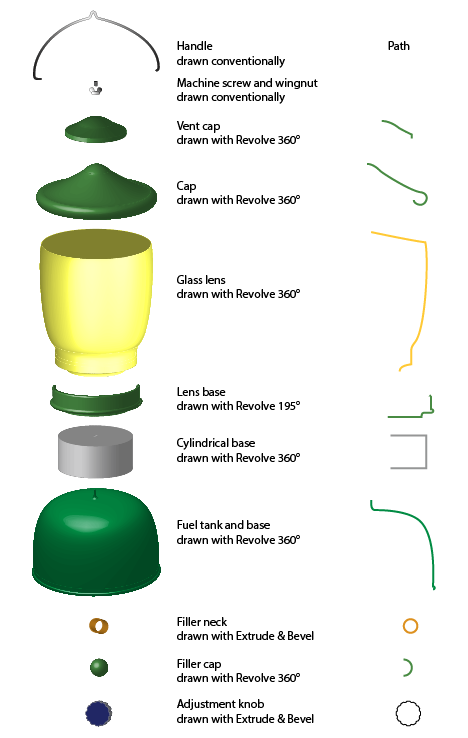
This is the illustration, exploded into its parts. On the right are the profiles of the paths used to create the 3D objects in the illustration. These paths are all you need to make realistic parts of an illustration. After drawing a path, select it, then choose the 3D tool to cause it to become a 3D part in your illustration.
The fuel tank/base is a spherical shape concatenated with a cylinder. Drawing an object with one straight side, turning into a half-round curve will do the trick. To make it more realistic, I put a little half-round curve at the very bottom to create the base seam on the bottom, as shown here:
![]()
The cylindrical base is really easy – it’s just a three-sided line that is revolved into a cylinder in Illustrator. Make the stroke of the line medium gray, revolve the object, and set the light source at the left edge of the illustration to put a nice gradient onto the surface.
The base for the glass lens is a slightly more complicated path, with a bump at the base and a rolled top. The profile of that path looks like this:

After drawing this base I had to experiment with the degree of rotation needed to wrap around the front of the lens, but not to go beyond that. It turned out that 195° is the right amount for a nice looking base.
The lens itself is pretty easy. It’s a rounded cylinder stroked with yellow, then revolved 360°. For the purposes of this lesson I did not put the gas tube, the mantels and the tiny adjustment lever inside the lens; that’s too much detail for this illustration.
On top of the lens are two cap pieces which are very similar. I used one to draw the second. They are both stroked with green, then revolved 360° to make their shapes. At the top are the machine screw and wing-nut, both of which I drew as conventional 2D parts in Illustrator. Drawing screws is easy, but there are a lot of small details you have to get right. I drew one thread, then propagated them downward to make the screw. The wing-nut is an easy item to draw; I have one on my desk that I used as a model. Adding a simple gray gradient makes it look almost real.
The wire handle was also easy. I drew half of it, made it look good, then reflected a copy of the half, joined them at the intersection, then outlined the path, stroked it to make it show better against the other parts.
When finished, the lantern looks pretty much like I remember them to look, and I was able to make it with Illustrator’s 3D functions. It’s easier than it appears if you know how to dissect a drawing into its component parts.
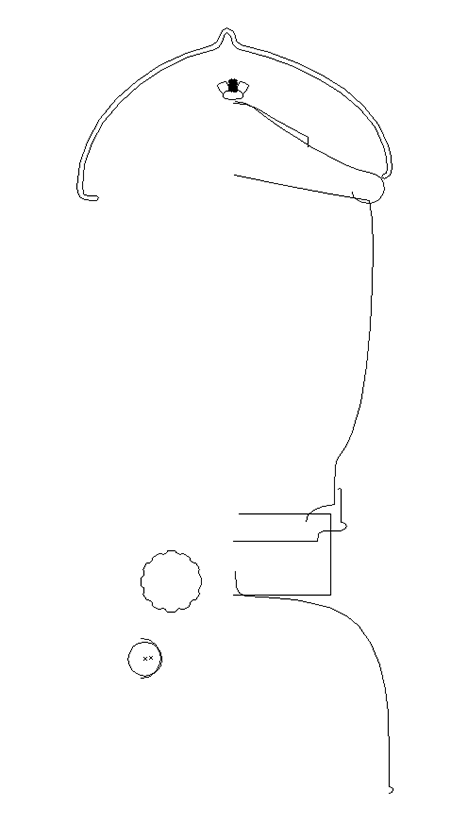
To demonstrate how “simple” the lantern illustration is, this shows the entire thing in Illustrator’s Outline view. There are a total of 12 major objects in the illustration; some have sub-parts (the machine screw has quite a few).
What could Adobe do better with Illustrator’s 3D functions? When you make a 3D object in Illustrator, it’s drawn internally with hundreds, sometimes thousands of Bézier curves and lines. The complexity of these components is mind-boggling. If you Expand one of these objects, you will discover just how many microscopic things Illustrator creates when making these parts. Many times there are three, four, five – ten copies of a line on top of another line that has the same characteristics. Editing things in Illustrator can take a long, long time, and can occasionally be maddening.
When Illustrator makes shaded gradients, it does so with scores of rectangles and other shapes, each filled with a slightly different shade of the same color. It would be much nicer if the program created simpler objects filled with gradients made with the gradient function that is used in the 2D part of the program. That would be really nice, and it would make fine editing tremendously better.
I recommend that you not attempt to edit the objects created by Illustrator’s 3D tools and then Expanding their appearance; it’s too frustrating.
Otherwise, these tools are functional and effective. Illustrations made with these tools are very attractive and realistic. If you don’t look behind the scenes you’re better off.