

Over the past eight months I have been documenting my year-long “portrait” project of Bishop Peak, the 1,559 foot mountain in San Luis Obispo. That project, which began in December, 2015, is well on its way, and will soon be made public in the Baker Center on the campus of Cal Poly. In a nutshell, the project entails taking photos of the mountain every day, then picking the best photo of each day and having that photo printed on aluminum material.
The printed photos are then machined to precise size, and will (soon!) be installed in a permanent display at Cal Poly. That requires six large sheets of aluminum to be machined with mortises for the photos. Once these panels are mounted, I will begin to populate the panels with the individual photos. I started the camera on March 1, and will take it down at the end of February, 2017 after I have completed the project. I take one photo every five minutes with a Canon T5 camera in a weatherproof box on the roof of Cal Poly’s Kennedy Library. I take 192 photos every day, and have accumulated over 30,000 photos in the project so far.
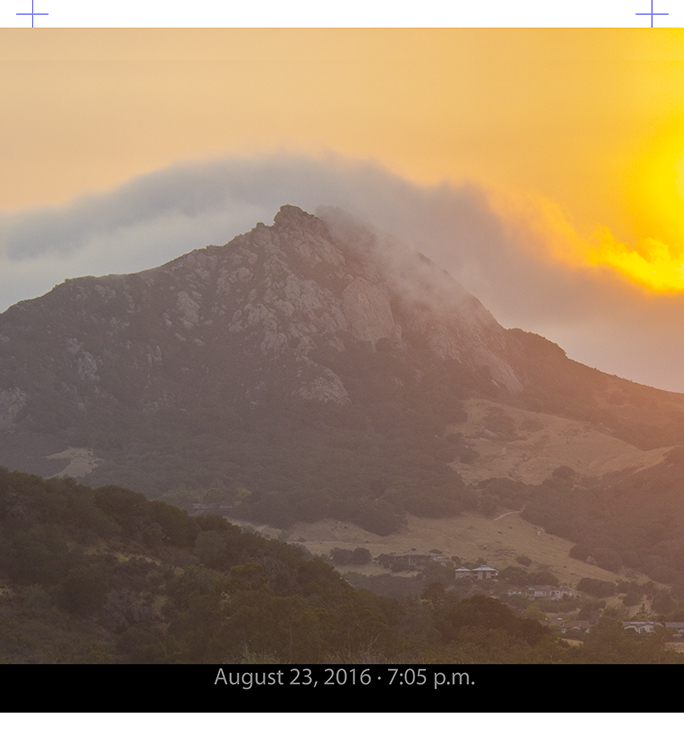
This is one of the photos of Bishop Peak, taken – obviously – on August 23rd. The sky is tinted by the presence of smoke from huge wildfires that are raging in our county and in the two adjacent counties. This is the file that I have printed to aluminum material, complete with the register marks, the black border and type at the bottom. Those things are added semi-automatically by my AppleScript which commands Adobe Photoshop to put the lines and type in position.
I never know which photo will be best until I look at the day’s collection, and compare it to the previous (and sometimes the next) day’s photo. I choose the images by which one is more colorful, or more simple, or – as is the case recently here – the one that has the most red sky caused by the huge wildfires that are raging in our county and the two adjacent counties of California. August will feature a whole week of yellow-red skies as a reflection of this unfortunate situation.
Many of the photos are very plain: blue sky with clear, sharp mountain. Those are emblematic of a “normal” day on which there was no weather that created an extraordinary photo. I have some with rain falling (early March), and I have several where the mountain is engulfed in fog – a very common occurrence during our summer months. I like the variety of these photos.
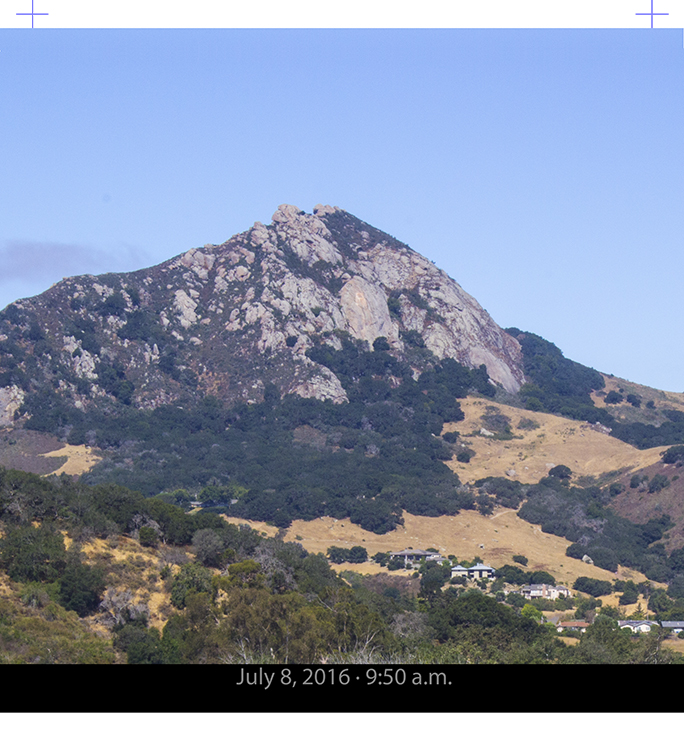
…and this is an example of one of the photos from a normal sunny day, July 8. It features a blue sky and clear, sharp detail in the mountain.
In June I had the first batch of aluminum prints made. These are done by a lab in Santa Barbara, California, using a dye-sublimation process. I send, using DropBox, a batch of photos to them to be printed. They print the batch, and ship them to me for machining and completion.
And, here is where the ecosystem got more complex. In December I built the box for the camera. I spent January and early February designing and building the first circuit board to run the camera. That, combined with a battery and two solar panels, were tested with the Canon camera for a few weeks to be sure that it would work in a stand-alone situation (I am not allowed to connect or attach to anything at Cal Poly; the camera must be autonomous).
On the first of March I started the camera on the roof of the building, accompanied by an escort from Cal Poly’s Facilities department (for safety reasons). Initially everything went well, but as you can read in my previous blogs, I had a few problems with the computer technology. By the end of March, things were going well. The camera was operating effectively, and the photos were coming out fine.
On the image processing end of the system, I had to develop a method for cropping and preparing the files for print. To do this, I wrote an AppleScript that controls Adobe Photoshop to crop, label, and draw register marks on the photos. I had small batches of the photos printed at three labs, and chose the Santa Barbara lab because I have a working relationship with them, and they did a nice job on the test prints. But all the labs were unable to cut the photos to a precise size, and that forced me to create an arm of my ecosystem for machining the photos to precise dimensions.
Machining the photos to size
As you may have read in previous blogs, I own a CNC router, a machine that cuts wood (and other materials) by computer control. It’s a spectacular device, and I used it to cut the parts for the camera box, the camera box mount, and even to cut the circuit board traces for the circuit boards that I developed for this project.
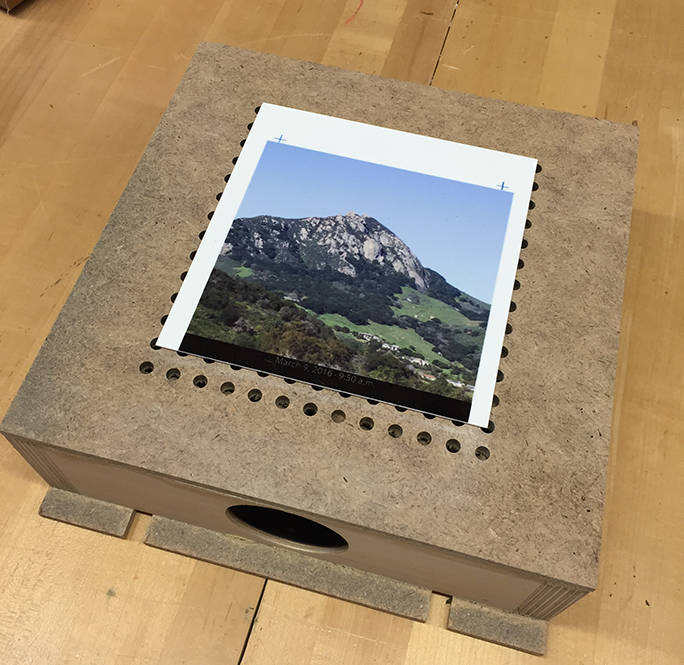
This is my small vacuum table with a raw aluminum print on top. The vacuum hose is inserted into the hole at the bottom to provide the suction to hold the plate in place. Then the CNC router cuts the photo to its precise size.
To cut the individual photos to precise dimensions, I built a vacuum table for the CNC machine. This table is small, only 10 inches square. I power it with a standard shop vacuum. When activated, it can hold a small sheet of aluminum in place for routing with amazing force (the atmosphere is my friend here). To cut the photos, I designed a pattern of register marks that are drawn by my AppleScript on each day’s photo. They are imaged in blue, and have a four-pixel white hole at the axis. This allows me to aim my CNC cutter precisely on the marks using the laser beam attached to the machine. When the red laser hits the blue lines of the register mark it almost disappears, but when it hits the white square at the center of the register mark, it is brilliant red, and I know that I am on-target.
Using an aluminum-cutting bit on the router, and a program that cuts the photos to the exact size I need for the installation, I cut each day’s photo, then wrap it and pack it to prevent scratching. Each photo takes about four minutes to align and cut (and I have only 365 photos to cut!).
Using a vacuum to hold small parts in place is more difficult than it would be with a larger sheet of material. This is simply a function of area. Since my rough photos are only six inches square, it takes a lot of vacuum pressure to hold them down against the several horsepower of the CNC machine’s motors pushing the cutter through the material. As a result, I cut these photos with four light passes of the cutter to ensure that they are each cut with the precision that this project demands, and they don’t go askew on the table.
A curious problem: thermal variation
One day back in May I noticed that the mountain appeared to be in a different position from one month to the next. I looked carefully at the images, comparing the mountain’s position in pixels measured from the top margin. I discovered that there was a considerable difference between images. To study this further, I converted an entire month into a time-lapse movie and watched it as a movie on my computer screen. The image of the mountain seemed move very slightly up and down from day to day. This, I determined was caused by the camera and its containment box getting warm, and cooling off during the day.
As a result of this, I modified my AppleScript to ask for the horizontal and vertical pixel position of a specific point on the mountain (I call it “the hook”). The values entered define the position of the cropping so that all of the mountain images come out in exactly the same position. This adds a small amount of time to my processing step because I have to measure “the hook” for each image (or for a batch of images) and make note of those pixel measurements to enter into a dialog presented by the AppleScript when that program is run.
The finished display: a 20-foot wide calendar
The finished photos will eventually be put into mortises on aluminum sheets in Cal Poly’s Baker Center. To make those panels I purchased sheets of a material called Alupanel. It’s 0.25 in. thick, and features two outer laminates of aluminum with a sandwich of polyethylene plastic in the center. It cuts easily, and machines nicely to make an attractive finished panel. But it takes a lot of time and patience to cut these panels, and the material is very expensive, so I am proceeding with extreme caution so I don’t wreck any of the raw panels. I have been doing that this week.

This is a miniature of my accurate digital mock-up of the final display. It will be just short of 20 feet wide, and about five feet tall. It starts with March, 2016 on the upper-left, and ends with February, 2017 on the lower-right. I have inserted the actual photos into this mock-up. Notice the predominance of red-orange images in August, on the upper-right – the atmospheric effect of smoke in the sky.
Cutting wood on the CNC machine is relatively easy. Cutting aluminum is a different thing altogether. Cutting polyethylene adds another dimension to the process. Cutting the Alupanel material has allowed me to learn some valuable lessons about taking on a project like this. I work with care, taking small steps and making close observations as I go. If something goes wrong, it is a very expensive mistake – the raw material is about $150 per sheet.
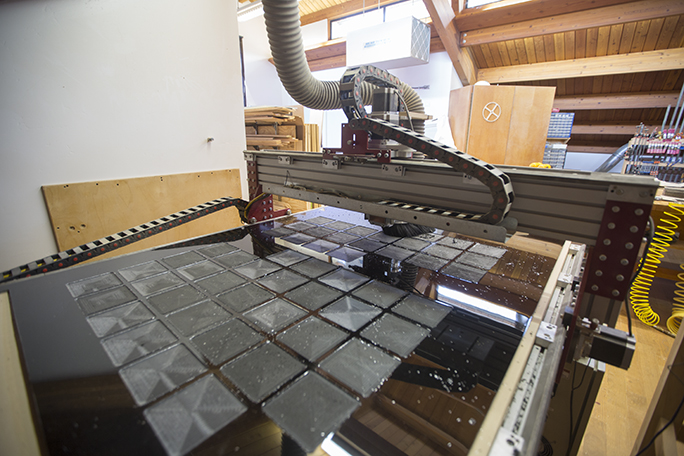
The is the CNC router cutting the mortises for March and September, 2016. The mortises are just a few hundredths of an inch deep, only enough to accommodate the individual aluminum photo plates that will be inserted after these panels are mounted.
My cutting tools are designed for aluminum, but they tend to melt the polyethylene plastic between the two aluminum surfaces. Getting the right combination of speed of rotation and feed rate proves to be an interesting process, and I am getting close to mastering that.
One these panels are cut, I will have Cal Poly’s Facilities Department mount them on the wall in the Baker Center, then I will begin the process of populating the panels with the individual photos. That will be done with an industrial adhesive, each photo inserted into its mortise. I’m about half-way into the photography part of the project now, and I hope to have the work on the wall very soon, which probably means during the month of September.
You can read the next installment of the story here: The Phinal Phase of the Bishop Peak Portrait Project.
One day back in May I noticed that the mountain appeared to be in a different position from one month to the next.
Hmmmm maybe you didn’t consider plate tectonics:? 😉
D.K.
It’s well documented that Bishop Peak moves from one side of Highway One to the other. You just have to keep watching, because it happens so quickly!
Brian
Well said! I do like your handsome face on the vinyl picture hanging on the fencing on the way to the PAC on campus.
D.K.