

My summer is coming to an end, and I am engaged in the phinal phase of the Bishop Peak Portrait Project (BPPP), the making of the final display panels.
On my previous large-scale photography projects, I have had the luxury to turning over the printing to a commercial provides, and the putting-up part to my friends Rob and Doug Brewster, who are geniuses at attaching my photos to the walls of the buildings at Cal Poly where they are on permanent display.
This time I am doing more of the work myself. I took responsibility for machining the large aluminum panels that will be mounted on the wall for the BPPP. I have now completed the cutting of the sheets, and I think that I would have jobbed it out to a more competent provider had I known then what I know now. But that is not possible, as the work is nearly done, and I have spent almost 50 hours standing by my CNC router over the past month preparing the shallow mortises that will hold the individual aluminum photos of each day of the BPPP.
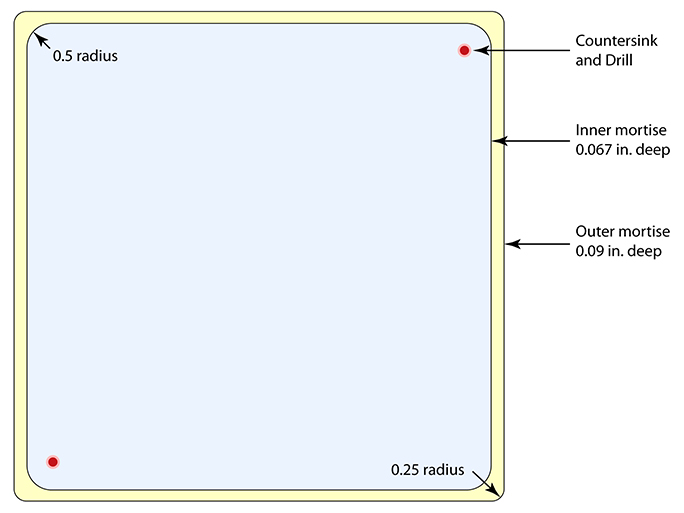
This is an illustration of how I am machining the mortises. I start by cutting the outermost, final mortise using a 0.25 inch diameter end mill. I cut this mortise slightly deep to reduce burrs along the edges of the cut. Then I follow with the inner mortise, cut with a faster and larger 0.5 inch end mill. I finish by countersinking and drilling the holes which will eventually support the panels in the Baker building at Cal Poly.
I am cutting a material called Alupanel, which is made in China for a British company. Alupanel is gorgeous material. It’s a laminate made of two sheets of aluminum (each about 0.012 in. thick) with a thick layer of polyethylene plastic in the middle. The surfaces of the aluminum are available in various colors, painted, or in brushed aluminum. I purchased the gloss black material in the 0.25 inch thickness for this project. It’s strong enough to be used effectively for my project, and it allows for machining, leaving a considerable amount of the plastic layer behind to hold the flat-head screws that hold the panels to the mounting material.
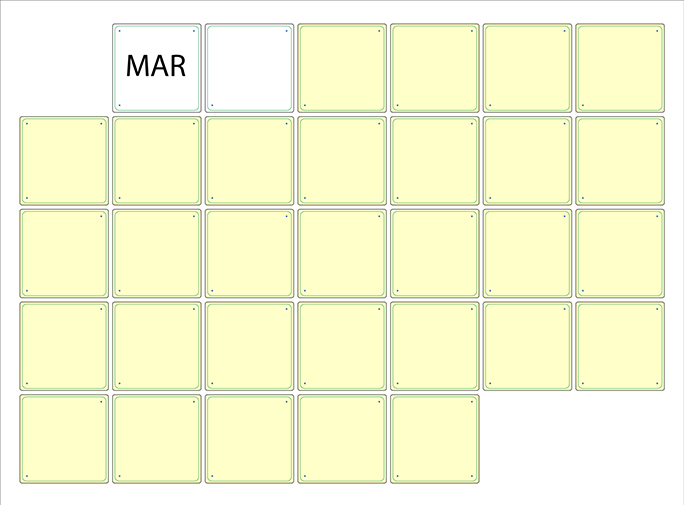
This is the machining pattern for the month of March. There are two months on each panel. You can see the little dots representing the countersinks and holes for the support screws in each mortise. There are extra screw holes in the extreme corners of the month.
I recognize that this is normally a blog about graphic arts and photography, and that it has taken a few sharp turns this year for me to discuss electronic circuit board making, the construction of a weatherproof box for time-lapse photography, and the programming of a Raspberry Pi computer. But in the big picture, this is about a large-scale photography project, one with tentacles that start with photographing a mountain to assembling and mounting the final photos – 365 of them – in a public display. So it’s about photography.
And, CNC routing.
Alupanel, for all of its beauty, is cantankerous stuff. The three layers of the material each have their own dynamic stresses. When solid, prior to machining, Alupanel behaves like a solid aluminum panel. Once I cut a mortise (about one-third) into the Alupanel board, removing the aluminum and some of the polyethylene plastic from one side, the internal pressure of the aluminum on the other side exerts itself, and the board warps. And by saying that it warps, I mean is turns into a large aluminum skateboard ramp. The internal pressure is so great that it pulls the screws out of the spoil board I use on the CNC machine – which means that it pulls with 30 to 40 lbs. of upward pressure.
To say that this has been a problem is an understatement. If it were in a cartoon, the finished Alupanel material would have a caption bubble saying “SPROINGG!!” as it pops up from the machining table.

Here you can see the Alupanel sheet shouting “Sproingg!!” as it warps after machining. This isn’t funny at all because the warping is very hard to control, and it can damage the laminate in the delicate strips between each of the mortises, causing it to separate.
I had (perhaps presciently) designed countersunk screw holes inside each of the 365 photo mortises to allow for the panels to be mounted on the wall later. I had no idea that these would become so important when I finished these panels. I originally thought that we would need just a few of the screw holes to attach the panels to the wall, but now I am using all of them (about 70 screws per panel) to hold the panels flat while I prepare them for the final installation. They will probably end up being used in the final installation, which is fine; I’m glad they are available because they have become so necessary.
Another issue that I have learned to manage is the issue of aluminum burrs. The cutters I use are carbide aluminum-cutting end mills. They are designed to do this. But they get clogged by aluminum chips and they get dulled by cutting. By panel six I had it all figured out. I use a new, sharp cutter at the beginning of each panel, and I leave the protective plastic sheeting in place during the cutting. This eliminates all but the rarest burrs from being left behind along the finished edges of the mortises. Those I have to remove by scraping the mortises out with a small and very sharp chisel. It’s time-consuming, but it’s necessary.
I also learned that applying a small amount of beeswax to the cutter prior to each row of mortises makes the cutting smoother, leaving fewer burrs for me to remove. Oh, I wish I had known these things when I started!
And that is the final step that I am taking now to finish the panels for installation. I go from mortise to mortise, cleaning and inspecting each one, and I have a test photo to insert into each mortise to ensure that the photos will fit when I install them later in the project. I will turn the aluminum panels over to Cal Poly in the coming days and they will be erected in the hallway of the Baker Center. Once up, I will go over with a box of aluminum photos and some very strong industrial adhesive to install the photos into the mortise. This is an on-going process which will take me from installation to completion at the end of February, 2017 when the project is complete.
You can read the next edition of the Bishop Peak Portrait Project story here.