

One of the things I learned while making my large photo exhibition was how to mount huge photo prints without getting wrinkles or bubbles.
I am a user of permanent self-adhesive foam core board. I love this stuff. My favorite brands are Elmer’s and Gilman, which I buy from ArtSupply.com in sheets up to 4 x 8 feet. These boards are 3/16 inch thick, and feature an adhesive so strong, and so permanent that it sticks to anything that touches it instantly. This stuff is unfailing, and occasionally exasperating.
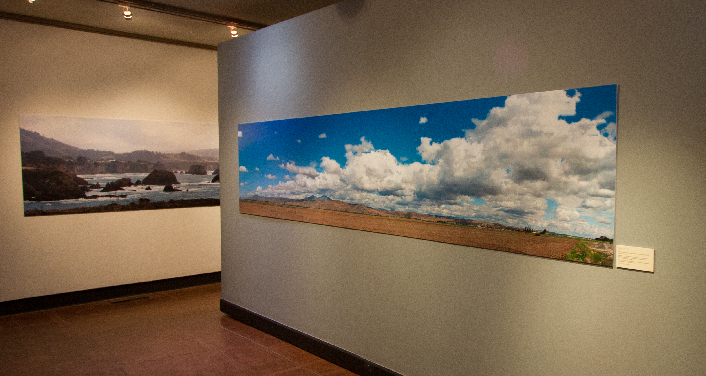
Two of the very large prints in my photo exhibition SLO PANO, on display at the San Luis Obispo Museum of Art through March 30. I printed and mounted these two by myself, and I got away with it. Doing the work with two friends makes it much easier. The print on the right is 14 feet long, and about 37 inches tall.
It’s usually human error that makes the adhesive exasperating. The foam core is just a benign material that – seemingly – grabs onto anything in its vicinity, and it will never let go.
Mounting small posters and sheets – up to about 32 x 40 inches (one of the standard sizes) is easy. It’s a one-person job. I usually arm myself with Big Blue – my five foot extruded aluminum cutting ruler, and Alvin, my 3 x 4 foot self-healing cutting mat. I also have an 1950s era Kodak hard rubber roller with a big cast iron handle. This is used to roll material down onto the smaller foam core boards.
For larger sheets, the job becomes a two-person or three-person project. And, it becomes a lot more difficult.
There are very nice laminating and mounting machines available to the wide-format industry. These, typically, cost about $20,000, and they are worth the investment I am sure. But, my operation is in my home, and I have no room for such a machine. And, my need to mount very large projects is limited. I did a lot of this while preparing my exhibition, but now that it’s up, I haven’t made a big print since.
For the low-budget crowd, those without a laminating machine, my friend Catherine and I came up with a great solution to the problem that involves nothing more than a large table, a long 3-inch roll core, and two to three people (three is best).
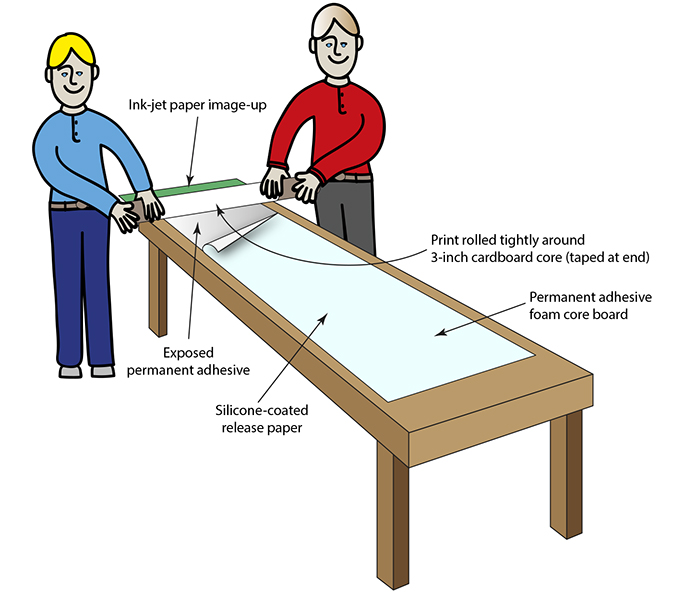
Here, the Dopëlganger twins prepare to roll a huge print onto a large sheet of self-adhesive foam core board. The third person (not shown) peels the release paper away just in front of the two as they press the photo paper to the adhesive in a continuous motion from one end to the other.
Having a long table is helpful, but it is possible to make do with a shorter table, and shift the work as you go.
Put the foam core on the table, with the adhesive side up.
Roll your large print out on top of the foam core to be sure it will fit on the sheet you have. Once it’s on the table put three strips of painter’s masking tape on the end of the photo paper, exposing half of the tape facing upward. To this you will affix the long cardboard core. Be sure the tape sticks, then wind the print very tightly around the core, image-inward. When it’s rolled all the way to the end, take it to the end of the foam core sheet and have one or two people hold the photo tight on the roll.
At the end of the foam core, pry up the silicone release paper, and fold-back a one-inch flap, exposing the adhesive. Crease this sharply with your fingernail.
With your two friends holding the tightly-wound roll of photo paper, CAREFULLY position the edge of the photo paper near the exposed adhesive. Then move it over the adhesive, and touch the center of the photo to adhere it to the center of the board. Then push with one finger from that center point toward each edge. This establishes the beginning of the mounted photo.
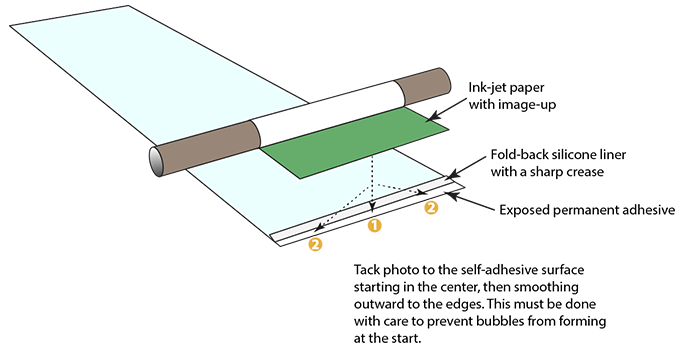
Tacking the photo paper at the head end of the roll is critically important. Start in the middle, and smooth the paper out to the edges. This must be done perfectly to prevent a wrinkle that will ruin the print, so be careful to start it right.
Being sure that the photo is tightly wound on the roll, move around to the edge ahead of your two friends, and have them set the roll of photo material down on the adhesive where you tacked the start. They should push downward while maintaining tension on the print.
Then, pull the silicone release paper away from the adhesive, while your friends roll the print down onto the adhesive. Go slowly, and stay ahead of them only by an inch or two. They will continue to unroll the print while pushing it down onto the foam core. You get only one chance.
When you get to the other end, remove the masking tape, and finish the roll-out. Your work should be perfect.
My team of volunteer helpers and I did this successfully five times while preparing the huge prints for my exhibition, and it worked perfectly every time. In the absence of an expensive laminating machine, this does the trick, and the result is the same.
thanks for sharing..easy and simple method to understand printing and laminating process…keep sharing !!!
What a great post! Thanks for sharing all this wonderful information.
I have a question. Does the foam core warp after time?
Also, can you give a bit more information on how you get straight perfect cuts on such large pieces?
Thanks!
Hi Steve,
Does foam core warp? Definitely. Once I ordered 1/4 in. self-adhesive foam core from very rainy Chicago, and it came on a truck to very dry San Luis Obispo. I mounted my photos on the boards, and in the following days the moisture left the back side of the board, but not the front (because it had the photos mounted on it). The result was seriously bowed prints. I tried putting them through a heated laminator to cook the moisture out of the front, to no avail. Ultimately I had to use wood screws to mount the boards to the museum wall. It turned out OK, but it was difficult to get them to stand flat on the walls.
Now, when I order foam core I give it time to acclimate before mounting photos on it. Once it has dried out, it causes no trouble. Photos I mounted this past January are still very flat and straight.
On the straight cuts, it’s a matter of having a very long aluminum straight-edge and a lot of patience. Cutting the 14-foot boards was exceptionally difficult, and I was in a wheelchair at the time (it was nearly impossible). First I put tiny tick-marks on the face of the photos with a string as my guide, then I cut between them with the long aluminum straight-edge and an X-Acto knife. Behind the board I use a six-foot Alvin cutting mat, which is very helpful.
Never try to cut through foam core in one pass; I usually cut two or three times with a very sharp blade to get through the 1/4 inch material. Thicker boards require more strokes. This requires good hand control to keep the blade tilted the same between cuts, avoiding the tendency to undercut the board.
I break a lot of X-Acto blades, but that’s part of the excitement!
Thank you for reading The Blognosticator,
Brian
Nice!
Just wondering: What kind of printer does 3′ x 14′?
Jim
Hi Jim,
The photos in the description I wrote were all printed on my Epson 9600, which can print up to 44 inches wide by any length (limited by the paper roll).
The rolls of material I buy are typically 100 feet in length, so I suppose I could print a 44 inch by 100 foot print in one piece.
Brian
Are small routers ever of any use cutting shapes out of foam or do you X-Acto blades the ‘one and only’..?
Hi Harold,
My good friend Bryn has been cutting a lot of styrofoam on our CNC router, and it works fine. The “saw”dust is a horrible mess, but otherwise I would say it’s successful.
Brian
This technique looks great. But is your foam core acid free? If not, your images will deteriorate with time.
Hi James,
I don’t think there is such a thing as archival foam core. It’s made of styrene plastic sandwiched between two sheets of paper. The paper might be acid-free, but that doesn’t buy you much time, as the styrofoam core will eventually deteriorate.
Obviously, this technique would work on an archival acid-free board, which can be bought, and the results would be longer-lasting.
For my exhibition I was only interested in the prints lasting 90 days, so I didn’t worry about the quality of the foam core other than its flatness.
Thanks for your comment.
Brian
p.s. You are the Blognosticator’s 100,000th reader.
Thanks for the great mounting tips, Brian–I’ve scrapped my old way of putting my panos on foam board. I just ran into a related problem of my own making–cutting a thin (maybe 1/16″) slice off the end of a pano to fit in an existing frame since I left it a tad too long. Huge problem trying to get my hand-held knife to cut it. Any ideas? (Also, what kind of camera are you using for your large panoramic images?)
Frank
Hi Frank,
I occasionally have to cut a tiny slice off the end of these boards once they are mounted. I find the easiest way to do it is to turn the whole thing upside-down, then use the long straight-edge (I bought a new 72-inch model recently called Keen-Cut; it’s great!) held against the edge of the foam-core, and then trim it back to the edge. This works well.
I sometimes take a 1/32 slice of foam-core with it, to make the edge consistent.
Brian Lawler
where can i buy the foam core? i’m looking to make 16 3’x6’ photos from 1915 industral and nautical photos i have scanned them in and would like to do this my self i have access to a large printer
Hi Elvino,
I buy the foam-core from (you’re going to love this…) foamcore.com.
They stock sizes up to 48 x 96 inches, and they have a variety of other stock sizes.
I have been very happy with them and their service.
One thing to be careful about is the humidity of the material once it arrives at your location. Two years back I received a shipment from them during the summer. It was muggy in Chicago, from their warehouse there, and very dry here in California. I had to allow the foam-core to acclimatize for about a month before using it to prevent warping.
When it warps there is nothing that can be done, because your photos are creating a moisture-barrier on one side while the other side expands or contracts. It’s a mess!
Best wishes,
Brian Lawler
Any tips to guide/help when mounting (HP Self-adhesive Indoor Paper) on a non adhesive Gator-Core foam board
Hi Eric,
I think I would just invert the process, carefully peeling the release paper from the HP material as the roll is approaching the foam-core.
I made a mounted print a couple of weeks back using a double-sided adhesive sheet (which is essentially the same thing), and I fed the board and photo into a laminating machine (with the heat turned off). As the material approached the nip-point, I peeled the release paper away. The result was perfect.
It helps to have an assistant when doing this kind of mounting, because you can have your helper jump in and peel, hold, pull, and share the success with you.
Brian P. Lawler
For the 14′ long print did you use 8′ sheets and just butt them together or did you use some other method? I ask because I also have a show where I am displaying a 12′ print. Thanks for the post, I have already tried it on a 6′ and 8′ print and it worked really well.
Hi Mark,
I’m glad you were successful in using the technique to mount large photos.
On the large foam-core, I experimented extensively with methods for splicing two sheets of foam-core.
I tried cutting a v-groove at the joint, and applying Gorilla Glue on the back side, while masking the front with clear packing tape. Unfortunately, this created a tiny visible bead. The Gorilla Glue is extraordinarily strong, but the little bead made it unworkable.
Then I tried a butt-joint with Weldwood II glue, also successful, but it created a bigger bump at the splice line.
I finally achieved success by cutting as clean a cut as possible for the splice, and applying a single line of clear packing tape across the back of the joint. When I applied the photo to the front, it became the second structural element, and the joint was almost invisible.
I tried making slightly diagonal joints, hoping that they would show less than a straight vertical line. But, that didn’t seem to matter so I returned to straight splices. It works quite well.
I hope you are successful with this technique.
Brian
Brian Lawler on Dec 3, 2014 said:
“I don’t think there is such a thing as archival foam core. It’s made of styrene plastic sandwiched between two sheets of paper. The paper might be acid-free, but that doesn’t buy you much time, as the styrofoam core will eventually deteriorate.”
Yes and no. There are products sold as archival foam core that are acid free board with a styrene core that, as you suggest, off-gas and slowly degrade. However Bainbridge make a product with buffers encapsulated in the styrene to neutralize the off-gassing. Search for : Bainbridge ArtCare White Archival Acid Free Foam Board. The problem for my application is that I can only find it it sizes up to 40×60 inches. I’d like 4×8 foot.
Michal
Hi Michal,
Thank you for the info on the archival foam core. I didn’t know that such a thing exists.
And, I am sorry that you can’t get it large enough for your project.
Brian P. Lawler
I’m exhibiting on foam board and was just wondering how you hung these works without damaging the foam core or making the hanging device visible?
Hi Nikeeta,
I used industrial Velcro material on the back of the foam core boards. I put two-inch strips on the corners, and periodically along the edges. It worked fine. I had to be careful not to push too hard to prevent the foam core from being damaged by the pressure.
Brian
Hi,
I am trying to mount a poster onto a canvas board. I have attempted this many different times using different spray adhesives, sealers, and Mod Podge but the poster I use tends to bubble or unstick from the canvas board overtime. Any suggestions on what adhesive to use or what boards to use? Have you ever used insulation board. Any help is appreciated!! Thanks!
Hi Amanda,
I’m sorry for the delay in responding. I would suggest that you get two-sided adhesive material, roll it onto your artwork, then transfer it to the board using my large roll technique. Double-sided adhesive material is available in rolls from companies like USI, and in sheets from Art Supply.com. It’s very nice material, and it is permanent.
When I am mounting artwork to boards, and the artwork is not flush to the edges, I use that stuff.
Brian
Hi Brian,
Thanks for posting these tips on mounting big prints. I have a question about a really big print that is being mounted onto sintra. The print is 60 inches by 107.25 and we are using your roll up method, but having a hard time keeping it straight on the reel and so it doesn’t lie down straight on the sintra. Any suggestions would be appreciated.
Thanks,
Kathleen
Dear Kathleen,
Sorry for my long delay in responding. I have been goofing off, teaching, and not blogging.
I had no particular trouble getting my 14-foot prints mounted, but it depends on how tightly you roll the material to the upper roll.
It absolutely takes three people for a print that large. Two on the roll of fresh material, and one to trouble-shoot on the fly.
I can’t offer any other advice other than to be really careful and keep the roll as tight as you can as you unroll it onto the Sintra.
I mounted two large prints this week (on material about 40 x 60 inches) and I did it alone! I was taking a huge risk in doing this, but it worked, and I got away with tempting the gods of self-adhesive board.
Best wishes,
Brian P. Lawler
So how did you connect more than one piece of foam core if they come in 8 foot boards? I am trying to mount large prints but don’t know what to do when they are over 8 foot..
Just saw your post as I was searching for info on mounting a laminated map on a foam board. My questions concerns using acid free vs. non-acid free foam board. In your estimation, how long would a laminated map last on a non-acid free board?
Thanks for any advice you can provide.
I have the same question as K2 regarding mounting of a laminated map. The map is 4′ by 6′ and we are wanting to use it for pin insertion at specific locations. What backing would you suggest, and in doing so what method of mounting wound work best? We are intending to frame it as well.
Appreciate any insight you can share.
Thank you.
Hi Colleen,
Sorry for the delay in responding to your question on my blog.
Mounting a 4 x 6 foot map is reasonably easy. I recommend using a product called Gator Foam, as it’s stronger than regular foam-core, and will not collapse when you put push-pins into it.
I have done many prints on Gator Foam, and they look and work really well.
Framing will be costly, but it’s probably a good idea.
Best wishes,
Brian P. Lawler
Thank you Brian for your response.
Does the Gator Foam come with a self-adhesive? If not, what method of attaching the map to the foam do you recommend that will result in a smooth surface finish? Also, what thickness should the Gator Foam be? Any additional recommendations are appreciated.
Thank you.
Hi Colleen,
I have never seen Gator Foam with a self-adhesive surface. I buy foam-core with the self-adhesive surface, and that is quite common. For the Gator Foam, I use a double-sided adhesive material available from foam core.com. I put it down on the surface first, then peel the top liner off and mount my prints to the exposed side.
Another approach would be to take your large print to a wide-format printing firm, and have them laminate it in a roll laminator machine.
Best of luck to you,
Brian P. Lawler
I just began dry mounting 16 x 20 prints onto foam board, then cutting the four sides with a mat cutter. The process was easy, and the result looked great–an inexpensive way of exhibiting 25 or 30 photographs at a time. However, by the next day, the boards had warped. I’m going to try again with boards that have “acclimated.” Two questions: (1) How do you prevent warping due to changes in humidity AFTER the acclimating process? (2) Is there a way to affix the foam board to a stiffer material (like gatorboard) after the photo is mounted–or some other strategy–to prevent or control warping?
am doing small work to start…prints from 5×7 up to 3×6. previously have used spray mount with some success. any problems long term with this technique ?
Spray mount to me is the Devil’s work. It’s messy, smelly, toxic, and it is a bug magnet! The reason I first tried self-adhesive foam-core was that I hated spray-mount so much. Now I will never go back.
My prints on foam-core are free of bubbles, dust, bugs, creases and other flaws, and they are smooth and professional looking.
Brian
Brain,
are you rolling the art work down on the exact same size piece of foamboard and staying in alignment all the way down? Thats impressive! I would like to use your method but I don’t see how I could do it without drifting to one side or the other. Or, can you use an over-sized board and trim back the excess?
Hi Court,
I do not attempt to get the print and the mounting board to be the same size. Instead, I mount the print on a larger board, and then trim to size, making a clean edge and a nice, square image.
Brian
Thank you Brian for sharing your generous information. What is the best way to mount the board to the wall when it is finished. Have you ever used 2 sided plexiglass or have you come up with something better? We are thinking of putting my husband’s photos on foam board and using 2 of them on our condo hall walls. The photos are (65×42 and 50 x42). Trying to keep the price down by not framing them. Ideas?
Thank you.
Nicki
Dear Nikki,
I have made many large and very large photo presentations that are mounted on the wall using wood stringers. This requires that a 1 x 2 or 1 x 4 board be ripped on an angle, with each half being mounted so that the photo can simply hang on the stringer once it’s on the wall.
The stringer on the wall will have the angular slope facing upward, and the print gets the opposite piece.
Use a light wood like pine, and it will work well.
Sometimes it’s necessary to put a second piece of wood on the bottom of the print to make the bottom stand equally far from the wall.
It makes a gorgeous display!
Best wishes,
Brian P. Lawler
Brian,
My client needs a “gallery wrap” of a 12″x96″ print on heavy luster large format paper media. I can imagine mounting the face first and then each wing of the wrap afterward. Have you tried doing this?
It would require precutting the foamcore of course making alignment more challenging. The finished look without framing is very appealing.
Bob
Thanks
Hi Bob,
Sorry for the delay in responding to your question. I have done similar things, and it looks great.
You’re right. The foam-core must be cut to final size first, then the image mounted, then the edges folded and glued.
I have done with with both double-sided adhesive material and spray adhesive (boo! hiss!).
Best wishes,
Brian P. Lawler
Hello, thanks for this article. It seems helpful for my project. My question is, in your opinion, would the following be a feasible project:
I bought a very large movie poster on eBay. It’s 4′ x 6′ — and many friends and artistic colleagues have said to NOT spend the money framing something so big, it will be far too heavy to hang in my apartment, and due both to the framing cost and the weight of the glass, it would be a terrible idea. I considered framing with plastic rather than glass, but I still think the framing would cost around $300-$500, not worth it.
So, I was considering just flat-mounting it (don’t know if that’s the right term) but obviously I dont want this to look like an arts and crafts project. Do you think your process as shown for your photo exhibit would work for me?
Dear Michael,
Sorry for the delay in responding. To mount something this large you will need to get a 4 x 6 foot piece of foam core board. You can get it from industrial suppliers, but that’s too large to find at a local art supply store.
Once you have the large board, mounting the poster will be difficult but not impossible. You’ll need a long mailing tube (longer than 4 feet) and a large, flat table. Once you have those in-place, the rest is fairly simple. You’ll also need help – at least two helpers to get it down flat.
Don’t mount your valuable poster until you have practiced at least once.
I hope you are successful in getting the poster mounted. It will look spectacular in your home.
Brian P. Lawler
p.s. Option B is to take the poster to a large-format ink-jet printing company and paying them to do it for you. That might be easier.
Hello,
I am a student worker at my college and I am asked to do a print job for our school. We are printing another school’s logo onto foam core, however as big as they want it I most likely will have to do it another way. My question is is how do you get your foam core to stick together?
Thank you,
Tabatha Bierie
Hi Tabatha,
I use self-adhesive foam core with a permanent adhesive. You can buy this material from various vendors including foamcore.com.
If you are splicing two pieces of foam-core together it’s more difficult. To do that I recommend using a very good straight-edge, a new X-Acto blade for every cut, and lots of practice!
To make the splice, I use thin clear packing tape on the back, and the print holds the front together (held in place by the permanent adhesive foam-core).
I hope this is helpful.
Brian P. Lawler
Hi Brian. Thank you so much for sharing your expertise. I am going to be mounting some paintings that were done on water color paper – so thicker than photo paper. Do you think the adhesive board you use will work on this thicker medium? Also the pics I am mounting also don’t need to last for hundreds of years – at most 20 ish (?). When you say that fo mm oars will deteriorate – what time frame are you thinking!
Thanks again for sharing!
Debbie
G’day Brian,
Thankyou for your knowledge and inspiration.
I’m mounting pictures onto a 2cm foam cor and wondering on your ideas at edging to hide the foam. Google leads me to Mod Podge but any other thoughts?
With thanks
Hi Linda,
In some cases I bought black core foam-core, and that is more attractive than white. You might also be able to get some very dark woodworker’s edge banding material, used for cabinetry, that has a set-adhesive backing.
Or, you could paint the edges with a roller, being very careful not to allow the paint to get onto the front.
Best wishes,
Brian P. Lawler
The Blognosticator
Thankyou for your prompt response,
I will follow up with the black foam core I feel. Great solution.
I did buy a woodworkers edge but it needs heat sealing ( with an iron) wasn’t sure if the foam would handle this so I haven’t tried yet many thanks
Linda.
Hi Linda,
I have also seen pressure-sensitive wood edging. It may be available where you live.
Brian P. Lawler
The Blognosticator