

I pride myself on being a competent user of Adobe Photoshop. I know how to make my photos look good by sliding sliders and pushing buttons and applying filters and adding Layer Effects and all sorts of visual things.
Occasionally I need to do something out of the ordinary, and in these situations I combine my skills in Photoshop with my skills in programming with AppleScript. I taught myself AppleScript back in the 1980s when I had insomnia. I simply couldn’t get to sleep at night. So, instead of counting sheep, I wrote programs with AppleScript.

For the uninitiated, AppleScript is a scripting language on the Macintosh computer. It is a full-bodied computer language that can send and receive instructions to and from various applications. You can, for example, query a FileMaker database, copy a line of information from that database, then move that copy to Adobe InDesign and paste the text into a document, while applying a specific type font, size, leading and color. It’s a very clever language.
The greatest advantage of AppleScript is its “natural language” quality. It has English-like commands (other languages are also supported). You can issue a command like:
tell application “Photoshop”
activate
…and the script will open Photoshop. Many applications have sophisticated AppleScript-ability. Some have none, so you cannot control them with AppleScript.
AppleScript wasn’t my first programming language. I learned COBOL in college, had learned a language called WPL on the Apple II, and had taught myself BASIC and some Pascal, all of which I found intriguing. I believe that once you learn any programming language you can use your skills to learn another. This is because programming languages have so much in common. It’s mostly form and syntax beyond the basic control functions. You just have to learn the localized grammar, and then figure out the details.
Yesterday I was working on a photo mural and I needed a set of absolutely precise masks to make a checkerboard collage of images. I started out with 24 selected images from a project I did in 2016 called the Bishop Peak Portrait Project. That project was a year-long photographic study of a mountain in San Luis Obispo. I took about 200 photos every day with a camera in a weatherproof box on the roof of the Kennedy Library on the Cal Poly campus.
The camera was trained on Bishop Peak, the most popular of the nine mountains that run from my city out to the ocean at Morro Bay, where Morro Rock is the second-to-last mountain in the chain. These glorious peaks were once part of the rim of a huge volcano that formed this part of California. We got the west half of the rim; the east half is located about 100 miles south of us in another part of the state.
My project was supported by a grant from Cal Poly’s College of Science and Mathematics. I started in March, 2016, and ended on the last day of February, 2017. Between those dates I took about 70,000 photos of my favorite mountain.
The camera was a Canon T5 with a standard lens zoomed to about 50mm. The camera was powered by two 12 volt motorcycle batteries and they were kept charged by a couple of small solar panels. The camera was controlled by a Raspberry Pi microcomputer on a circuit board of my own design. It had two small power supplies and a transistor circuit that triggered the camera when the Raspberry Pi signaled for an exposure. I had it set to take one photo every five minutes from 5:00 a.m. until about 10:00 p.m.
I had a 256 GB SD card in the camera which allowed me to leave the camera unattended for weeks at a time. I would occasionally climb the six floors to the roof of the building and retrieve the camera card, replacing it with another.
Then I would discard the nighttime shots – many of my photos were black rectangles – then rename the files in Adobe Bridge (I used a six-digit numbering scheme). Then I scored the photos in Adobe Bridge, giving them four stars if I liked them, and five stars if I loved them.
Eventually I had to pick only one photo to represent the best image taken each day for 365 days. It was surprisingly difficult because there were so many to choose from.
The end product is a mural on permanent display at Cal Poly of the 365 photos, each printed on a 5 x 5 inch square of aluminum, mounted on a 22-foot panel in calendar order. It turned out really well.
This year I was approached by a representative of a local law firm to provide some images for their new office. It was suggested that I could pick some of my Bishop Peak photos to make a photo collage for a wall in their foyer.
I looked through my photos and picked about 30 of my favorites. Then I opened them (they are all DNG raw images) in Camera Raw, made adjustments for contrast and vibrance, and converted them into Photoshop images. Each is about 12 x 9 inches in size at 300 ppi.
I wanted to make a grid of photos six across and four down for the collage. The total size of the final image is about six feet wide by three feet tall. The image will be printed and mounted on stiff Gator Foam board, then attached to the wall with a wooden cleat.
I made a layout in Photoshop with blue guidelines separating the master image into a grid, then I started bringing in the images and arranging them in an attractive layout.
After the second and third images I realized that it is very difficult to get the edges of these photos to align with pixel-precision and not have any gaps or corners that show errors of position or size. I needed a mask!
So, I drew one, and then I copied it and propagated it across my canvas. But it was slightly off, and the corners didn’t work perfectly, and at the end of the first row I had a handful of pixels that ran off the end. I needed more precision.
I decided to draw the masks using AppleScript. To do this I made a template in Illustrator and put the coordinates in pixels onto the template.
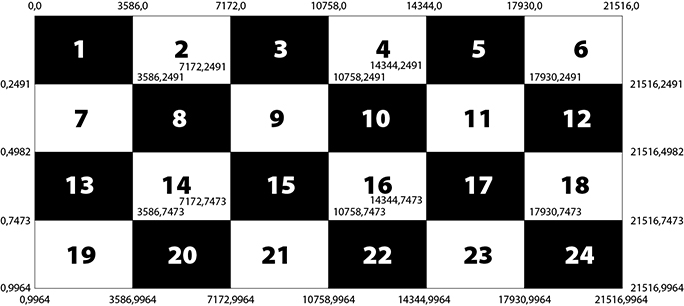
of each mask in pixels. The entire canvas is 21,516 X 9964 pixels in size.
Photoshop can be programmed with Visual Basic on Windows machines, with Javascript on Mac and Windows, and with AppleScript on Mac. I have considerable experience with the AppleScript version, and I approached it by opening a script I had written a few years ago when I was making the 365-photo mural for Cal Poly. That script uses pixel coordinates to make a block of black on which I put the date and time of each photo. I saved a new copy of that script, stripped it of its text components, and kept the rectangles part for my masking adventure.
The idea was to make solid black rectangles of exactly the correct size for one photo, followed by an equal amount of white space, followed by another black rectangle until it filled the canvas with a checkerboard of solids and white spaces. This would be the primary mask. I created a canvas in Photoshop and had it open, then I tested my script on a single rectangle. It worked, so I built a whole row and tested it again. That failed due to a simple math error, so I fixed that error and got a row of three black rectangles with equal white spaces between.
Here is an example:
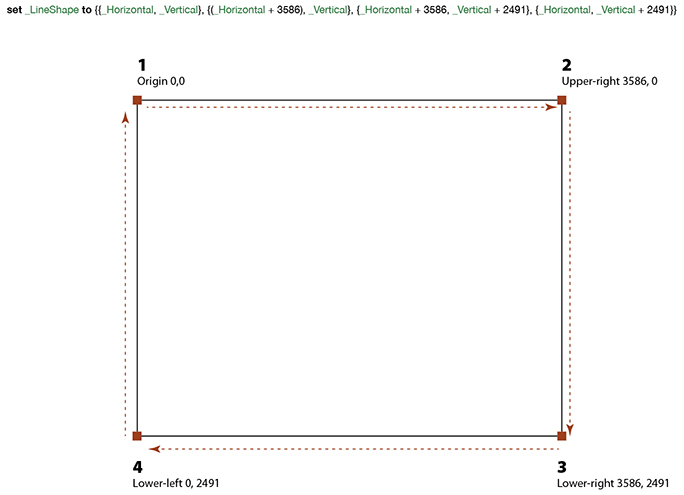
It uses a Cartesian coordinate system of X,Y points, then in a subsequent line it
fills the rectangle with black.
In the line of code you’ll see that the bold words are commands, the green words are variables, and the integer values are shown in bold. Sets of brackets hold pairs of X,Y coordinates made up of variable names
and integers. In the script I first set the variables to 0, and then increment them for the various rectangles.
Then I incremented the vertical starting point and made the second row of rectangles. That worked also, so I made all four rows. After testing it, I saved the canvas and began inserting the 24 photos into the document.
I only need two master masks for this project, and one is the inverse of the other, so I only created one checkerboard.
After I dragged a new photo onto the canvas, which results in that image being on a new layer, I selected one or the other mask, then created a layer mask for the photo, isolating it from the adjacent images (one only has to avoid those whose corners touch). The next photo used the opposite mask, and gradually I built the collage with its 24 images, 12 using the positive mask, the other 12 using the negative.
Note: It’s important to unlink the image from its mask on each layer so that the mask stays put while you move the photo around inside it. This is done by clicking on the chain icon between the image and its mask in the Layers menu.
The photos are very consistent, with the mountain appearing almost exactly in the same location in each image (I use another script I wrote in 2016 to crop the images to the correct ratio, and to put the mountain top in the same position from image to image.
It took several hours to build the final collage, and it is pixel-perfect. There is not a single corner that is not correct; no hairlines show; no gaps exist. It is absolutely accurate.
The Scripting Guide published by Adobe gives (mostly) clear examples and instructions for controlling Photoshop. They also publish similar guides for Illustrator and InDesign. Automating tasks and producing visuals with absolute precision are the byproducts of the scripting supplements for these three applications. The syntax can be confusing at times, but I have always been able to find online examples that clear-up ambiguities when I get stuck in an AppleScript program, or an Adobe-specific implementation of AppleScript.
Regardless of your choice of programming languages – VisualBasic, Javascript or AppleScript – if you commit to learning how to automate with scripting, the benefits are many. It takes a bit of time to master it, but the results are worth the effort.