

Museums often have no-photography rules, depending on their policy about allowing visitors to take photos, or the legal arrangements they have with art owners, copyright holders and other things that go beyond my pay grade.
In the Galleria dell’Accademia in Florence, Italy, a few years ago I noticed that the museum had finally given up on its prohibition of photography of the statue of David. On my prior visit they played a continuous recording in numerous languages saying that photography was prohibited. My guess is that the museum staff threatened to quit if management didn’t stop playing the recording.
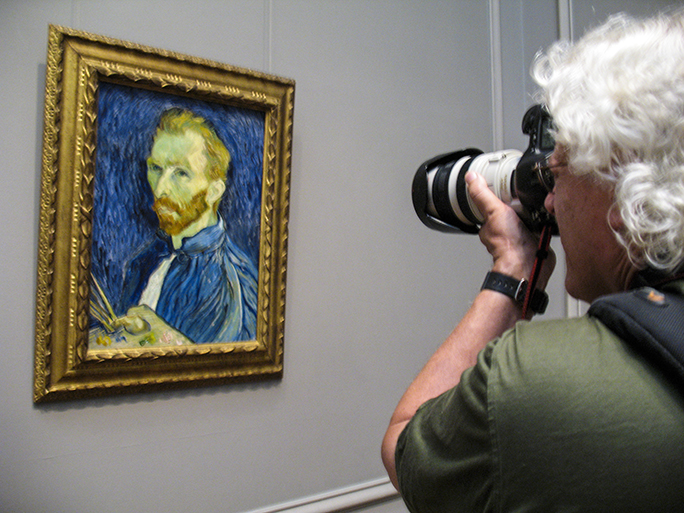
Here I am, having a close photographic experience with Vincent Van Gogh at the National Portrait Gallery in Washington, D.C. in 2008. This gallery allows photos, but does not allow tripods. This painting does not have glass in its frame, making the relief of the brushstrokes visible.
Since the tourists ignored the prohibition anyway, the museum acquiesced to the ubiquity of cell phone cameras. They just gave up. It probably doesn’t matter anyway because the value of a photo of the statue is exactly nothing. These photos are just mementos, photos that people show to others saying, “Look – I took a photo of the David!”
The fact that millions of people have taken (previously illicit) photos of that statue does not diminish the value of the original in any way. Michelangelo would be proud.
(I know that most museums prohibit flash photography, and I know that the powerful ultraviolet light emitted by some strobe flash tubes can potentially damage the colors in works of art. That is a topic for another day.)
Taking photos of fine art in ambient light does no harm to the originals, nor does it hurt the marketing opportunities that museums have to sell postcards. I buy them too, and just like you, I never send them to anyone. They end up in boxes in my storage locker with postcards from other trips to other lands.

This is my off-axis photo of Van Gogh’s Père Tanguy portrait in the Rodin Museum in Paris. I was able to eliminate all but three pinpoint reflections in the glass that protects the image.
I suppose that an unscrupulous photographer could take an illicit photo of a painting, then print postcards to sell on the sidewalk outside the museum to take business away from the museum. That scenario is unlikely, but in case you are considering this as a career, following is my technique for making a darn good reproduction photo of a masterpiece in a museum.
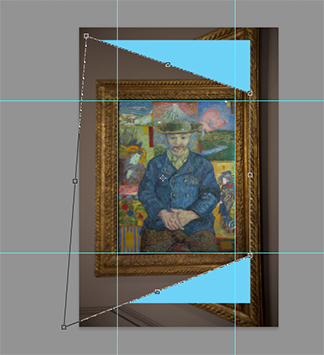
This is the same image, squared-up in Adobe Photoshop. I use the Distort tool to align the image with a grid of guidelines I put into the image frame. The blue was set as the background color so you can see how much distortion was needed to get the image square.
There are two Van Gogh paintings on display at the Rodin Museum in Paris. On my first visit to that museum, nine years ago, I noticed that the paintings were not secured to the wall, only hung on a cable like the paintings that hang in my home. I also noticed that the two paintings were not covered with glass, making the three dimensional brush strokes easily visible. To me, that is what makes Van Gogh’s work so fun to see in person.
On my visit to the Rodin this week I was pleased to see that they have now secured the frames to the wall with very sturdy connectors. I was disappointed to see that they now have glass in front of the paintings (this is good, really, because it protects them from people and the environment). The problem with the glass is that it hides the paint strokes from the viewer, and it increases the reflections on the painting.
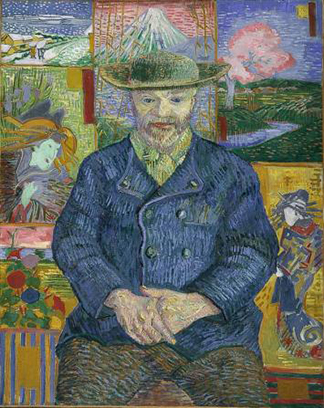
This is the reproduction of the Père Tanguy portrait that is available for free download from the Musée Rodin. The museum had the advantage of taking this image in a carefully controlled photo studio.
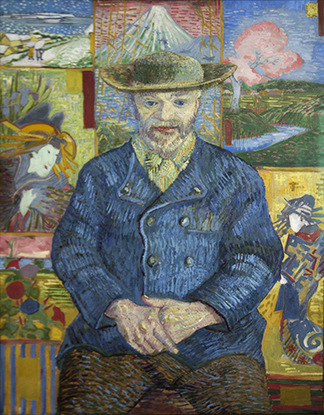
This is my Père Tanguy portrait reproduction after correcting the distortion in the top image. It started as a 62 MB image, and ended up being cropped to about 18 MB. That is enough resolution to reproduce the image on postcard-size works. Note that my image missed a little bit of the right-hand vertical.
I wanted to photograph the image of Père Tanguy, the art supply dealer Van Gogh painted in lieu of payment for pigments and canvas. Mssr. Tanguy was, according to the information at the Rodin Museum, a nice fellow who supported starving artists, and willingly posed when they wanted to trade a painting for the raw materials of their craft. The indoor lighting at the museum shone down from the ceiling in pinpoints of light that reflected off the new glass. It was impossible to take a good photo with the reflections in it.
Instead, I took the photo from an angle that provided the fewest reflections. And, as cinematographers say, I left the rest for “post” (this means that I’ll leave it to the next guy to fix it.)
It turns out that I am that next guy, so it was up to me to fix the photo. I shoot in camera Raw, and then I convert as I import into my computer into DNG format (this is my insurance against obsolescence). I opened the DNG, then made some small tonal adjustments and opened the image in Photoshop. There, I dragged guidelines to the edges of the image as I would like it to be.
Then, using the Marquee tool, I selected a rectangular area of the photo large enough to expand it to fit the space and square the photo to these guidelines. Choosing the Distort tool under Image>Transform>Distort. I usually compress rather than expand the corners when I do this, meaning that one corner (the upper-right in this example) should be brought inward rather than taking the upper-left corner and dragging it upward. This results in a reduction of pixels in the image, and that might be better than an interpolation of new pixels caused by stretching the image. As I pull or push the corners of the image, I add the Shift key to keep the control point from wandering vertically while I am pushing it horizontally (or vice versa).
In the end, I have a nice, square image of Pere Tanguy, free of reflections (mostly) and ready for contrast adjustment and finishing. The Rodin Museum provides the dimensions of the original on their web site, figures which make it possible to return the image to its proper proportions. I set my canvas to these proportions, then scale the image non-proportionally until it fits (with Snap turned on).
I downloaded the Museum’s low-res version of the original image (they no doubt have a photo studio for this work), opened it in Photoshop next to mine, and then I adjusted mine to match better in contrast, color saturation, and black values. The final product is over 18MB, and at that size I could print postcards with good enough quality to set up outside the museum and sell my wares. But I’m too busy for that, and they own the original. It is an interesting exercise, one that is useful for photographing highly reflective art (I used this technique once for photographing badges).
I appreciate the fact that Musée Rodin does not mind when techies like me come to visit, carrying professional cameras and intent on making nice images of their masterpieces. They are generous with their originals, and I am grateful that they seem to have no cares about my taking photos in their beautiful museum.