

This is the second of several blogs about scanning and reproducing line art from 19th century copper engravings and similar artwork.
When converting scanned line art into printable line art there is only one file format that will work without causing the art to be turned into halftone patterns.
That format is the Bitmap format (.bmp).
Converting to bitmap requires attention to detail, as it can easily go wrong. It starts with scanning, which I recommend be made to a grayscale file. Some scanners can scan directly to bitmap, but that seldom works well because the scan appears too harsh, and much of the fine detail in an image can be lost. Instead, I recommend scanning as an 8-bit grayscale image at a resolution of 2,400 pixels per inch (ppi). This will be a fairly slow scan because the scanner will be working at such fine resolution.
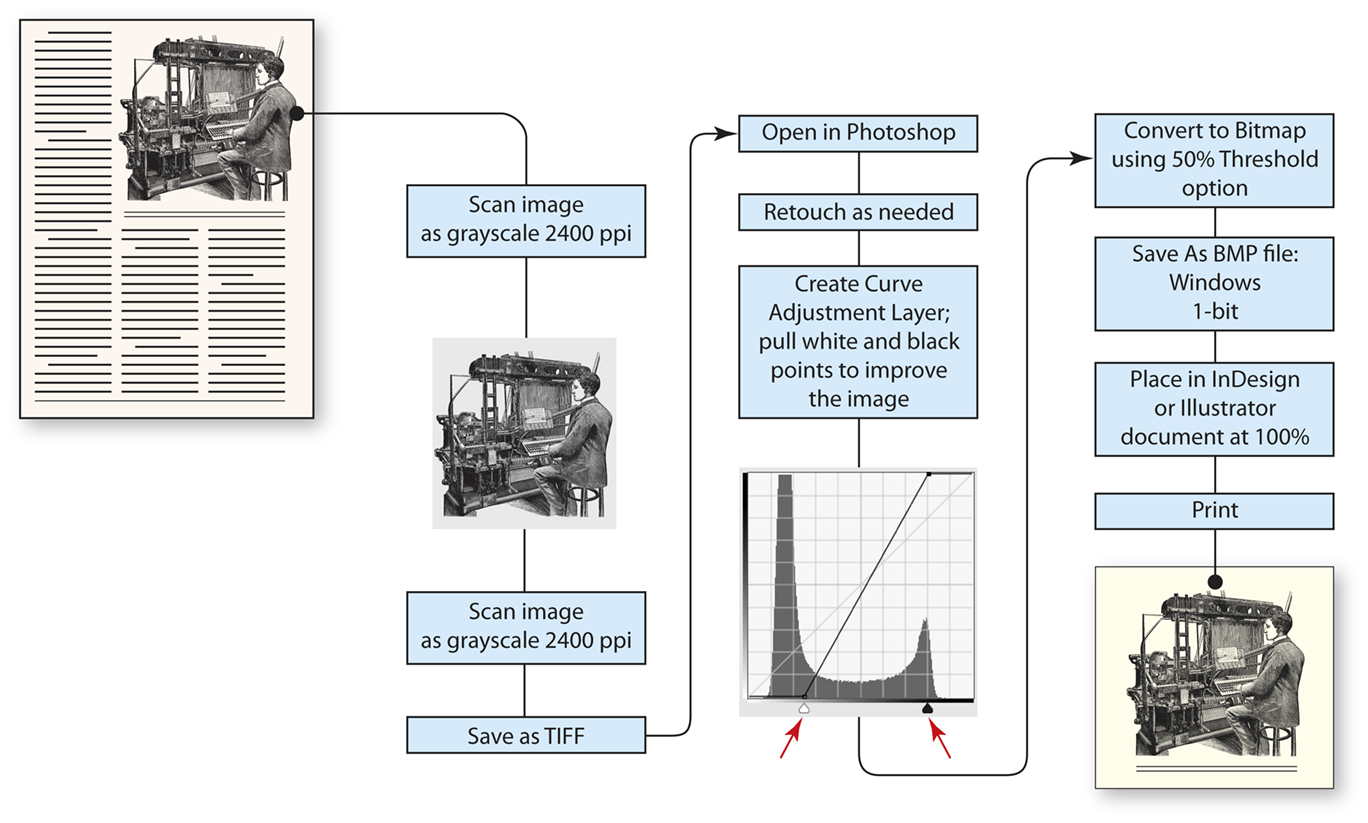
Once the grayscale image is acquired, open it in Adobe Photoshop and create a Curve Adjustment Layer. On the curve layer, try adjusting the white point and black point (black and white indicators at the bottom) to maximize the detail in the image while darkening the blacks and opening up the whites. Be careful not to cause pinching of the lines and leave some of the gray in the lightest areas.
If the image needs retouching to correct for mechanical damage, fix it while the image is in grayscale mode. That makes a smoother correction that is not obvious in the final image.
After retouching, save the file in TIFF (the scanner created a TIFF) or change the format to PSD. This will become your master file. The final bitmap file will be a derivative file.
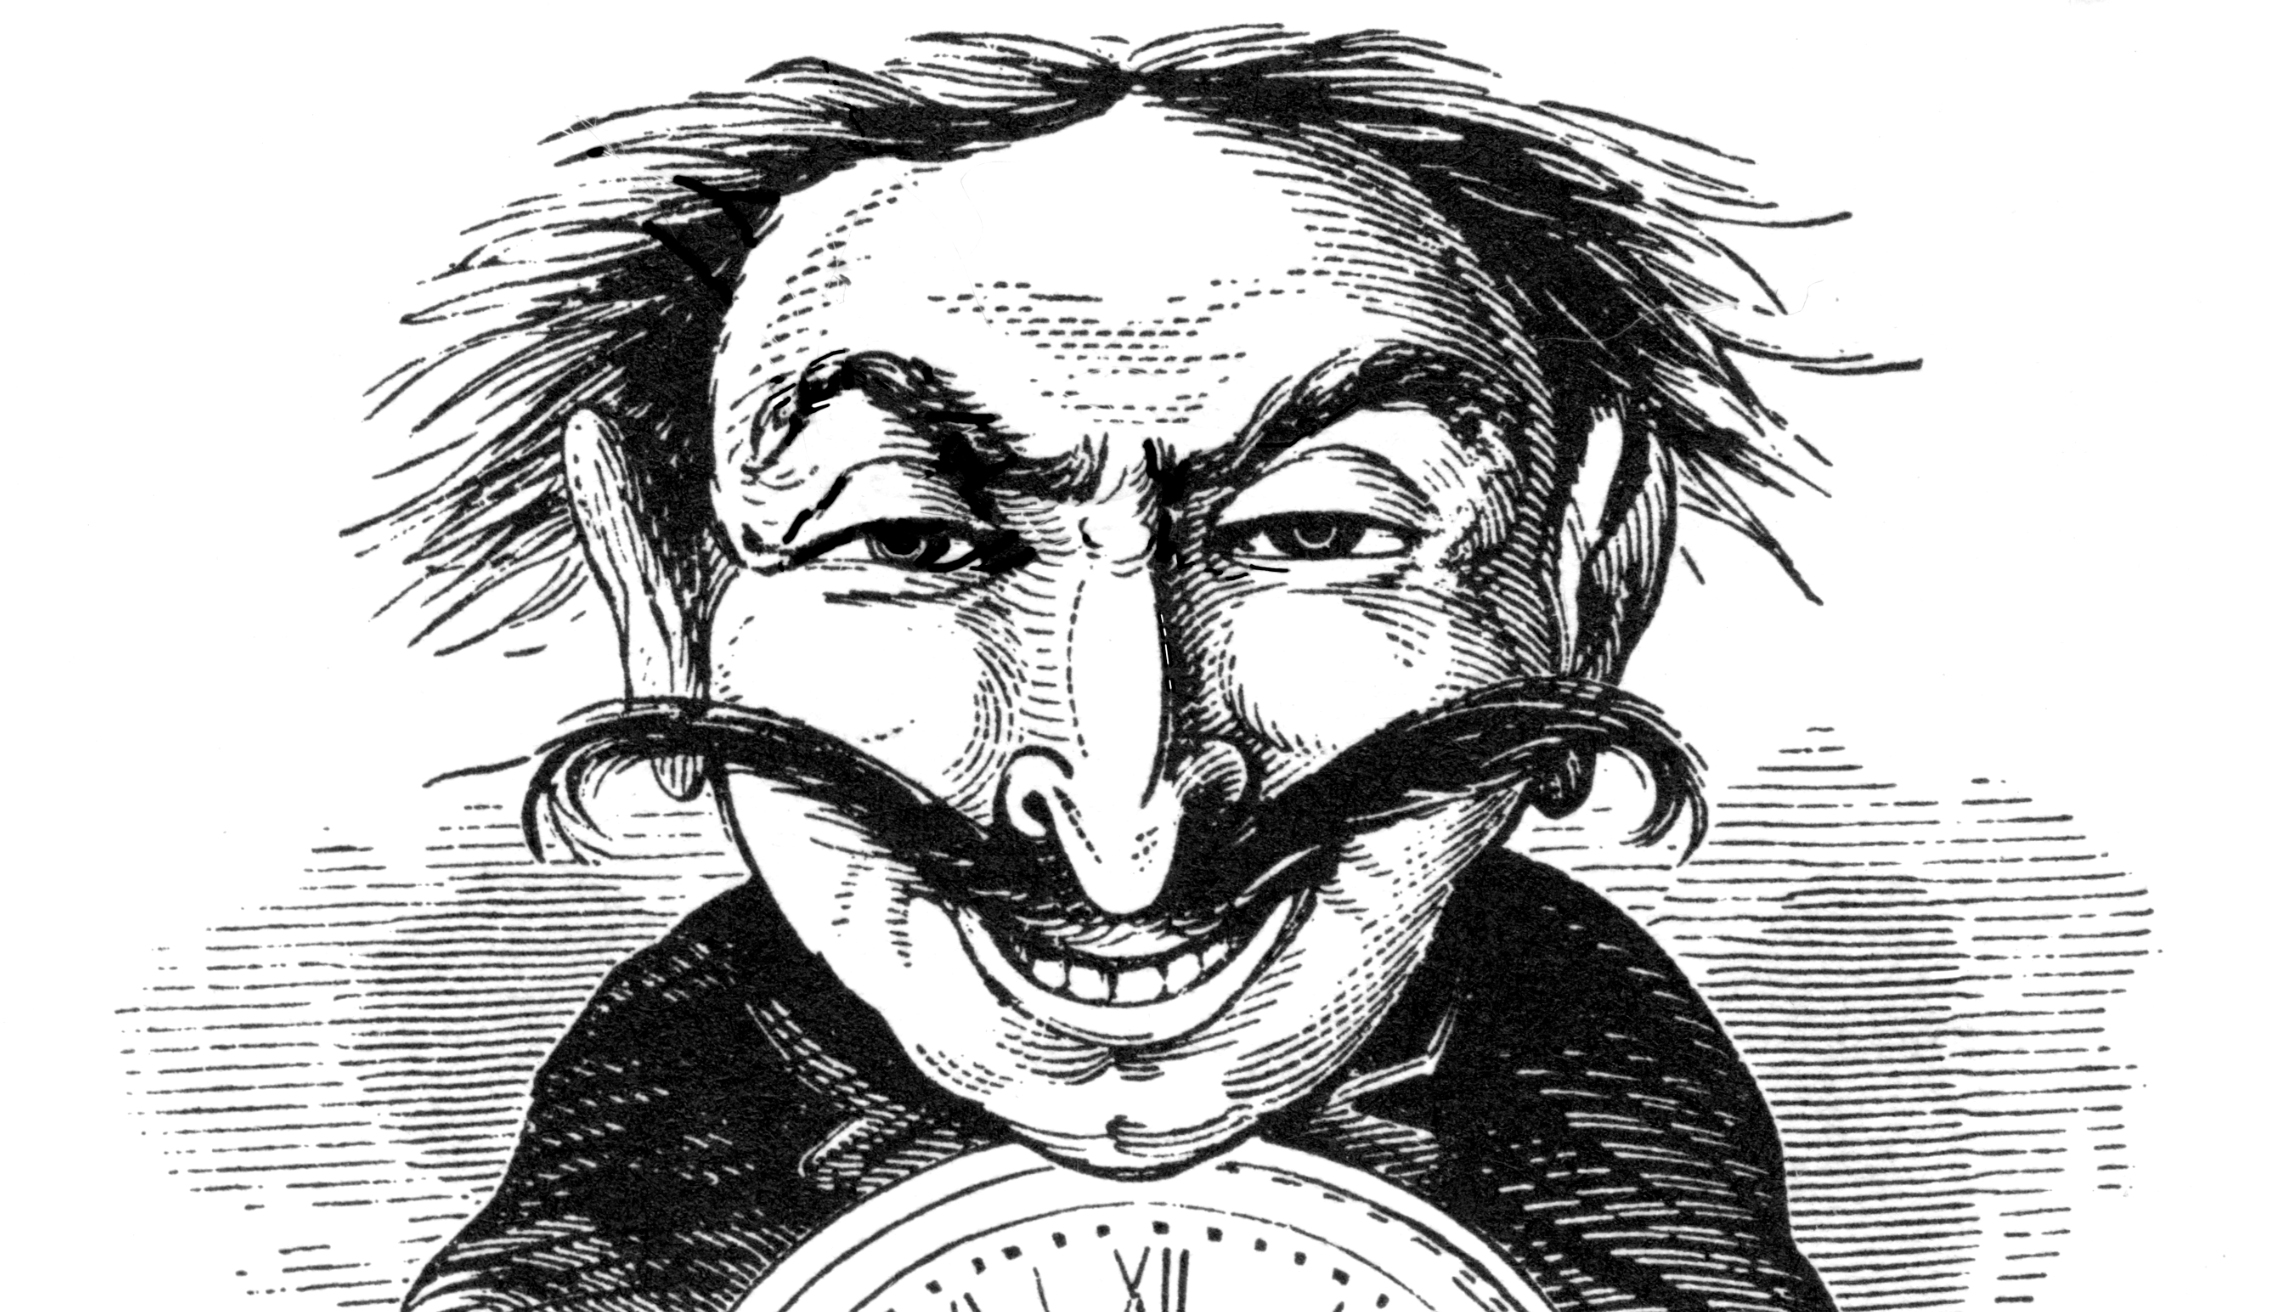
This is an engraving scanned from a Dover book of line art at 2400 ppi. It is represented here as a tonal grayscale image (modified with an Adjustment Layer in Photoshop).
Change the mode from grayscale to BMP (Image>Mode>Bitmap). This, curiously, is the only file format that will keep the line art as line matter and not convert it to halftone dots (or other halftone patterns) in the final reproduction. There are four primary methods of conversion in the menu. Choose 50% Threshold as the method; the others create unnecessary noise and other patterns. The result will be a clean, line illustration that will translate into line-only matter on the final plate (this works well on digital printing machines also). I used a Kodak Trendsetter to make aluminum printing plates for my tests. That machine has a native resolution of 2400 spi, which matches the resolution of our BMP file. The results are extraordinarily sharp. On a different test on a Konica-Minolta C1100 digital press I also obtained excellent results printing through an EFI Fiery RIP as BMP. The resolution of the Konica-Minolta (1200 spi) was adequate to make excellent images of the same art, though obviously at half the resolution of the offset process I tested.
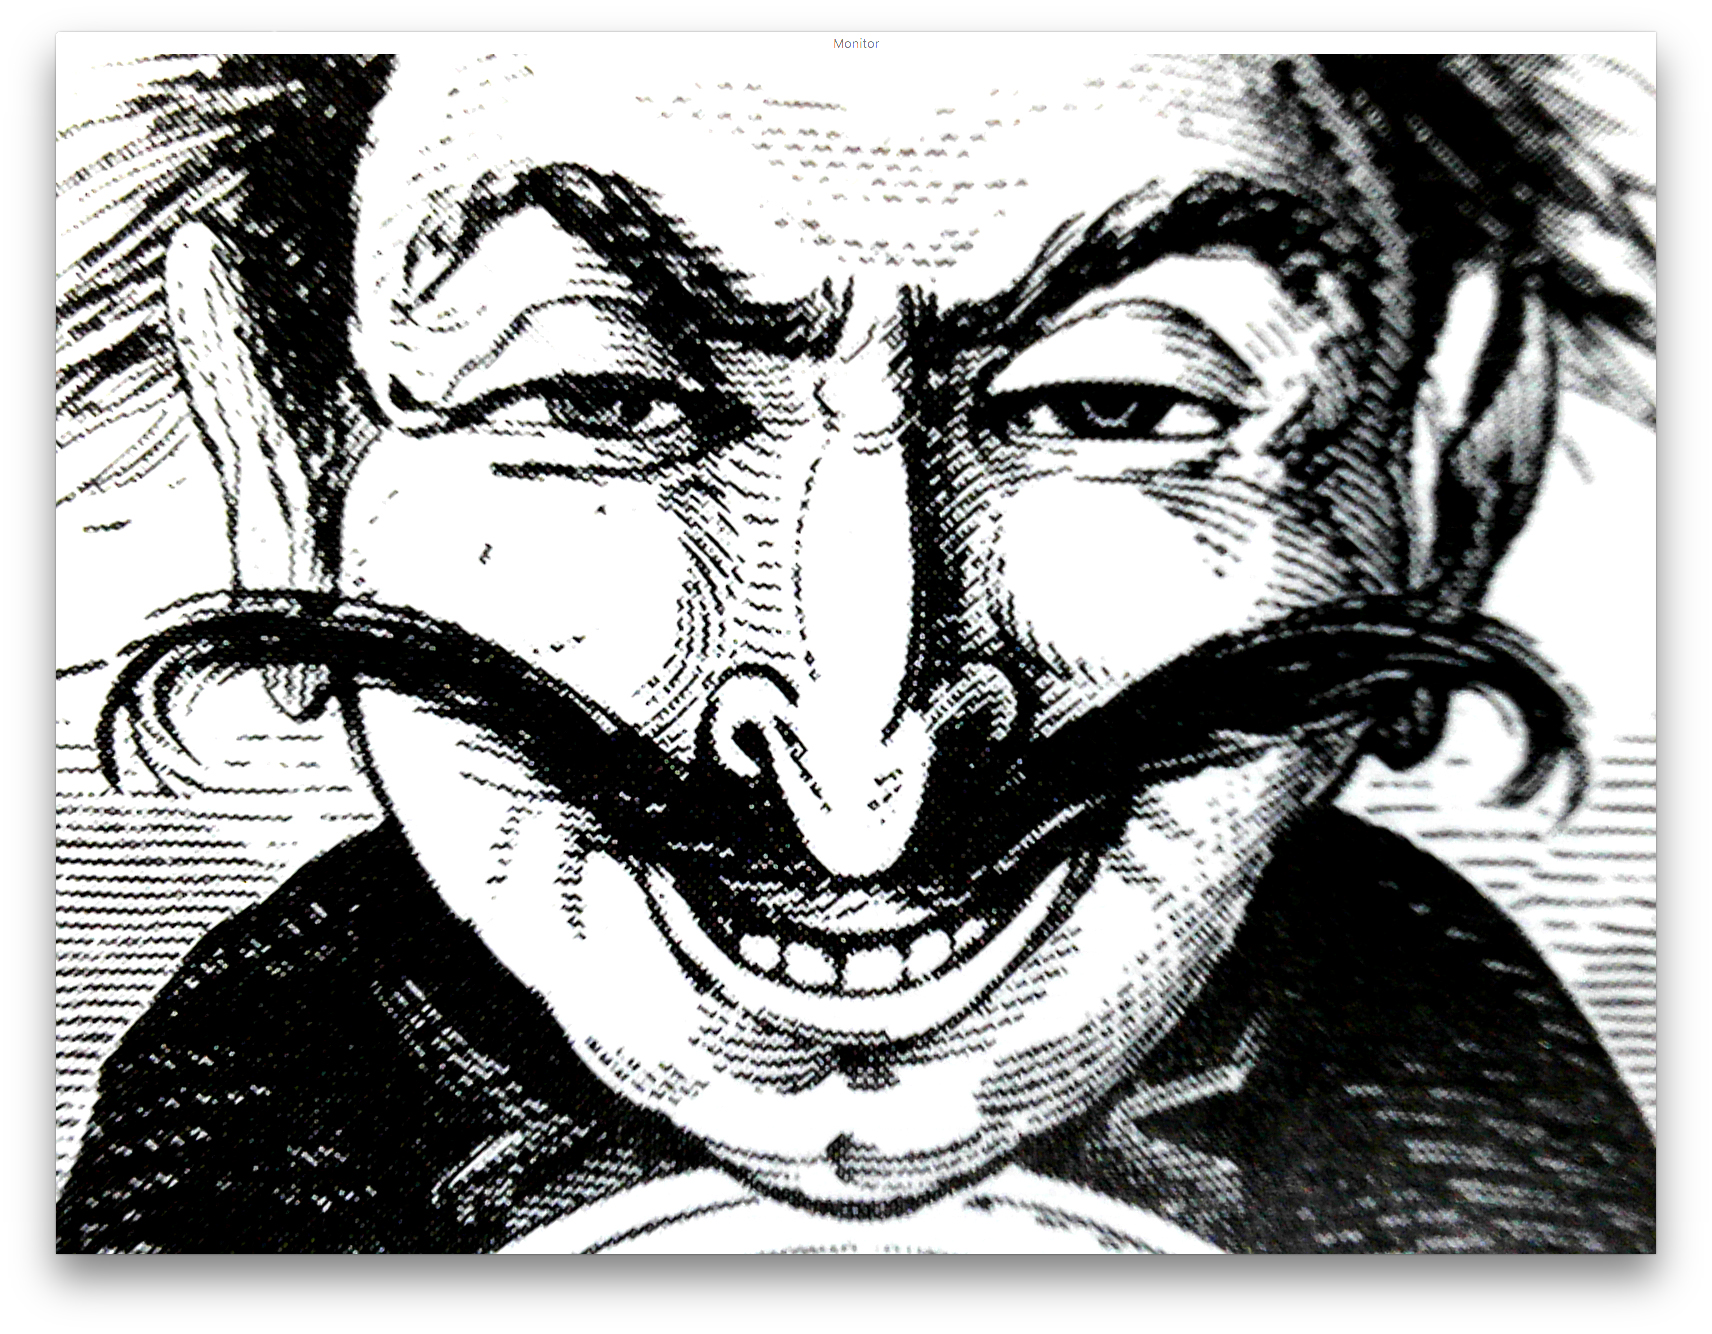
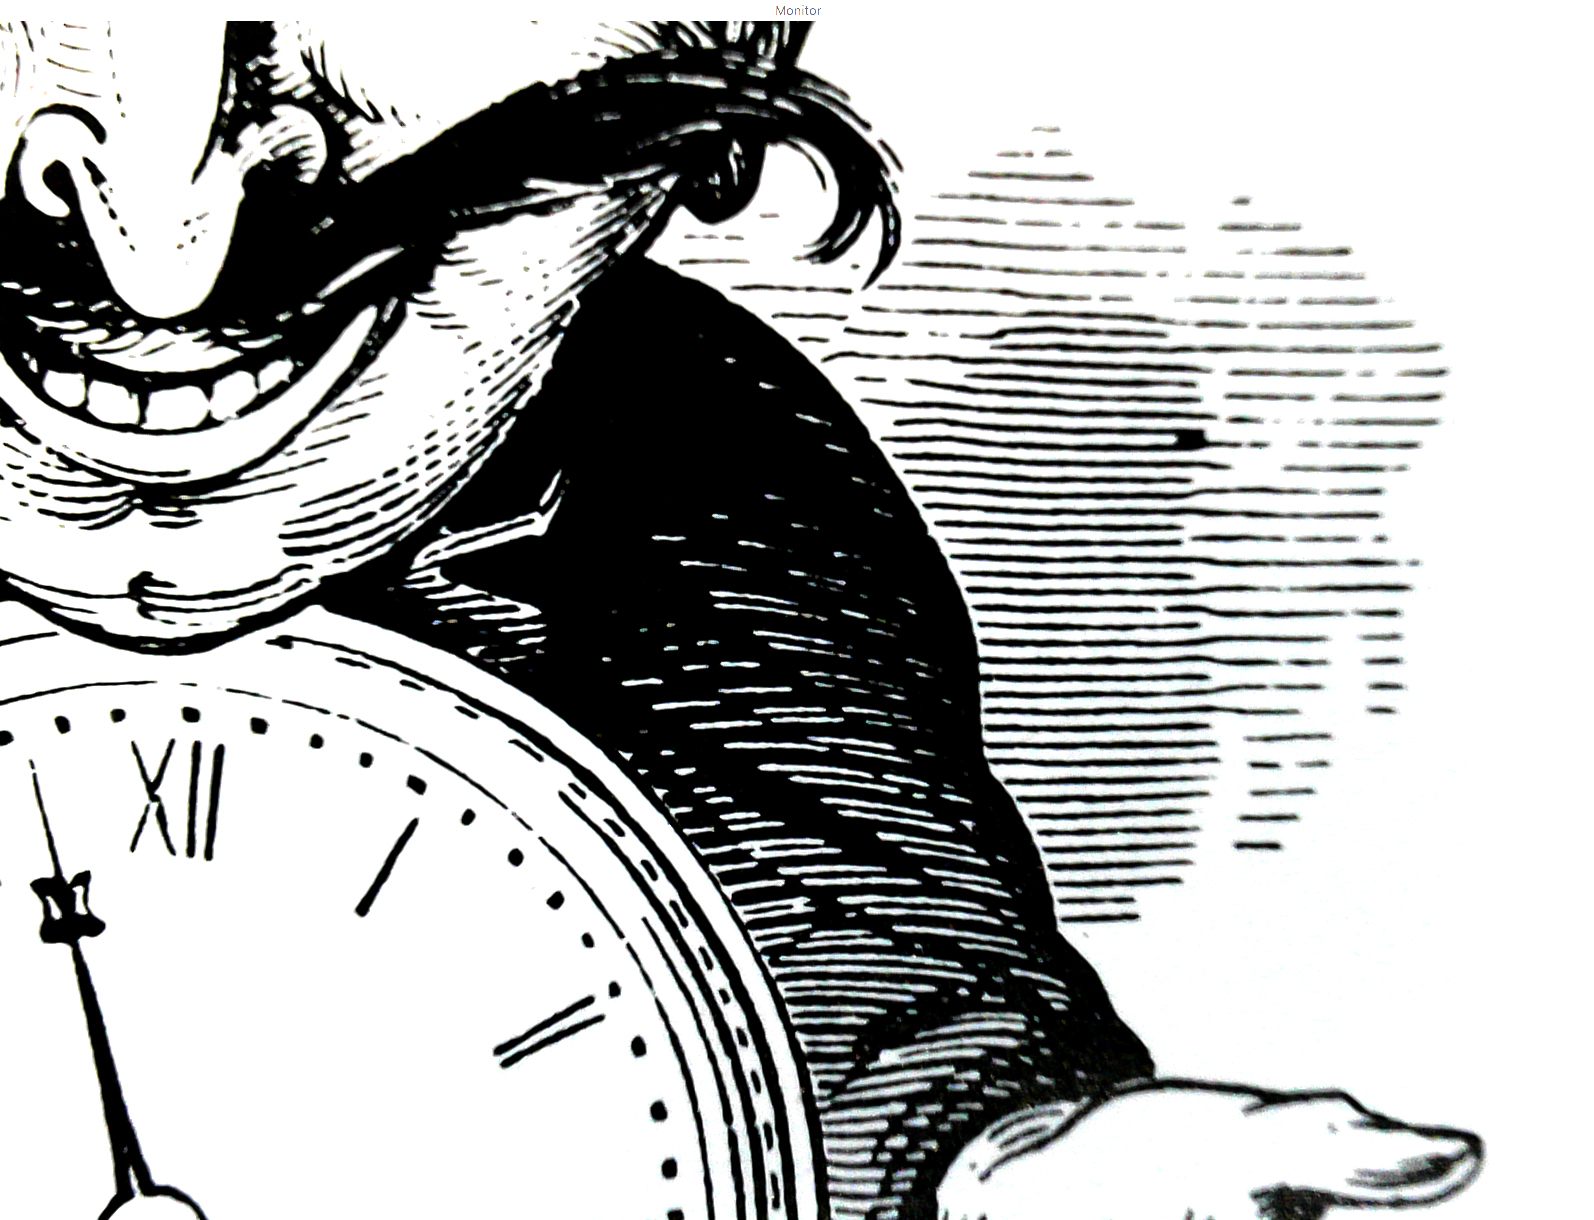
This is a photomicrograph of the same image printed by offset lithography at 2400 spi. Notice the effect of the halftone pattern on the engraved lines. Click on the image to see an enlarged view. 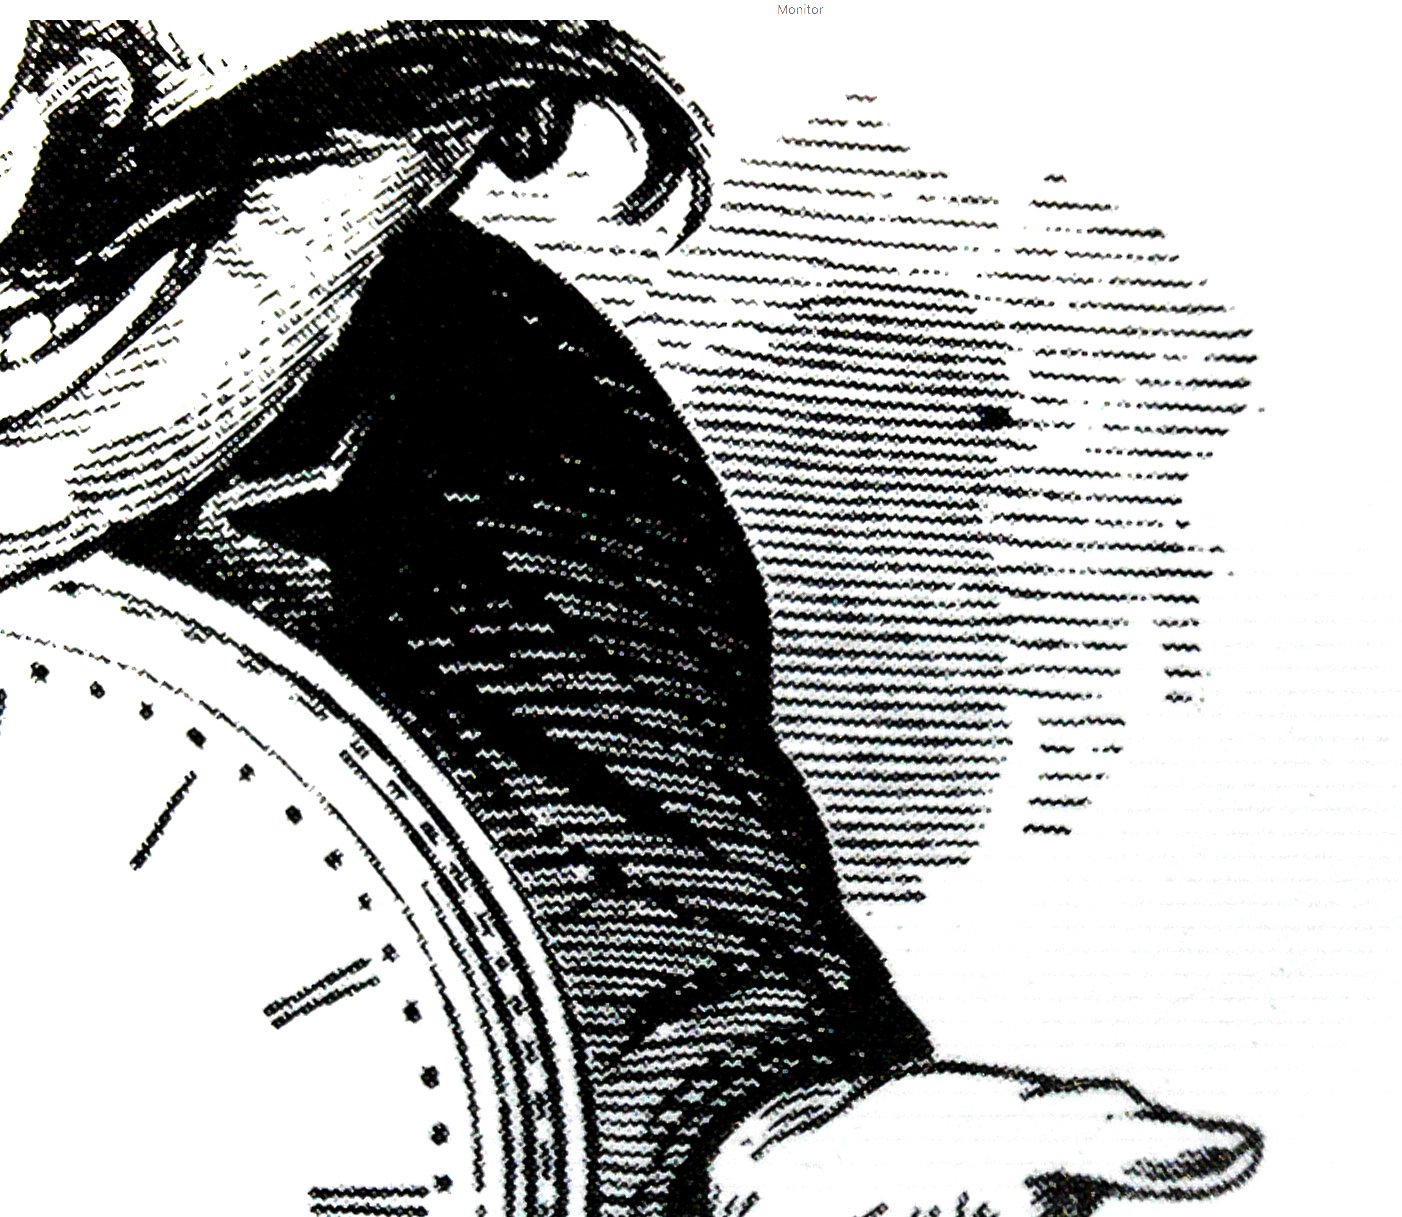
The halftone pattern is especially destructive to the fine lines in the engraving that are designed to provide tonality. By using the BMP file format, this can be avoided (see images below). Click on the image to see an enlarged view.
With the line art image in-hand, proceed as normal with page layout. BMP files are effective in Adobe InDesign and Illustrator. Both applications support placing these illustrations. Scaling is important! You should try to reproduce engraved illustrations at their original size. Making them smaller increases the resolution of the engraving (the distance between the engraved tonal lines of the original), and that will challenge most printing processes. It’s acceptable to increase the size of the illustration in the final layout, but be very careful reducing these illustrations.
This photomicrograph shows how clearly the image is reproduced when saved as a BMP file. The lines on the right are clear, and have not been turned into halftone patterns. Click on the image to see an enlarged view.
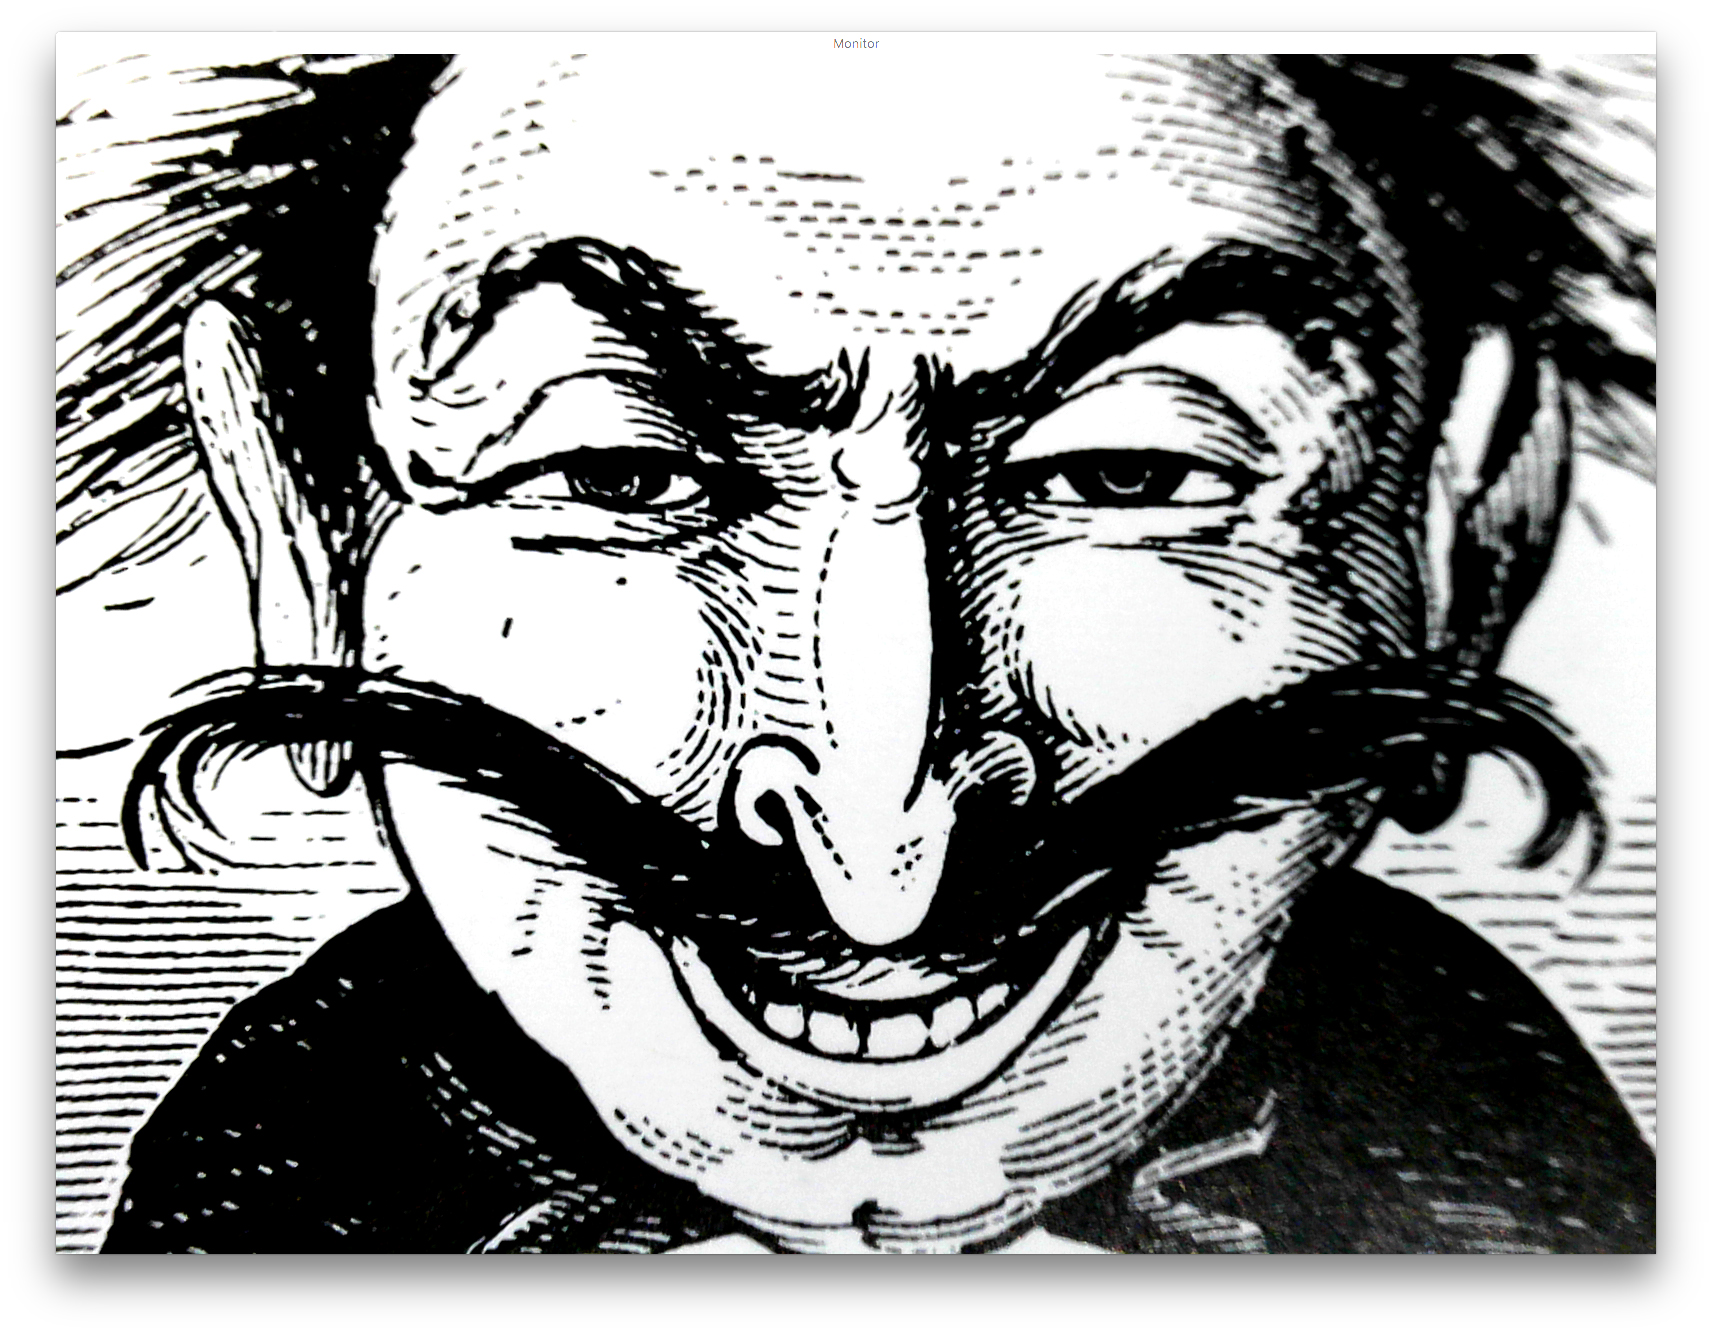
This photomicrograph shows the quality of the engraved lines when printed from the BMP file on the offset lithographic version of the job. Click on the image to see an enlarged view.
For output I created CMYK Adobe PDF files. These were processed through Prinergy for the Trendsetter, and through the Fiery RIP for the Konica-Minolta. In both cases the BMP data is treated as line art, and no attempt is made to change it to halftone patterns.
In my next blog I will discuss ways to colorize engraved illustrations.